| Last Modified: 05-08-2025 | 6.11:8.1.0 | Doc ID: RM100000001QKKK |
| Model Year Start: 2021 | Model: RAV4 | Prod Date Range: [08/2020 - ] |
| Title: WIPER / WASHER: WASHER MOTOR: INSTALLATION; 2021 - 2025 MY RAV4 RAV4 HV [08/2020 - ] | ||
INSTALLATION
PROCEDURE
1. INSTALL LEVEL WARNING SWITCH ASSEMBLY
Click here
![2019 - 2025 MY RAV4 RAV4 HV [02/2019 - ]; WIPER / WASHER: WASHER LEVEL WARNING SWITCH: INSTALLATION+](/t3Portal/stylegraphics/info.gif)
2. INSTALL WINDSHIELD WASHER JAR ASSEMBLY
|
(a) Attach the guide and temporarily place the windshield washer jar assembly. |
|
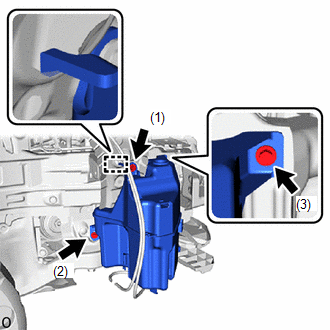
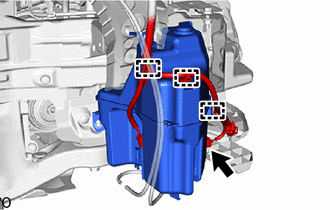
(b) Install the windshield washer jar assembly with the 3 bolts in the order shown in the illustration.
Torque:
5.5 N·m {56 kgf·cm, 49 in·lbf}
|
(c) Connect the connector. |
|
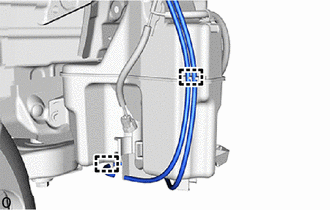
(d) Attach the clamp.
|
(e) Attach the clamp and connect the washer hose. |
|
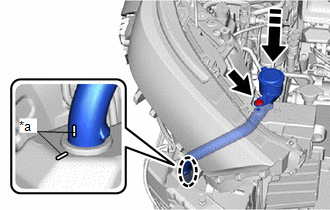
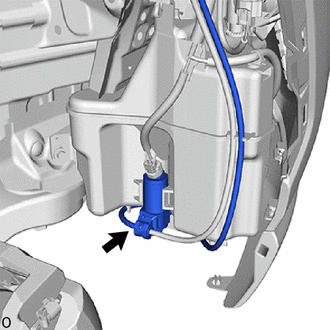
3. INSTALL WASHER INLET SUB-ASSEMBLY
(a) Hold the position shown in the illustration and insert the washer inlet sub-assembly into the windshield washer jar in the direction indicated by the arrow.
HINT:
Align the matchmarks on the washer inlet with the matchmarks on the windshield washer jar assembly and install it.
|
*a |
Matchmarks |

|
Place Hand Here |

|
Install in this Direction |
(b) Install the washer inlet sub-assembly with the clip.
4. INSTALL FRONT BUMPER COVER
(a) except Off Road Package:
Click here
(b) for Off Road Package:
Click here
5. INSTALL WINDSHIELD WASHER MOTOR AND PUMP ASSEMBLY
(a) Install the windshield washer motor and pump assembly as shown in the illustration.
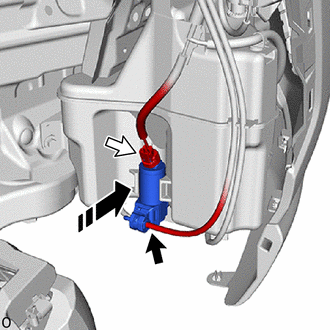
|
|
Install in this Direction |

|
Washer hose |

|
Connector |
(b) Connect the connector.
(c) Connect the washer hose to the windshield washer motor and pump assembly.
HINT:
Insert washer hose to joint all the way.
6. ADD WINDSHIELD WASHER FLUID
|
(a) Connect the washer hose to the windshield washer motor and pump assembly. HINT: Insert washer hose to joint all the way. |
|
(b) Add the windshield washer fluid to the windshield washer jar assembly.
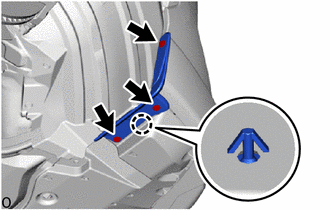
7. INSTALL FRONT FENDER LINER RH
|
(a) Attach the claw to install the front fender liner RH and 4 grommets. |
|
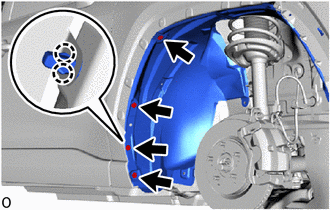
(b) w/ Mudguard:
(1) Install the 8 clips and 2 screws.

|
*A |
w/o Mudguard |
- |
- |
|
|
Clip |
|
Screw |
(c) w/o Mudguard:
(1) Install the 9 clips and 2 screws.
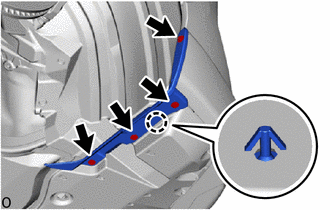
8. INSTALL FRONT FENDER MOULDING SUB-ASSEMBLY RH (except Off Road Package)
HINT:
Use the same procedure described for the LH side.
Click here
9. INSTALL FRONT FENDER MOULDING SUB-ASSEMBLY RH (for Off Road Package)
HINT:
Use the same procedure described for the LH side.
Click here
10. INSTALL NO. 1 ENGINE UNDER COVER
(a) for A25A-FKS:
Click here
(b) for A25A-FXS:
Click here
11. INSTALL FRONT FENDER MUDGUARD RH (w/ Mudguard)
(a) for Short Type:
HINT:
Use the same procedure described for the LH side.
Click here
(b) for Long Type:
HINT:
Use the same procedure described for the LH side.
Click here
12. INSTALL FRONT FENDER FRONT SPLASH SHIELD RH (for Long Type)
|
(a) Attach the claw and install the front fender front splash shield RH. |
|
(b) Install the 4 screws.
13. INSTALL FRONT FENDER FRONT SPLASH SHIELD RH (for Short Type)
|
(a) Attach the claw and install the front fender front splash shield RH. |
|
(b) Install the 3 screws.
14. INSTALL FRONT WHEEL
Click here
15. ADJUST FRONT TELEVISION CAMERA ASSEMBLY (w/ Panoramic View Monitor System)
(a) for Gasoline Model:
Click here
(b) for HV Model:
Click here
|
|
|