| Last Modified: 01-30-2024 | 6.11:8.1.0 | Doc ID: RM100000001QI80 |
| Model Year Start: 2021 | Model: RAV4 HV | Prod Date Range: [08/2020 - 10/2023] |
| Title: HEATING / AIR CONDITIONING: COMPRESSOR (for A25A-FXS): INSTALLATION; 2021 - 2023 MY RAV4 HV [08/2020 - 10/2023] | ||
INSTALLATION
PROCEDURE
1. ADJUST COMPRESSOR OIL
|
(a) When replacing the compressor with motor assembly with a new one, gradually discharge the inert gas from the service valve, and drain the following amount of oil from the new compressor with motor assembly before installation. Standard: (Oil capacity inside the new compressor with motor assembly: 120 to 135 cc (4.06 to 4.56 fl. oz)) - (Remaining oil amount in the removed compressor with motor assembly) = (Oil amount to be removed from the new compressor with motor assembly) NOTICE:
|
|
2. INSTALL COMPRESSOR WITH MOTOR ASSEMBLY
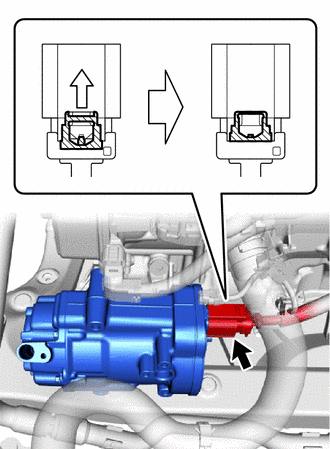
(a) Remove the insulating tape from the connector (B).

|
Connector (B) |

|
Slide |

|
Green-colored Lock |
(b) Connect the connector (B) and slide the green-colored lock as shown in the illustration to securely lock it.
CAUTION:
Make sure to wear insulated gloves.
NOTICE:
Make sure that the connector is connected securely.
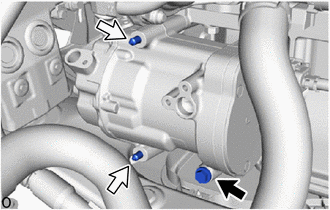
(c) Using an E8 "TORX" socket wrench, temporarily install the compressor with motor assembly with the 2 stud bolts and bolt.
|
|
Bolt |
|
|
Stud Bolt |
Torque:
Stud Bolt :
5.0 N·m {51 kgf·cm, 44 in·lbf}
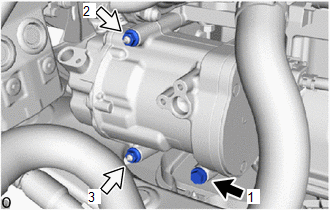
(d) Install the compressor with motor assembly with the bolt and 2 nuts.
|
|
Bolt |
|
|
Nut |
Torque:
24.5 N·m {250 kgf·cm, 18 ft·lbf}
HINT:
Tighten the bolts and nuts in the order shown in the illustration, or temporarily install 3 of them, and then tighten them in the order 1, 2 and 3.
(e) Connect the connector (A).
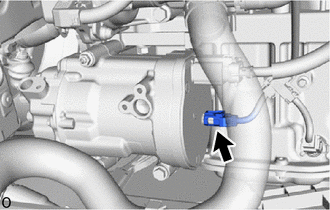
|
|
Connector (A) |
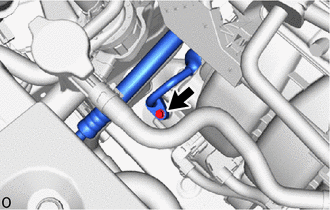
3. CONNECT NO. 1 COOLER REFRIGERANT DISCHARGE HOSE
(a) Remove the vinyl tape wrapped around the connection of the No. 1 cooler refrigerant discharge hose and No. 1 cooler refrigerant discharge hose.
(b) Sufficiently apply compressor oil to a new O-ring and the fitting surface of the compressor with motor assembly.
Compressor Oil:
ND-OIL 11 or equivalent
NOTICE:
Do not use any compressor oil other than ND-OIL 11 or equivalent. If any compressor oil other than ND-OIL 11 or equivalent is used, compressor motor insulation performance may decrease, resulting in leakage of electric power.
(c) Install the O-ring to the No. 1 cooler refrigerant discharge hose.
NOTICE:
Keep the O-ring and O-ring fitting surface free of foreign matter.
|
(d) Connect the No. 1 cooler refrigerant discharge hose with the bolt. Torque: 9.8 N·m {100 kgf·cm, 87 in·lbf} NOTICE:
|
|
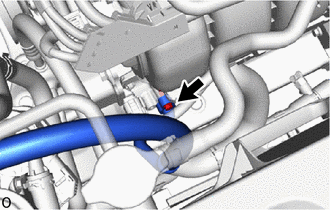
4. CONNECT SUCTION HOSE SUB-ASSEMBLY
(a) Remove the vinyl tape wrapped around the connection of the suction hose sub-assembly and suction hose sub-assembly.
(b) Sufficiently apply compressor oil to a new O-ring and the fitting surface of the compressor with motor assembly.
Compressor Oil:
ND-OIL 11 or equivalent
NOTICE:
Do not use any compressor oil other than ND-OIL 11 or equivalent. If any compressor oil other than ND-OIL 11 or equivalent is used, compressor motor insulation performance may decrease, resulting in leakage of electric power.
(c) Install the O-ring to the suction hose sub-assembly.
NOTICE:
Keep the O-ring and O-ring fitting surface free of foreign matter.
|
(d) Connect the suction hose sub-assembly. Torque: 9.8 N·m {100 kgf·cm, 87 in·lbf} NOTICE:
|
|
5. INSTALL FRONT FENDER LINER RH
Click here
![2021 - 2024 MY RAV4 RAV4 HV [08/2020 - ]; WIPER / WASHER: WASHER MOTOR: INSTALLATION+](/t3Portal/stylegraphics/info.gif)
6. INSTALL FRONT FENDER APRON SEAL RH (for TMC Made)
Click here
7. INSTALL FRONT FENDER APRON SEAL RH (for TMMC Made)
HINT:
Use the same procedure described as for the front fender apron seal RH (for TMC Made).
8. INSTALL FRONT FENDER MUDGUARD RH (w/ Mudguard)
(a) for Short Type:
HINT:
Use the same procedure described as for the LH side.
Click here
(b) for Long Type:
HINT:
Use the same procedure described as for the LH side.
Click here
9. INSTALL NO. 1 ENGINE UNDER COVER
Click here
10. INSTALL FRONT FENDER FRONT SPLASH SHIELD LH
Click here
11. INSTALL FRONT FENDER FRONT SPLASH SHIELD RH
Click here
12. INSTALL FRONT FENDER MOULDING SUB-ASSEMBLY RH (for TMC Made)
HINT:
Use the same procedure described as for the LH side.
Click here
13. INSTALL FRONT FENDER FRONT OUTSIDE MOULDING RH (for TMMC Made)
HINT:
Use the same procedure described as for the front fender moulding sub-assembly RH (for TMC Made).
14. INSTALL FRONT WHEEL RH
Click here
15. INSTALL SERVICE PLUG GRIP
Click here
16. CHARGE AIR CONDITIONING SYSTEM WITH REFRIGERANT
Click here
17. WARM UP COMPRESSOR
Click here
18. INSPECT FOR REFRIGERANT LEAK
Click here
|
|
|