| Last Modified: 01-30-2024 | 6.11:8.1.0 | Doc ID: RM100000001MR2Q |
| Model Year Start: 2020 | Model: RAV4 | Prod Date Range: [10/2019 - 01/2020] |
| Title: LIGHTING (INT): LIGHTING SYSTEM: Interior Light Circuit; 2020 MY RAV4 RAV4 HV [10/2019 - 01/2020] | ||
|
Interior Light Circuit |
DESCRIPTION
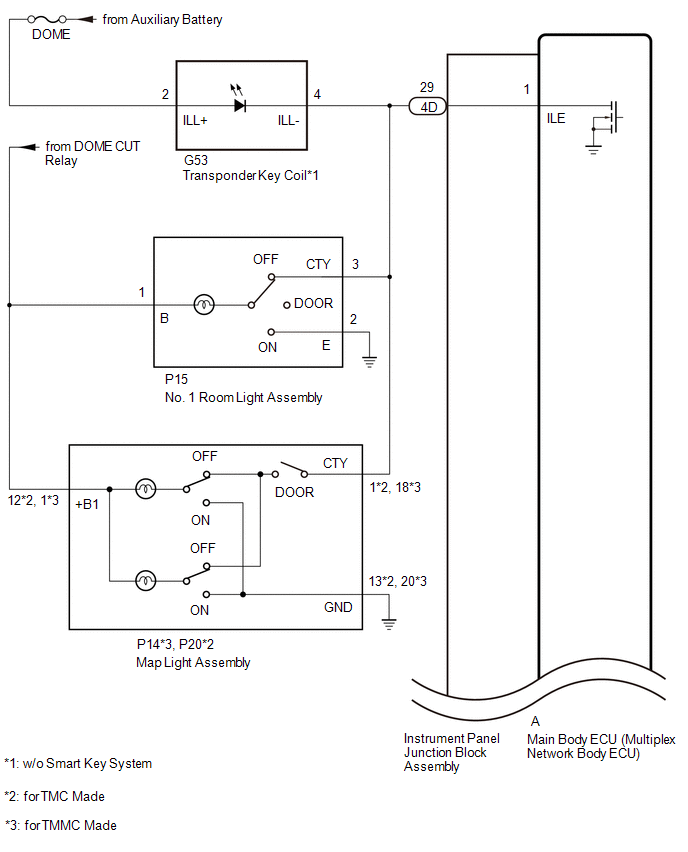
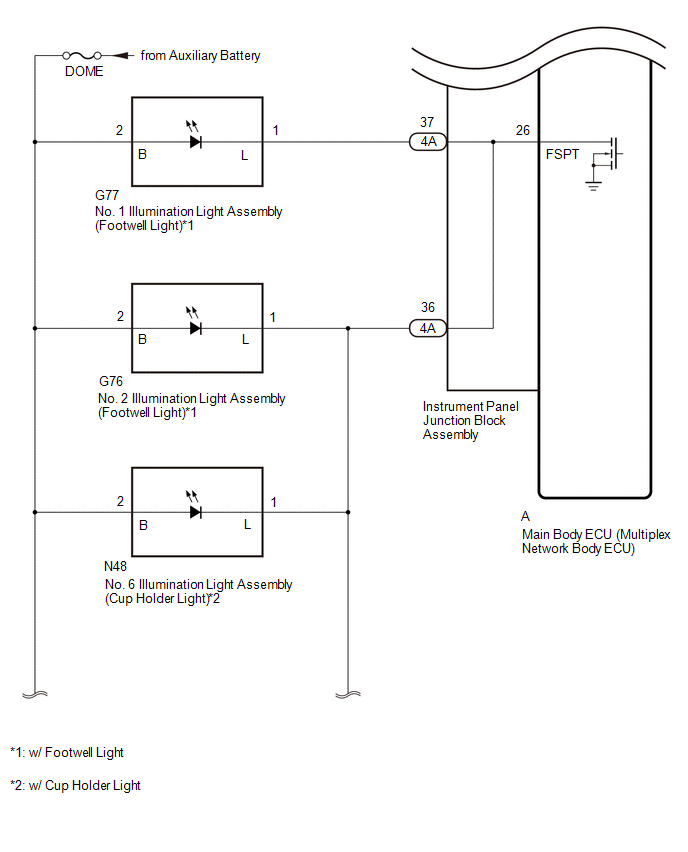
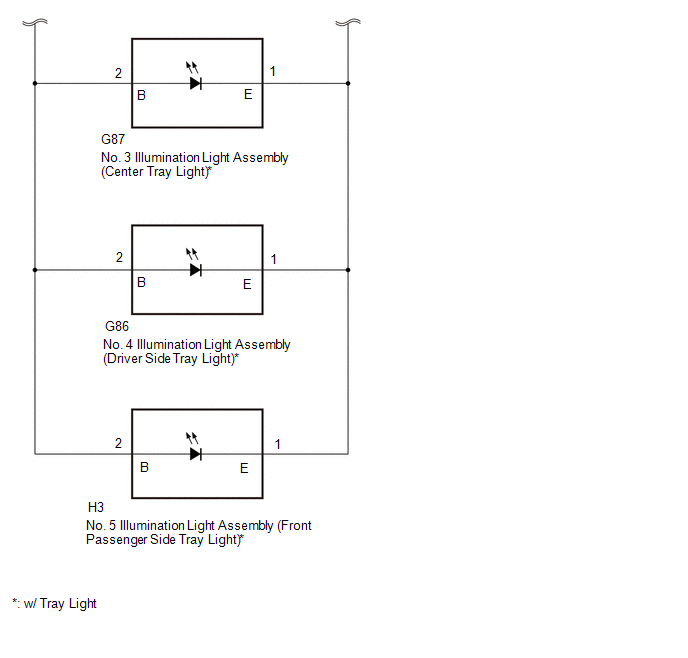
The main body ECU (multiplex network body ECU) controls the operation of the following lights:
- Map light assembly
- No. 1 room light assembly
- Transponder key coil*1
- No. 1 interior illumination light assembly (footwell light)*2
- No. 2 interior illumination light assembly (footwell light)*2
- No. 3 interior illumination light assembly (center tray light)*3
- No. 4 interior illumination light assembly (driver side tray light)*3
- No. 5 interior illumination light assembly (front passenger side tray light)*3
-
No. 6 interior illumination light assembly (cup holder light)*4
- *1: w/o Smart Key System
- *2: w/ Footwell Light
- *3: w/ Tray Light
- *4: w/ Cup Holder Light
WIRING DIAGRAM


CAUTION / NOTICE / HINT
NOTICE:
- Inspect the fuses for circuits related to this system before performing the following procedure.
-
w/ Smart Key System:
Before replacing the main body ECU (multiplex network body ECU), refer to Registration.
PROCEDURE
|
1. |
CHECK INTERIOR LIGHT |
(a) Check which interior illumination does not turn on.
|
Result |
Proceed to |
|---|---|
|
Map light assembly, No. 1 room light assembly or transponder key coil (w/o Smart Key System) does not turn on |
A |
|
Interior foot illumination (w/ Footwell Light), tray illumination (w/ Tray Light) or cup holder illumination (w/ Cup Holder Light) does not turn on |
B |
| B |

|
|
|
2. |
PERFORM ACTIVE TEST USING TECHSTREAM |
(a) Perform the Active Test according to the display on the Techstream.
Body Electrical > Main Body > Active Test
|
Tester Display |
Measurement Item |
Control Range |
Diagnostic Note |
|---|---|---|---|
|
Illuminated Entry System |
Turns on the lights that are controlled by the illuminated entry system* |
OFF or ON |
Perform the Active Test with the DOOR switch in the map light assembly, No. 1 room light assembly and transponder key coil (w/o Smart Key System) turned on. |
Body Electrical > Main Body > Active Test
|
Tester Display |
|---|
|
Illuminated Entry System |
OK:
Map light assembly, No. 1 room light assembly and transponder key coil (w/o Smart Key System) turn on or off.
| OK |

|
PROCEED TO NEXT SUSPECTED AREA SHOWN IN PROBLEM SYMPTOMS TABLE |
|
|
3. |
CHECK HARNESS AND CONNECTOR (MAP LIGHT ASSEMBLY - INSTRUMENT PANEL JUNCTION BLOCK ASSEMBLY) |
- *1: for TMMC Made
- *2: for TMC Made
- *3: w/o Smart Key System
(a) Disconnect the P14*1 or P20*2 map light assembly connector.
(b) Disconnect the P15 No. 1 room light assembly connector.
(c) Disconnect the G53 transponder key coil connector.*3
(d) Disconnect the 4D instrument panel junction block assembly connector.
(e) Measure the resistance according to the value(s) in the table below.
Standard Resistance:
for TMC Made
|
Tester Connection |
Condition |
Specified Condition |
|---|---|---|
|
P20-1 (CTY) - 4D-29 |
Always |
Below 1 Ω |
|
P20-1 (CTY) or 4D-29 - Body ground |
Always |
10 kΩ or higher |
for TMMC Made
|
Tester Connection |
Condition |
Specified Condition |
|---|---|---|
|
P14-18 (CTY) - 4D-29 |
Always |
Below 1 Ω |
|
P14-18 (CTY) or 4D-29 - Body ground |
Always |
10 kΩ or higher |
| NG |

|
REPAIR OR REPLACE HARNESS OR CONNECTOR |
|
|
4. |
CHECK INSTRUMENT PANEL JUNCTION BLOCK ASSEMBLY |
(a) Remove the instrument panel junction block assembly.

|
*a |
Component without harness connected (Instrument Panel Junction Block Assembly) |
- |
- |
(b) Remove the main body ECU (multiplex network body ECU) from the instrument panel junction block assembly.
(c) Measure the resistance according to the value(s) in the table below.
Standard Resistance:
|
Tester Connection |
Condition |
Specified Condition |
|---|---|---|
|
4D-29 - A-1 (ILE) |
Always |
Below 1 Ω |
| OK |

|
| NG |

|
|
5. |
PERFORM ACTIVE TEST USING TECHSTREAM |
(a) Perform the Active Test according to the display on the Techstream.
Body Electrical > Main Body > Active Test
|
Tester Display |
Measurement Item |
Control Range |
Diagnostic Note |
|---|---|---|---|
|
Fr Foot Light |
Operation of the following lights:
|
OFF or ON |
- |
Body Electrical > Main Body > Active Test
|
Tester Display |
|---|
|
Fr Foot Light |
- *1: w/ Tray Light
- *2: w/ Cup Holder Light
OK:
Connected light is turn on or off.
| OK |

|
PROCEED TO NEXT SUSPECTED AREA SHOWN IN PROBLEM SYMPTOMS TABLE |
|
|
6. |
CHECK HARNESS AND CONNECTOR (NO. 1 INTERIOR ILLUMINATION LIGHT ASSEMBLY [FOOTWELL LIGHT] - INSTRUMENT PANEL JUNCTION BLOCK ASSEMBLY) |
- *1: w/ Tray Light
- *2: w/ Cup Holder Light
(a) Disconnect the G77 No. 1 interior illumination light assembly (footwell light) connector.
(b) Disconnect the G76 No. 2 interior illumination light assembly (footwell light) connector.
(c) Disconnect the G87 No. 3 interior illumination light assembly (center tray light) connector.*1
(d) Disconnect the G86 No. 4 interior illumination light assembly (driver side tray light) connector.*1
(e) Disconnect the H3 No. 5 interior illumination light assembly (front passenger side tray light) connector.*1
(f) Disconnect the N48 No. 6 interior illumination light assembly (cup holder light) connector.*2
(g) Disconnect the 4A instrument panel junction block assembly connector.
(h) Measure the resistance according to the value(s) in the table below.
Standard Resistance:
|
Tester Connection |
Condition |
Specified Condition |
|---|---|---|
|
4A-37 - G77-1 (L) |
Always |
Below 1 Ω |
|
4A-37 or G77-1 (L) - Body ground |
Always |
10 kΩ or higher |
| NG |

|
REPAIR OR REPLACE HARNESS OR CONNECTOR |
|
|
7. |
CHECK INSTRUMENT PANEL JUNCTION BLOCK ASSEMBLY |
(a) Remove the instrument panel junction block assembly.

|
*a |
Component without harness connected (Instrument Panel Junction Block Assembly) |
- |
- |
(b) Remove the main body ECU (multiplex network body ECU) from the instrument panel junction block assembly.
(c) Measure the resistance according to the value(s) in the table below.
Standard Resistance:
|
Tester Connection |
Condition |
Specified Condition |
|---|---|---|
|
4A-37 - A-26 (FSPT) |
Always |
Below 1 Ω |
| OK |

|
| NG |

|
|
|
|

![2019 - 2024 MY RAV4 RAV4 HV [11/2018 - ]; LIGHTING (INT): LIGHTING SYSTEM: DATA LIST / ACTIVE TEST](/t3Portal/stylegraphics/info.gif)