|
Last Modified: 01-30-2024 |
6.11:8.1.0 |
Doc ID: RM100000001K4HO |
|
Model Year Start: 2020 |
Model: RAV4 |
Prod Date Range: [10/2019 - 10/2022] |
|
Title: CELLULAR COMMUNICATION: DCM(TELEMATICS TRANSCEIVER): REMOVAL; 2020 - 2022 MY RAV4 RAV4 HV [10/2019 - 10/2022] |
REMOVAL
CAUTION / NOTICE / HINT
The necessary procedures (adjustment, calibration, initialization or registration) that must be performed after parts are removed, installed or replaced during the DCM (telematics transceiver) removal/installation are shown below.
Necessary Procedure After Parts Removed/Installed/Replaced (for HV Model)
|
Replacement Part or Procedure
|
Necessary Procedures
|
Effect/Inoperative Function When Necessary Procedures not Performed
|
Link
|
|
DCM (Telematics transceiver)
|
DCM activation
|
Safety connect system
|
![2020 - 2022 MY RAV4 RAV4 HV [10/2019 - 10/2022]; CELLULAR COMMUNICATION: SAFETY CONNECT SYSTEM: DCM ACTIVATION](/t3Portal/stylegraphics/info.gif)
|
|
Code registration*
|
w/ Smart Key System:
-
Wireless door lock control system
-
Smart key system (for Entry function)
-
Smart key system (for start function)
-
Hybrid control system cannot be started
|
|
|
Back-up battery
|
Perform the reset back-up battery condition
|
Safety connect system
|
|
Necessary Procedure After Parts Removed/Installed/Replaced (for Gasoline Model)
|
Replacement Part or Procedure
|
Necessary Procedures
|
Effect/Inoperative Function When Necessary Procedures not Performed
|
Link
|
|
DCM (Telematics transceiver)
|
DCM activation
|
Safety connect system
|
|
|
Code registration*
|
w/ Smart Key System:
-
Wireless door lock control system (for Gasoline model, with smart key system)
-
Smart key system (for Entry function, Gasoline model)
-
Smart key system (for Start function, Gasoline model)
-
Engine start function
|
|
|
Back-up battery
|
Perform the reset back-up battery condition
|
Safety connect system
|
|
PROCEDURE
1. REMOVE CONSOLE BOX ASSEMBLY
Click here
2. REMOVE AIR CONDITIONING CONTROL ASSEMBLY
Click here
3. REMOVE LOWER CENTER INSTRUMENT PANEL FINISH PANEL
Click here
4. REMOVE DCM (TELEMATICS TRANSCEIVER) WITH BRACKET (w/ Navigation System)
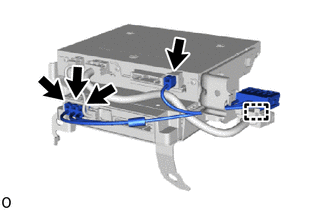
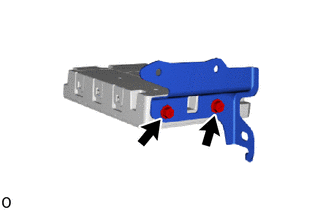
(a) Remove the 2 bolts.

|
Bolt
|

|
Connector
|
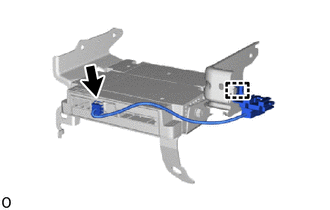
(b) Disconnect the 3 connectors.

|
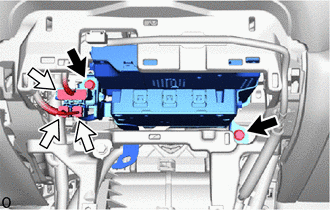
Place Hand Here
|

|
Remove in this Direction
|
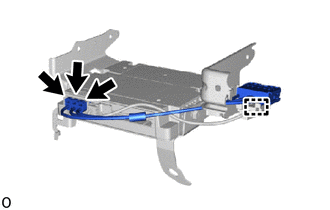
(c) Place your hand at the position shown in the illustration, and then while bending the instrument panel safety pad assembly, detach the guide and remove the DCM (telematics transceiver) with bracket.
(d) Disconnect the 3 connectors.
HINT:
Remove the DCM (telematics transceiver) with bracket together with the No. 2 navigation wire, No. 2 antenna cord sub-assembly and telephone ECU wire (to transceiver).
5. REMOVE DCM (TELEMATICS TRANSCEIVER) WITH BRACKET (w/o Navigation System)
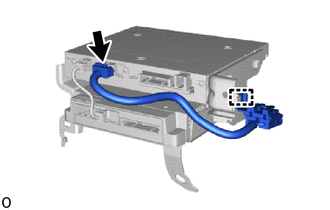
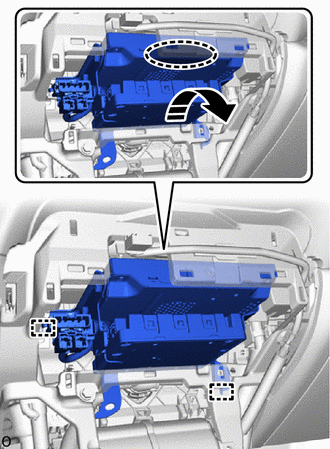
(a) Remove the 2 bolts.
|
|
Bolt
|
|
|
Connector
|
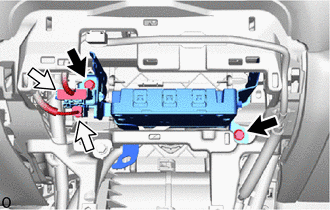
(b) Disconnect the 2 connectors.
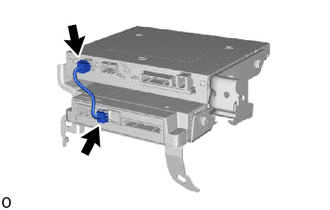
(c) Detach the guide and remove the DCM (telematics transceiver) with bracket.
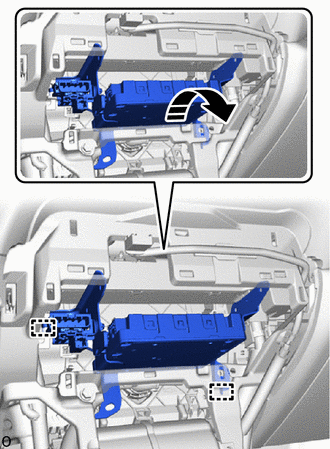
|
|
Remove in this Direction
|
(d) Disconnect the connector.
HINT:
Remove the DCM (telematics transceiver) with bracket together with the No. 2 antenna cord sub-assembly and telephone ECU wire.
6. REMOVE NO. 2 ANTENNA CORD SUB-ASSEMBLY
(a) w/ Navigation System:
|
(1) Disconnect the 4 connectors.
|
|
(2) Detach the clamp and remove the No. 2 antenna cord sub-assembly.
(b) w/o Navigation System:
(1) Disconnect the 3 connectors.
|
(2) Detach the clamp and remove the No. 2 antenna cord sub-assembly.
|
|
7. REMOVE NO. 2 NAVIGATION WIRE (w/ Navigation System)
|
(a) Disconnect the connector.
|
|
(b) Detach the clamp and remove the No. 2 navigation wire.
8. REMOVE TELEPHONE ECU WIRE (TO TRANSCEIVER) (w/ Navigation System)
|
(a) Disconnect the 2 connectors and remove the telephone ECU wire (to transceiver).
|
|
9. REMOVE TELEPHONE ECU WIRE (w/o Navigation System)
|
(a) Disconnect the connector.
|
|
(b) Detach the clamp and remove the telephone ECU wire.
10. REMOVE NO. 1 MULTI-MEDIA MODULE BRACKET
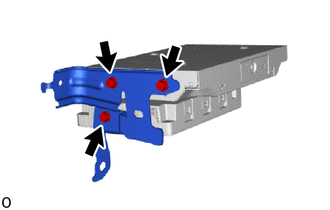
(a) w/ Navigation System:
|
(1) Remove the 3 screws and No. 1 multi-media module bracket.
|
|
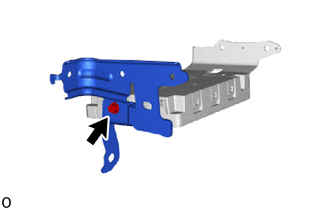
(b) w/o Navigation System:
|
(1) Remove the screw and No. 1 multi-media module bracket.
|
|
11. REMOVE NO. 2 MULTI-MEDIA MODULE BRACKET
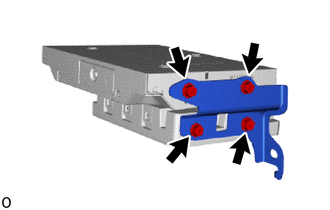
(a) w/ Navigation System:
|
(1) Remove the 4 screws and No. 2 multi-media module bracket.
|
|
(b) w/o Navigation System:
|
(1) Remove the 2 screws and No. 2 multi-media module bracket.
|
|
12. REMOVE DCM (TELEMATICS TRANSCEIVER)
|