| Last Modified: 01-30-2024 | 6.11:8.1.0 | Doc ID: RM100000001H9AJ |
| Model Year Start: 2019 | Model: RAV4 HV | Prod Date Range: [02/2019 - 08/2020] |
| Title: A25A-FXS (ENGINE CONTROL): ECM: INSTALLATION; 2019 - 2020 MY RAV4 HV [02/2019 - 08/2020] | ||
INSTALLATION
PROCEDURE
1. INSTALL NO. 2 ECM BRACKET
(a) Install the No. 2 ECM bracket to the ECM with the 2 screws.
Torque:
4.5 N·m {46 kgf·cm, 40 in·lbf}
NOTICE:
If the ECM has been struck or dropped, replace it.
2. INSTALL NO. 1 ECM BRACKET
(a) Install the No. 1 ECM bracket to the ECM with the 2 screws.
Torque:
4.5 N·m {46 kgf·cm, 40 in·lbf}
NOTICE:
If the ECM has been struck or dropped, replace it.
3. INSTALL ECM
(a) Install the ECM with the 2 nuts and bolt.
Torque:
8.0 N·m {82 kgf·cm, 71 in·lbf}
NOTICE:
If the ECM has been struck or dropped, replace it.
(b) Install the bolt and attach the clamp.
Torque:
10 N·m {102 kgf·cm, 7 ft·lbf}
|
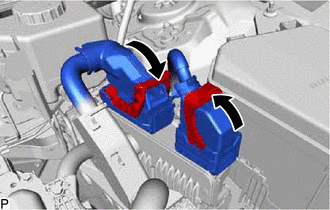
(c) Connect the 2 connectors to the ECM and push down the lever to lock it. NOTICE:
|
|
4. CONNECT CABLE TO NEGATIVE AUXILIARY BATTERY TERMINAL
5. INSTALL BATTERY HOLE COVER
6. INSTALL REAR NO. 2 FLOOR BOARD
7. INSTALL DECK BOARD ASSEMBLY
8. PERFORM INITIALIZATION
|
|
|

![2019 - 2020 MY RAV4 HV [11/2018 - 08/2020]; MAINTENANCE: A25A-FXS AUXILIARY BATTERY: INSTALLATION+](/t3Portal/stylegraphics/info.gif)