| Last Modified: 01-30-2024 | 6.11:8.1.0 | Doc ID: RM100000001G2CD |
| Model Year Start: 2019 | Model: RAV4 | Prod Date Range: [11/2018 - 08/2020] |
| Title: LIGHTING (EXT): LIGHTING SYSTEM (w/ Headlight ECU without AFS): Clearance Light/Daytime Running Light Circuit; 2019 - 2020 MY RAV4 RAV4 HV [11/2018 - 08/2020] | ||
|
Clearance Light/Daytime Running Light Circuit |
DESCRIPTION
Clearance light function:
- When the main body ECU (multiplex network body ECU) receives the light control switch position signal, it sends an illumination request signal to the headlight ECU sub-assembly LH/RH and illuminates the clearance lights.
Daytime running light function:
- When the operation conditions of the daytime running lights are met, the main body ECU (multiplex network body ECU) sends an illumination request signal to the headlight ECU sub-assembly LH/RH and illuminates the daytime running lights.
WIRING DIAGRAM
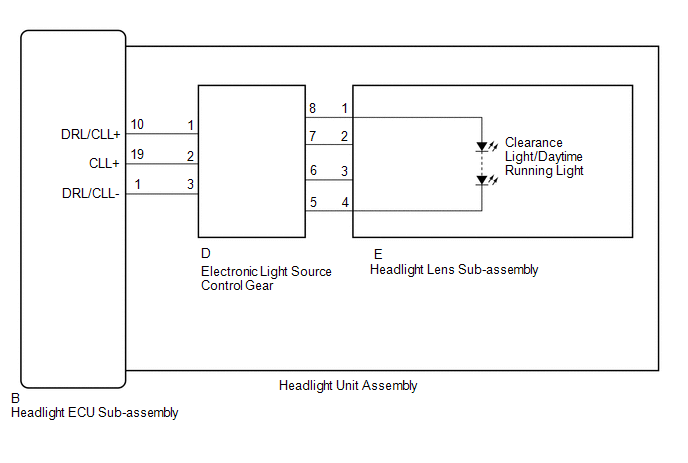
for Triple Beam Headlight
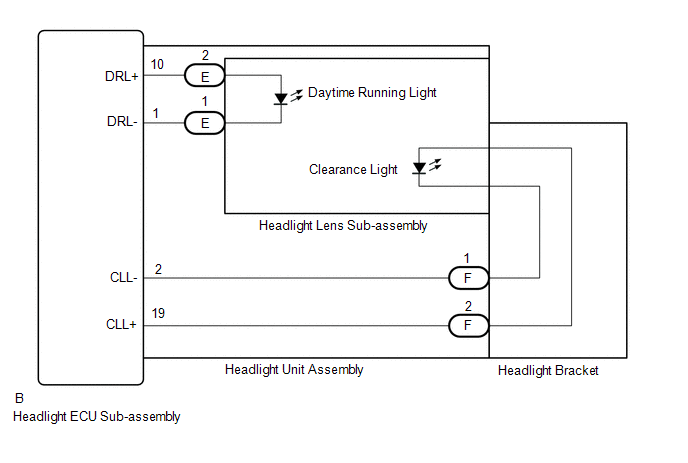
for Single Beam Headlight
CAUTION / NOTICE / HINT
NOTICE:
If the headlight ECU sub-assembly LH has been replaced, it is necessary to synchronize the vehicle information and initialize the headlight ECU sub-assembly LH.
PROCEDURE
|
1. |
CONFIRM MODEL |
(a) Choose the model to be inspected.
|
Result |
Proceed to |
|---|---|
|
for Triple Beam Headlight |
A |
|
for Single Beam Headlight |
B |
| B |

|
|
|
2. |
CHECK LIGHTS |
(a) Check the illumination of each clearance lights and daytime running lights.
|
Result |
Proceed to |
|---|---|
|
LH side daytime running light does not operate properly (clearance light operates normally) |
A |
|
LH side clearance light does not operate properly (daytime running light operates normally) |
B |
|
RH side daytime running light does not operate properly (clearance light operates normally) |
C |
|
RH side clearance light does not operate properly (daytime running light operates normally) |
D |
| B |

|
| C |

|
| D |

|
|
|
3. |
PERFORM ACTIVE TEST USING TECHSTREAM |
(a) Connect the Techstream to the DLC3.
(b) Turn the ignition switch to ON.
(c) Turn the Techstream on.
(d) Enter the following menus: Body Electrical / HL AutoLeveling / Active Test.
(e) Perform the Active Test according to the display on the Techstream.
Body Electrical > HL AutoLeveling > Active Test
|
Tester Display |
Measurement Item |
Control Range |
Diagnostic Note |
|---|---|---|---|
|
Daytime Running Light |
Daytime running lights |
OFF or ON |
- |
Body Electrical > HL AutoLeveling > Active Test
|
Tester Display |
|---|
|
Daytime Running Light |
OK:
Daytime running light illuminates.
| OK |

|
PROCEED TO NEXT SUSPECTED AREA SHOWN IN PROBLEM SYMPTOMS TABLE |
|
|
4. |
CHECK HEADLIGHT UNIT ASSEMBLY LH |
(a) Interchange the headlight unit assembly LH with RH and connect the connectors.
|
|
5. |
CHECK OPERATION (DAYTIME RUNNING LIGHT) |
(a) Check the operation of the daytime running light.
|
Result |
Proceed to |
|---|---|
|
LH side daytime running light does not illuminate. |
A |
|
RH side daytime running light does not illuminate. |
B |
| A |

|
|
|
6. |
INSPECT HEADLIGHT UNIT ASSEMBLY LH |
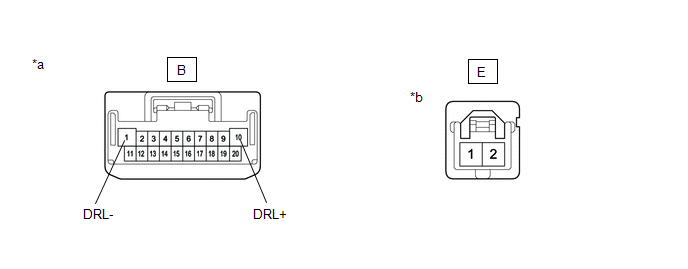
|
*a |
Component without harness connected (to Headlight ECU Sub-assembly LH) |
*b |
Component without harness connected (to Headlight Lens Sub-assembly LH) |
(a) Remove the headlight assembly LH.
(b) Remove the headlight lens sub-assembly LH.
(c) Measure the resistance according to the value(s) in the table below.
Standard Resistance:
|
Tester Connection |
Wiring Color |
Condition |
Specified Condition |
|---|---|---|---|
|
B-10 (DRL+) - E-2 |
R-W |
Always |
Below 1 Ω |
|
B-1 (DRL-) - E-1 |
G-W |
Always |
Below 1 Ω |
| OK |

|
| NG |

|
|
7. |
PERFORM ACTIVE TEST USING TECHSTREAM |
(a) Connect the Techstream to the DLC3.
(b) Turn the ignition switch to ON.
(c) Turn the Techstream on.
(d) Enter the following menus: Body Electrical / HL AutoLeveling / Active Test.
(e) Perform the Active Test according to the display on the Techstream.
Body Electrical > HL AutoLeveling > Active Test
|
Tester Display |
Measurement Item |
Control Range |
Diagnostic Note |
|---|---|---|---|
|
Clearance Light |
Clearance lights |
OFF or ON |
- |
Body Electrical > HL AutoLeveling > Active Test
|
Tester Display |
|---|
|
Clearance Light |
OK:
Clearance light illuminates.
| OK |

|
PROCEED TO NEXT SUSPECTED AREA SHOWN IN PROBLEM SYMPTOMS TABLE |
|
|
8. |
CHECK HEADLIGHT BRACKET LH |
(a) Interchange the headlight bracket LH with RH and connect the connectors.
|
|
9. |
CHECK OPERATION (CLEARANCE LIGHT) |
(a) Check the operation of the clearance light.
|
Result |
Proceed to |
|---|---|
|
LH side clearance light does not illuminate. |
A |
|
RH side clearance light does not illuminate. |
B |
| B |

|
|
|
10. |
CHECK HEADLIGHT UNIT ASSEMBLY LH |
(a) Interchange the headlight unit assembly LH with RH and connect the connectors.
|
|
11. |
CHECK OPERATION (CLEARANCE LIGHT) |
(a) Check the operation of the clearance light.
|
Result |
Proceed to |
|---|---|
|
LH side clearance light does not illuminate. |
A |
|
RH side clearance light does not illuminate. |
B |
| A |

|
|
|
12. |
INSPECT HEADLIGHT UNIT ASSEMBLY LH |
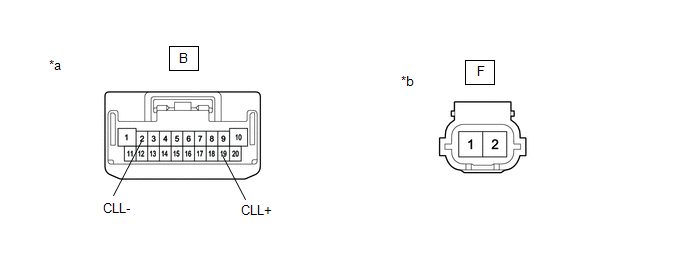
|
*a |
Component without harness connected (to Headlight ECU Sub-assembly LH) |
*b |
Component without harness connected (to Headlight Bracket LH) |
(a) Remove the headlight assembly LH.
(b) Remove the headlight bracket LH.
(c) Measure the resistance according to the value(s) in the table below.
Standard Resistance:
|
Tester Connection |
Wiring Color |
Condition |
Specified Condition |
|---|---|---|---|
|
B-19 (CLL+) - F-2 |
R |
Always |
Below 1 Ω |
|
B-2 (CLL-) - F-1 |
GR |
Always |
Below 1 Ω |
| OK |

|
| NG |

|
|
13. |
PERFORM ACTIVE TEST USING TECHSTREAM |
(a) Connect the Techstream to the DLC3.
(b) Turn the ignition switch to ON.
(c) Turn the Techstream on.
(d) Enter the following menus: Body Electrical / HL AutoLeveling (Sub) / Active Test.
(e) Perform the Active Test according to the display on the Techstream.
Body Electrical > HL AutoLeveling (Sub) > Active Test
|
Tester Display |
Measurement Item |
Control Range |
Diagnostic Note |
|---|---|---|---|
|
Daytime Running Light |
Daytime running lights |
OFF or ON |
- |
Body Electrical > HL AutoLeveling (Sub) > Active Test
|
Tester Display |
|---|
|
Daytime Running Light |
OK:
Daytime running light illuminates.
| OK |

|
PROCEED TO NEXT SUSPECTED AREA SHOWN IN PROBLEM SYMPTOMS TABLE |
|
|
14. |
CHECK HEADLIGHT UNIT ASSEMBLY RH |
(a) Interchange the headlight unit assembly RH with LH and connect the connectors.
|
|
15. |
CHECK OPERATION (DAYTIME RUNNING LIGHT) |
(a) Check the operation of the daytime running light.
|
Result |
Proceed to |
|---|---|
|
RH side daytime running light does not illuminate. |
A |
|
LH side daytime running light does not illuminate. |
B |
| A |

|
|
|
16. |
INSPECT HEADLIGHT UNIT ASSEMBLY RH |

|
*a |
Component without harness connected (to Headlight ECU Sub-assembly RH) |
*b |
Component without harness connected (to Headlight Lens Sub-assembly RH) |
(a) Remove the headlight assembly RH.
(b) Remove the headlight lens sub-assembly RH.
(c) Measure the resistance according to the value(s) in the table below.
Standard Resistance:
|
Tester Connection |
Wiring Color |
Condition |
Specified Condition |
|---|---|---|---|
|
B-10 (DRL+) - E-2 |
R-W |
Always |
Below 1 Ω |
|
B-1 (DRL-) - E-1 |
G-W |
Always |
Below 1 Ω |
| OK |

|
| NG |

|
|
17. |
PERFORM ACTIVE TEST USING TECHSTREAM |
(a) Connect the Techstream to the DLC3.
(b) Turn the ignition switch to ON.
(c) Turn the Techstream on.
(d) Enter the following menus: Body Electrical / HL AutoLeveling (Sub) / Active Test.
(e) Perform the Active Test according to the display on the Techstream.
Body Electrical > HL AutoLeveling (Sub) > Active Test
|
Tester Display |
Measurement Item |
Control Range |
Diagnostic Note |
|---|---|---|---|
|
Clearance Light |
Clearance lights |
OFF or ON |
- |
Body Electrical > HL AutoLeveling (Sub) > Active Test
|
Tester Display |
|---|
|
Clearance Light |
OK:
Clearance light illuminates.
| OK |

|
PROCEED TO NEXT SUSPECTED AREA SHOWN IN PROBLEM SYMPTOMS TABLE |
|
|
18. |
CHECK HEADLIGHT BRACKET RH |
(a) Interchange the headlight bracket RH with LH and connect the connectors.
|
|
19. |
CHECK OPERATION (CLEARANCE LIGHT) |
(a) Check the operation of the clearance light.
|
Result |
Proceed to |
|---|---|
|
RH side clearance light does not illuminate. |
A |
|
LH side clearance light does not illuminate. |
B |
| B |

|
|
|
20. |
CHECK HEADLIGHT UNIT ASSEMBLY RH |
(a) Interchange the headlight unit assembly RH with LH and connect the connectors.
|
|
21. |
CHECK OPERATION (CLEARANCE LIGHT) |
(a) Check the operation of the clearance light.
|
Result |
Proceed to |
|---|---|
|
RH side clearance light does not illuminate. |
A |
|
LH side clearance light does not illuminate. |
B |
| A |

|
|
|
22. |
INSPECT HEADLIGHT UNIT ASSEMBLY RH |

|
*a |
Component without harness connected (to Headlight ECU Sub-assembly RH) |
*b |
Component without harness connected (to Headlight Bracket RH) |
(a) Remove the headlight assembly RH.
(b) Remove the headlight bracket RH.
(c) Measure the resistance according to the value(s) in the table below.
Standard Resistance:
|
Tester Connection |
Wiring Color |
Condition |
Specified Condition |
|---|---|---|---|
|
B-19 (CLL+) - F-2 |
R |
Always |
Below 1 Ω |
|
B-2 (CLL-) - F-1 |
GR |
Always |
Below 1 Ω |
| OK |

|
| NG |

|
|
23. |
CHECK LIGHTS |
(a) Check the illumination of each clearance lights and daytime running lights.
|
Result |
Proceed to |
|---|---|
|
LH side clearance lights and daytime running lights do not illuminate |
A |
|
RH side clearance lights and daytime running lights do not illuminate |
B |
| B |

|
|
|
24. |
PERFORM ACTIVE TEST USING TECHSTREAM |
(a) Connect the Techstream to the DLC3.
(b) Turn the ignition switch to ON.
(c) Turn the Techstream on.
(d) Enter the following menus: Body Electrical / HL AutoLeveling / Active Test.
(e) Perform the Active Test according to the display on the Techstream.
Body Electrical > HL AutoLeveling > Active Test
|
Tester Display |
Measurement Item |
Control Range |
Diagnostic Note |
|---|---|---|---|
|
Clearance Light |
Clearance lights |
OFF or ON |
- |
|
Daytime Running Light |
Daytime running lights |
OFF or ON |
- |
Body Electrical > HL AutoLeveling > Active Test
|
Tester Display |
|---|
|
Clearance Light |
Body Electrical > HL AutoLeveling > Active Test
|
Tester Display |
|---|
|
Daytime Running Light |
OK:
Clearance lights and daytime running lights illuminate.
| OK |

|
PROCEED TO NEXT SUSPECTED AREA SHOWN IN PROBLEM SYMPTOMS TABLE |
|
|
25. |
CHECK HEADLIGHT UNIT ASSEMBLY LH |
(a) Interchange the headlight unit assembly LH with RH and connect the connectors.
|
|
26. |
CHECK OPERATION (CLEARANCE LIGHTS AND DAYTIME RUNNING LIGHTS) |
(a) Check the operation of the clearance lights and daytime running lights.
|
Result |
Proceed to |
|---|---|
|
LH side clearance lights and daytime running lights do not illuminate. |
A |
|
RH side clearance lights and daytime running lights do not illuminate. |
B |
| A |

|
|
|
27. |
INSPECT HEADLIGHT UNIT ASSEMBLY LH |
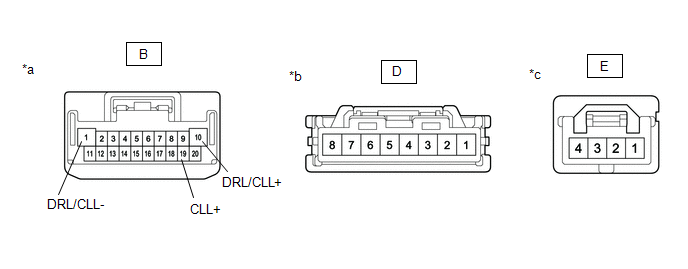
|
*a |
Component without harness connected (to Headlight ECU Sub-assembly LH) |
*b |
Component without harness connected (to Electronic Light Source Control Gear LH) |
|
*c |
Component without harness connected (to Headlight Lens Sub-assembly LH) |
- |
- |
(a) Remove the headlight assembly LH.
(b) Remove the headlight lens sub-assembly LH.
(c) Measure the resistance according to the value(s) in the table below.
Standard Resistance:
|
Tester Connection |
Wiring Color |
Condition |
Specified Condition |
|---|---|---|---|
|
B-10 (DRL/CLL+) - D-1 |
R |
Always |
Below 1 Ω |
|
B-19 (CLL+) - D-2 |
G-W |
Always |
Below 1 Ω |
|
B-1 (DRL/CLL-) - D-3 |
GR |
Always |
Below 1 Ω |
|
D-8 - E-1 |
BR |
Always |
Below 1 Ω |
|
D-7 - E-2 |
G |
Always |
Below 1 Ω |
|
D-6 - E-3 |
R-W |
Always |
Below 1 Ω |
|
D-5 - E-4 |
W |
Always |
Below 1 Ω |
| NG |

|
|
|
28. |
CHECK HEADLIGHT LENS SUB-ASSEMBLY LH |
(a) Temporarily replace the headlight lens sub-assembly LH with a new one or normally functioning one.
(b) Check the operation of the clearance lights.
- Turn the ignition switch to ON.
- Turn the light control switch to the AUTO or TAIL position.
(c) Check the operation of the clearance lights and daytime running lights.
OK:
Clearance lights and daytime running lights operate normally.
| OK |

|
END (HEADLIGHT LENS SUB-ASSEMBLY LH IS DEFECTIVE) |
| NG |

|
|
29. |
PERFORM ACTIVE TEST USING TECHSTREAM |
(a) Connect the Techstream to the DLC3.
(b) Turn the ignition switch to ON.
(c) Turn the Techstream on.
(d) Enter the following menus: Body Electrical / HL AutoLeveling (Sub) / Active Test.
(e) Perform the Active Test according to the display on the Techstream.
Body Electrical > HL AutoLeveling (Sub) > Active Test
|
Tester Display |
Measurement Item |
Control Range |
Diagnostic Note |
|---|---|---|---|
|
Clearance Light |
Clearance lights |
OFF or ON |
- |
|
Daytime Running Light |
Daytime running lights |
OFF or ON |
- |
Body Electrical > HL AutoLeveling (Sub) > Active Test
|
Tester Display |
|---|
|
Clearance Light |
Body Electrical > HL AutoLeveling (Sub) > Active Test
|
Tester Display |
|---|
|
Daytime Running Light |
OK:
Clearance lights and daytime running lights illuminate.
| OK |

|
PROCEED TO NEXT SUSPECTED AREA SHOWN IN PROBLEM SYMPTOMS TABLE |
|
|
30. |
CHECK HEADLIGHT UNIT ASSEMBLY RH |
(a) Interchange the headlight unit assembly RH with LH and connect the connectors.
|
|
31. |
CHECK OPERATION (CLEARANCE LIGHTS AND DAYTIME RUNNING LIGHTS) |
(a) Check the operation of the clearance lights and daytime running lights.
|
Result |
Proceed to |
|---|---|
|
RH side clearance lights and daytime running lights do not illuminate. |
A |
|
LH side clearance lights and daytime running lights do not illuminate. |
B |
| A |

|
|
|
32. |
INSPECT HEADLIGHT UNIT ASSEMBLY RH |

|
*a |
Component without harness connected (to Headlight ECU Sub-assembly RH) |
*b |
Component without harness connected (to Electronic Light Source Control Gear RH) |
|
*c |
Component without harness connected (to Headlight Lens Sub-assembly RH) |
- |
- |
(a) Remove the headlight assembly RH.
(b) Remove the headlight lens sub-assembly RH.
(c) Measure the resistance according to the value(s) in the table below.
Standard Resistance:
|
Tester Connection |
Wiring Color |
Condition |
Specified Condition |
|---|---|---|---|
|
B-10 (DRL/CLL+) - D-1 |
R |
Always |
Below 1 Ω |
|
B-19 (CLL+) - D-2 |
G-W |
Always |
Below 1 Ω |
|
B-1 (DRL/CLL-) - D-3 |
GR |
Always |
Below 1 Ω |
|
D-8 - E-1 |
BR |
Always |
Below 1 Ω |
|
D-7 - E-2 |
G |
Always |
Below 1 Ω |
|
D-6 - E-3 |
R-W |
Always |
Below 1 Ω |
|
D-5 - E-4 |
W |
Always |
Below 1 Ω |
| NG |

|
|
|
33. |
CHECK HEADLIGHT LENS SUB-ASSEMBLY RH |
(a) Temporarily replace the headlight lens sub-assembly RH with a new one or normally functioning one.
(b) Check the operation of the clearance lights.
- Turn the ignition switch to ON.
- Turn the light control switch to the AUTO or TAIL position.
(c) Check the operation of the clearance lights and daytime running lights.
OK:
Clearance lights and daytime running lights operate normally.
| OK |

|
END (HEADLIGHT LENS SUB-ASSEMBLY RH IS DEFECTIVE) |
| NG |

|
|
|
|
![2019 - 2021 MY RAV4 RAV4 HV [11/2018 - 12/2021]; LIGHTING (EXT): LIGHTING SYSTEM (w/ Headlight ECU without AFS): INITIALIZATION](/t3Portal/stylegraphics/info.gif)
