- Perform "Reset Memory".
- Perform acceleration sensor zero point calibration and store system information memorization.
| Last Modified: 01-30-2024 | 6.11:8.1.0 | Doc ID: RM100000001FHD7 |
| Model Year Start: 2019 | Model: RAV4 | Prod Date Range: [11/2018 - 02/2019] |
| Title: AXLE AND DIFFERENTIAL: REAR AXLE CARRIER (for AWD): REMOVAL; 2019 MY RAV4 RAV4 HV [11/2018 - 02/2019] | ||
REMOVAL
CAUTION / NOTICE / HINT
The necessary procedures (adjustment, calibration, initialization, or registration) that must be performed after parts are removed and installed, or replaced during rear axle carrier removal/installation are shown below.
|
Replaced Part or Performed Procedure |
Necessary Procedure |
Effect/Inoperative Function when Necessary Procedure not Performed |
Link |
|---|---|---|---|
|
Rear wheel alignment adjustment |
|
|
|
|
Suspension, tires, etc. (The vehicle height changes because of suspension or tire replacement.) |
Television camera assembly optical axis (Back camera position setting) |
Parking assist monitor system |
|
|
Panoramic view monitor system |
|
|
|
Perform headlight ECU sub-assembly LH initialization |
Lighting system (EXT)(w/ Headlight ECU) |
|
HINT:
- Use the same procedure for the RH and LH sides.
- The following procedure is for the LH side.
PROCEDURE
1. RELEASE PARKING BRAKE
Click here
![2019 - 2024 MY RAV4 RAV4 HV [11/2018 - ]; PARKING BRAKE: ELECTRIC PARKING BRAKE ACTUATOR: REMOVAL+](/t3Portal/stylegraphics/info.gif)
2. REMOVE REAR WHEEL
Click here
3. REMOVE LOWER NO. 2 CONTROL ARM COVER (w/ Cover)
Click here
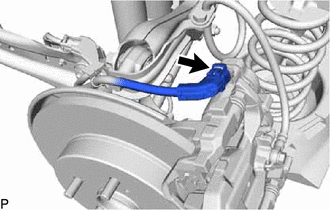
4. DISCONNECT NO. 2 PARKING BRAKE WIRE ASSEMBLY
|
(a) Disconnect the No. 2 parking brake wire assembly connector from the parking brake actuator assembly. NOTICE:
|
|
|
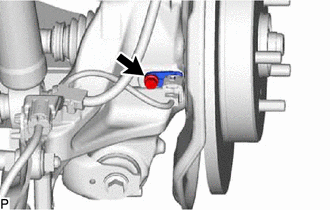
(b) Remove the bolt and disconnect the skid control sensor from the rear axle carrier sub-assembly. NOTICE:
|
|
|
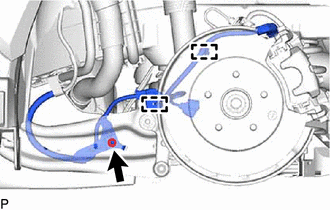
(c) Remove the nut, disengage the 2 clamps and separate the No. 2 parking brake wire assembly from the rear flexible hose bracket and rear trailing arm assembly. |
|
5. DISCONNECT REAR FLEXIBLE HOSE
|
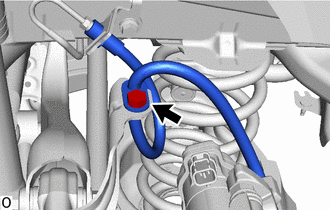
(a) Remove the bolt and disconnect the rear flexible hose from the rear flexible hose bracket. |
|
6. REMOVE REAR AXLE SHAFT NUT
Click here
7. DISCONNECT REAR DISC BRAKE CALIPER ASSEMBLY LH
|
(a) Remove the 2 bolts and disconnect the rear disc brake caliper assembly from the rear axle carrier sub-assembly. NOTICE: Use wire or an equivalent tool to keep the rear disc brake caliper assembly from hanging by the rear flexible hose. |
|

8. REMOVE REAR DISC
Click here
9. REMOVE REAR AXLE HUB AND BEARING ASSEMBLY LH
Click here
10. REMOVE NO. 2 FLEXIBLE HOSE BRACKET
|
(a) Remove the bolt and flexible hose bracket from the rear axle carrier sub-assembly. |
|
11. REMOVE REAR HEIGHT CONTROL SENSOR SUB-ASSEMBLY LH (for LH Side)
Click here
12. REMOVE REAR STABILIZER LINK ASSEMBLY LH
Click here
13. REMOVE REAR COIL SPRING LH
Click here
14. REMOVE REAR LOWER COIL SPRING INSULATOR LH
Click here
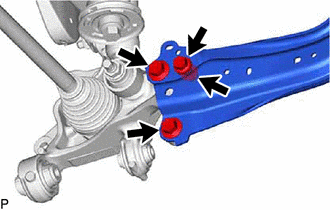
15. REMOVE REAR NO. 1 SUSPENSION ARM ASSEMBLY LH
|
(a) Remove the bolt, nut and rear No. 1 suspension arm assembly LH from the rear axle carrier sub-assembly and rear suspension member sub-assembly. NOTICE: Because the nut has its own stopper, do not turn the nut. Loosen the bolt with the nut secured. |
|
16. REMOVE REAR AXLE CARRIER SUB-ASSEMBLY
|
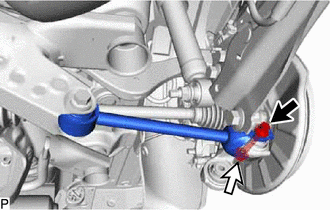
(a) Loosen the 3 bolts and nut of the rear trailing arm assembly. |
|
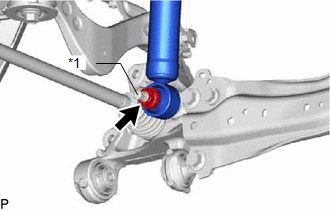
|
(b) Loosen the nut of the rear shock absorber assembly. NOTICE: Hold the rear axle carrier pin while rotating the nut. |
|
|
(c) Using a jack and wooden block, support the rear axle carrier sub-assembly. NOTICE:
|
|
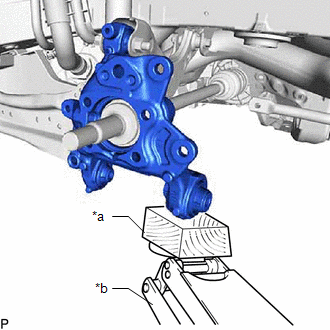
|
(d) Loosen the bolt (A). NOTICE: Because the nut has its own stopper, do not turn the nut. Loosen the bolt with the nut secured. |
|
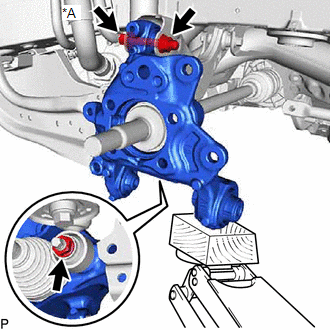
(e) Remove the 3 bolts, nut and disconnect the rear trailing arm assembly from the rear axle carrier sub-assembly.
(f) Remove the nut and disconnect the rear shock absorber assembly from the rear axle carrier sub-assembly.
NOTICE:
Hold the rear axle carrier pin while rotating the nut.
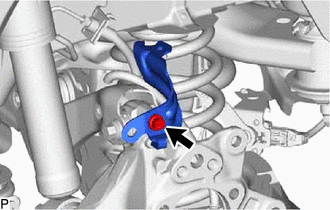
(g) Remove the bolt (A), nut and rear axle carrier sub-assembly from the rear upper control arm assembly.
NOTICE:
Because the nut has its own stopper, do not turn the nut. Loosen the bolt with the nut secured.
|
|
|