| Last Modified: 01-30-2024 | 6.11:8.1.0 | Doc ID: RM100000001FHAN |
| Model Year Start: 2019 | Model: RAV4 HV | Prod Date Range: [11/2018 - ] |
| Title: HYBRID / BATTERY CONTROL: BATTERY BLOWER: REMOVAL; 2019 - 2024 MY RAV4 HV [11/2018 - ] | ||
REMOVAL
PROCEDURE
1. REMOVE BENCH TYPE REAR SEAT CUSHION ASSEMBLY
Click here
![2019 - 2024 MY RAV4 RAV4 HV [11/2018 - ]; SEAT: REAR SEAT ASSEMBLY: REMOVAL+](/t3Portal/stylegraphics/info.gif)
2. REMOVE REAR SEAT CUSHION LOCK HOOK
Click here
3. REMOVE REAR DOOR SCUFF PLATE LH
Click here
4. REMOVE NO. 3 BATTERY SERVICE COVER BOARD
|
(a) Remove the 2 clips (A). |
|
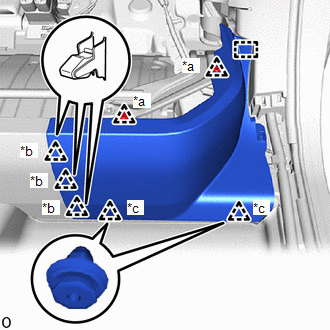
(b) Disengage the 3 clips (B), 2 clips (C) and guide to remove the No. 3 battery service cover board.
5. REMOVE REAR DOOR SCUFF PLATE RH
HINT:
Use the same procedure as for the LH side.
6. REMOVE NO. 2 BATTERY SERVICE COVER BOARD
|
(a) Remove the 2 clips (A). |
|
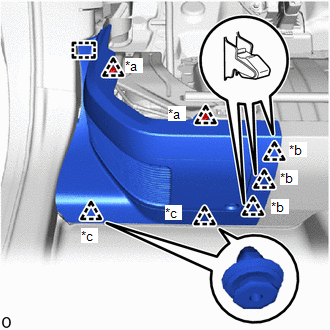
(b) Disengage the 3 clips (B), 2 clips (C) and guide to remove the No. 2 battery service cover board.
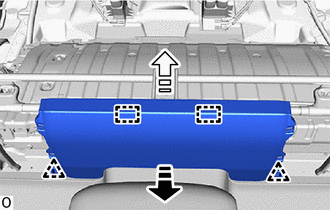
7. REMOVE BATTERY SERVICE COVER BOARD
(a) Pull the battery service cover board in the direction indicated by the arrow (1) shown in the illustration to disengage the 2 clips.

|
Remove in this Direction (1) |

|
Remove in this Direction (2) |
(b) Pull the battery service cover board in the direction indicated by the arrow (2) shown in the illustration to disengage the 2 guides to remove it from the rear seat cushion leg sub-assembly.
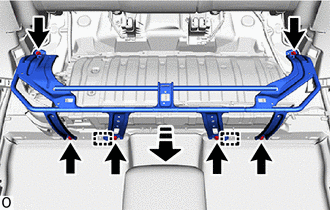
8. REMOVE REAR SEAT CUSHION LEG SUB-ASSEMBLY
(a) Remove the 6 bolts.
|
|
Remove in this Direction |
(b) Pull in the direction of the arrow in the illustration and detach the 2 guides and remove the rear seat cushion leg sub-assembly.
9. REMOVE NO. 1 HYBRID BATTERY INTAKE DUCT
|
(a) Disengage the 2 clamps. |
|

|
(b) Remove the 2 clips and No. 1 hybrid battery intake duct from the battery cooling blower assembly. |
|
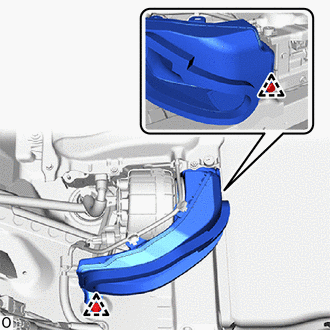
10. REMOVE BATTERY COOLING BLOWER ASSEMBLY
|
(a) Disconnect the battery cooling blower assembly connector. |
|
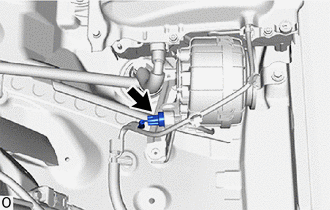
|
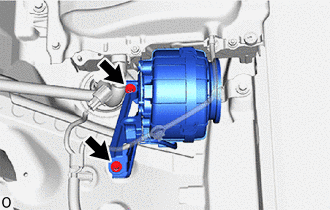
(b) Remove the 2 bolts and battery cooling blower assembly from the HV battery. NOTICE:
|
|
11. REMOVE BATTERY COOLING BLOWER BRACKET
|
(a) Disengage the clamp. |
|
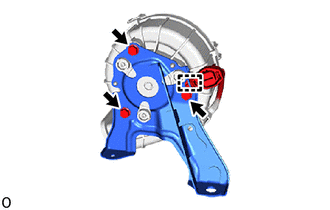
(b) Remove the 3 bolts and battery cooling blower bracket from the battery cooling blower assembly.
|
|
|