Last Modified: 01-30-2024 6.11:8.1.0 Doc ID: RM100000001EVB1
Model Year Start: 2019 Model: RAV4 HV Prod Date Range: [11/2018 - 02/2019]
Title: A25A-FXS (ENGINE CONTROL): CAMSHAFT TIMING CONTROL MOTOR: INSTALLATION; 2019 MY RAV4 HV [11/2018 - 02/2019]

INSTALLATION

CAUTION / NOTICE / HINT

NOTICE:

This procedure includes the installation of small-head bolts. Refer to Small-Head Bolts of Basic Repair Hint to identify the small-head bolts.

Click here 2019 - 2024 MY RAV4 RAV4 HV [11/2018 -        ]; INTRODUCTION: REPAIR INSTRUCTION: PRECAUTION

HINT:

Perform "Inspection After Repair" after removing and installing, or replacing the cam timing control motor with EDU assembly.

Click here 2019 - 2020 MY RAV4 HV [11/2018 - 08/2020]; A25A-FXS (ENGINE CONTROL): SFI SYSTEM (w/o Canister Pump Module): INITIALIZATION

PROCEDURE

1. INSTALL CAM TIMING CONTROL MOTOR WITH EDU ASSEMBLY

HINT:

Perform "Inspection After Repair" after removing and installing, or replacing the cam timing control motor with EDU assembly.

Click here 2019 - 2020 MY RAV4 HV [11/2018 - 08/2020]; A25A-FXS (ENGINE CONTROL): SFI SYSTEM (w/o Canister Pump Module): INITIALIZATION

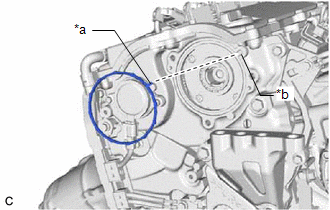
(a) Install a new cam timing control motor O-ring to the No. 2 timing chain cover assembly with the protrusion of the cam timing control motor O-ring oriented as shown in the illustration.

*a

Protrusion

*b

Groove

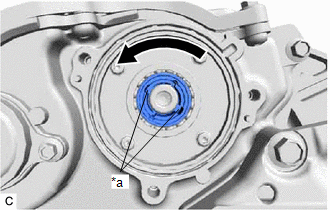
(b) Turn the cutout of the camshaft timing gear assembly eccentric shaft counterclockwise by hand, and set it to the maximum retard angle position.

HINT:

  • If a camshaft lobe is opening a valve, the eccentric shaft will be difficult to turn.
  • When the cutout of the camshaft timing gear assembly eccentric shaft cannot be turned any farther, it is set to the maximum retard angle.

*a

Cutout

(c) Install the cam timing control motor with EDU assembly to the No. 2 timing chain cover assembly.

NOTICE:

  • When installing, align the joints of the cam timing control motor with EDU assembly with the cutouts of the camshaft timing gear assembly eccentric shaft.
  • Align the pin holes of the cam timing control motor with EDU assembly with the knock pins of the No. 2 timing chain cover assembly when installing the cam timing control motor with EDU assembly.
  • Make sure the contact surface of the cam timing control motor with EDU assembly (the surface that contacts the No. 2 timing chain cover assembly) is free of foreign matter.
  • When installing the cam timing control motor with EDU assembly, do not use excessive force.
  • If the cam timing control motor with EDU assembly has been struck or dropped, replace it.
  • Do not disassemble the cam timing control motor with EDU assembly. If disassembled, replace it.

*a

Joint

*b

Cutout

*c

Pin Hole

*d

Knock Pin

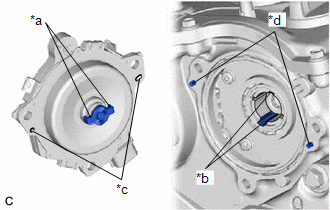
(d) Install the 3 bolts.

Torque:

21 N·m {214 kgf·cm, 15 ft·lbf}

(e) Connect the cam timing control motor with EDU assembly connector.

2. CONNECT CABLE TO NEGATIVE AUXILIARY BATTERY TERMINAL

Click here 2019 - 2020 MY RAV4 HV [11/2018 - 08/2020]; MAINTENANCE: A25A-FXS AUXILIARY BATTERY: INSTALLATION

3. INSPECT FOR ENGINE OIL LEAK

Click here 2019 MY RAV4 HV [11/2018 - 02/2019]; MAINTENANCE: A25A-FXS OIL AND OIL FILTER: REPLACEMENT+

4. INSTALL NO. 1 ENGINE COVER SUB-ASSEMBLY

Click here 2019 MY RAV4 HV [11/2018 - 02/2019]; A25A-FXS (ENGINE MECHANICAL): ENGINE ASSEMBLY: INSTALLATION+

5. INSTALL BATTERY HOLE COVER

Click here 2019 - 2020 MY RAV4 HV [11/2018 - 08/2020]; MAINTENANCE: A25A-FXS AUXILIARY BATTERY: INSTALLATION+

6. INSTALL REAR NO. 2 FLOOR BOARD

Click here 2019 - 2020 MY RAV4 HV [11/2018 - 08/2020]; MAINTENANCE: A25A-FXS AUXILIARY BATTERY: INSTALLATION+

7. INSTALL DECK BOARD ASSEMBLY

Click here 2019 - 2020 MY RAV4 HV [11/2018 - 08/2020]; MAINTENANCE: A25A-FXS AUXILIARY BATTERY: INSTALLATION+