| Last Modified: 01-30-2024 | 6.11:8.1.0 | Doc ID: RM100000001EF8Z |
| Model Year Start: 2019 | Model: RAV4 | Prod Date Range: [11/2018 - 12/2021] |
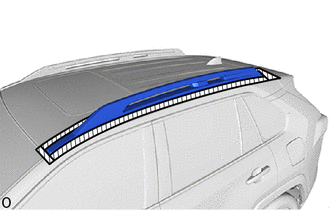
| Title: EXTERIOR PANELS / TRIM: ROOF RACK: REMOVAL; 2019 - 2021 MY RAV4 RAV4 HV [11/2018 - 12/2021] | ||
REMOVAL
CAUTION / NOTICE / HINT
HINT:
- Use the same procedure for the RH and LH sides.
- The procedure listed below is for the LH side.
- If leaving the roof rack leg on the vehicle side, perform procedures 2 through 5 and procedures 10 through 12. (except Off Road Package)
- If removing together with the roof rack leg, perform procedure procedures 6 through 12. (except Off Road Package)
PROCEDURE
1. REMOVE ROOF CARRIER (w/ Roof Carrier)
Click here
![2019 - 2024 MY RAV4 RAV4 HV [11/2018 - ]; EXTERIOR PANELS / TRIM: ROOF CARRIER: REMOVAL](/t3Portal/stylegraphics/info.gif)
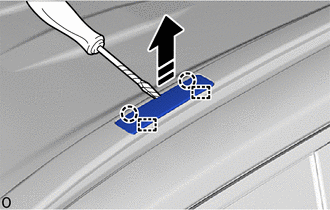
2. REMOVE NO. 1 ROOF SIDE GARNISH LID LH (except Off Road Package)
HINT:
Perform this procedure only if leaving the roof rack leg on the vehicle side.
(a) w/o Roof Carrier:

|
Remove in this Direction |

|
Protective Tape |
(1) Using needle-nose pliers with its tip wrapped with protective tape, detach the claw and guide to remove the No. 1 roof side garnish lid LH as shown in the illustration.
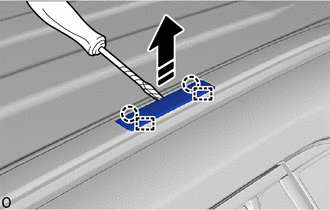
3. REMOVE NO. 2 ROOF SIDE GARNISH LID LH (except Off Road Package)
HINT:
Perform this procedure only if leaving the roof rack leg on the vehicle side.
(a) w/o Roof Carrier:
|
|
Remove in this Direction |
|
|
Protective Tape |
(1) Using needle-nose pliers with its tip wrapped with protective tape, detach the claw and guide to remove the No. 2 roof side garnish lid LH as shown in the illustration.
4. REMOVE ASSIST GRIP ASSEMBLY (except Off Road Package)
HINT:
Perform this procedure only if leaving the roof rack leg on the vehicle side.
Click here
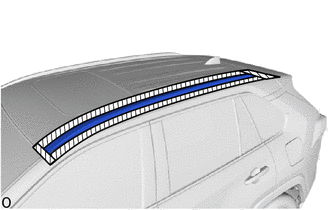
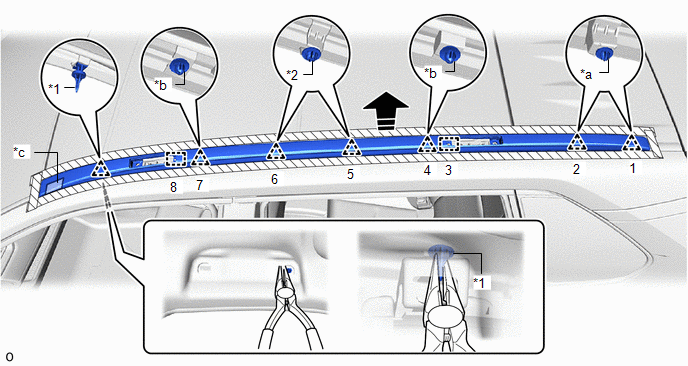
5. REMOVE FRONT ROOF SIDE GARNISH SUB-ASSEMBLY LH (except Off Road Package)
HINT:
Perform this procedure only if leaving the roof rack leg on the vehicle side.
(a) Put protective tape around the front roof side garnish sub-assembly LH.
|
|
Protective Tape |
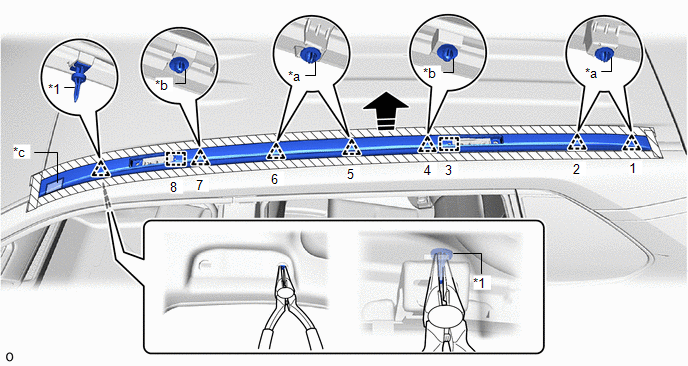
(b) Remove the 2 bolts.

(c) except Panoramic Moon Roof:
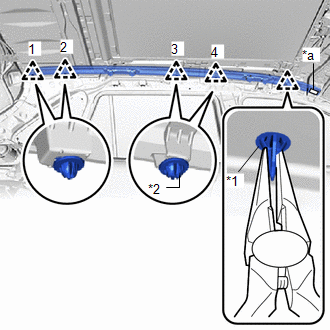
(1) Detach the guide and clip in the order shown in the illustration.
|
*1 |
Front Roof Rack Retainer LH |
- |
- |
|
*a |
Clip<A> |
*b |
Clip<B> |
|
*c |
Double-sided Tape |
- |
- |
|
|
Remove in this Direction |
- |
- |
NOTICE:
If the front roof side garnish sub-assembly LH has been removed, replace the clip<A> with a new one.
HINT:
Remove directly upward without twisting left/right.
(2) Insert needle-nose pliers No. 2 from the hole on the front side of the assist grip installation area and detach the front roof rack retainer LH.
(3) Detach the double-sided tape and remove the front roof side garnish sub-assembly LH.
(d) for Panoramic Moon Roof:
(1) Detach the guide and clip and rear roof rack retainer LH in the order shown in the illustration.
|
*1 |
Front Roof Rack Retainer LH |
*2 |
Rear Roof Rack Retainer LH |
|
*a |
Clip<A> |
*b |
Clip<B> |
|
*c |
Double-sided Tape |
- |
- |
|
|
Remove in this Direction |
- |
- |
NOTICE:
If the front roof side garnish sub-assembly LH has been removed, replace the clip<A> with a new one.
HINT:
Remove directly upward without twisting left/right.
(2) Insert needle-nose pliers No. 2 from the hole on the front side of the assist grip installation area and detach the front roof rack retainer LH.
(3) Detach the double-sided tape and remove the front roof side garnish sub-assembly LH.
6. REMOVE ROOF HEADLINING ASSEMBLY (except Off Road Package)
HINT:
Perform this procedure only if removing together with the roof rack leg.
Click here
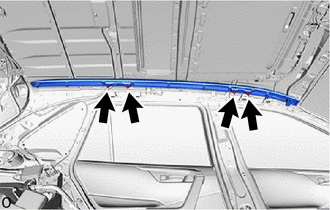
7. REMOVE ROOF SIDE RAIL GARNISH SUB-ASSEMBLY LH (except Off Road Package)
HINT:
Perform this procedure only if removing together with the roof rack leg.
(a) Put protective tape around the roof side rail garnish sub-assembly LH.
|
|
Protective Tape |
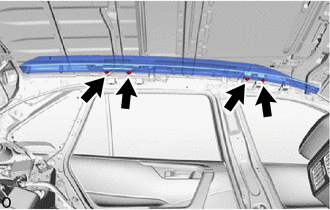
(b) except Panoramic Moon Roof:
|
(1) Remove the 4 nuts. |
|
|
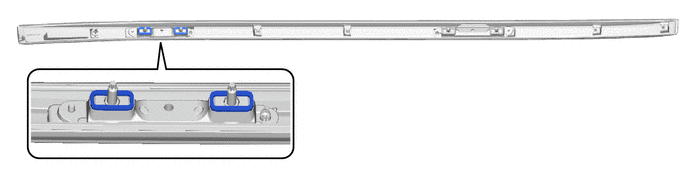
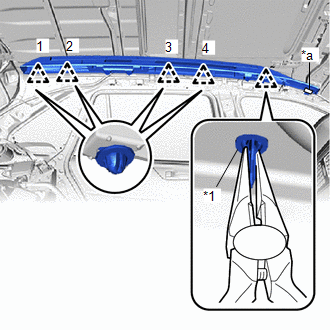
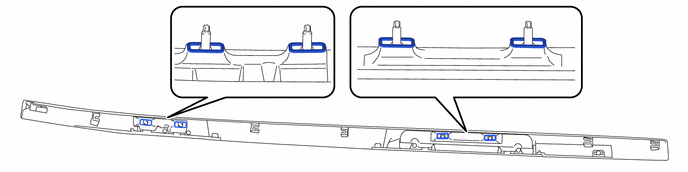
(2) Detach the clip in the order shown in the illustration. NOTICE: If the roof side rail garnish sub-assembly LH has been removed, replace the clip with a new one. |
|
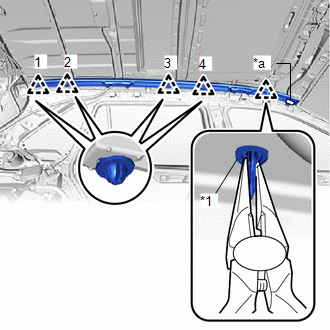
(3) Using a needle-nose pliers, detach the front roof rack retainer LH.
(4) Detach the double-sided tape and remove the roof side rail garnish sub-assembly LH.
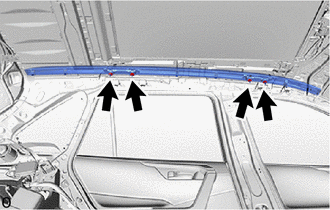
(c) for Panoramic Moon Roof:
|
(1) Remove the 4 nuts. |
|
|
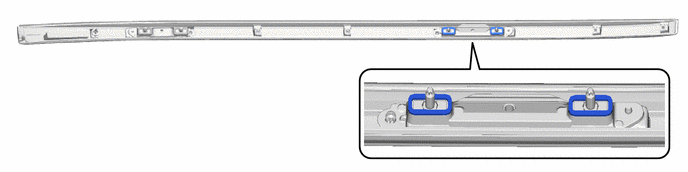
(2) Detach the clip and rear roof rack retainer LH in the order shown in the illustration. NOTICE: If the roof side rail garnish sub-assembly LH has been removed, replace the clip with a new one. |
|
(3) Using a needle-nose pliers, detach the front roof rack retainer LH.
(4) Detach the double-sided tape and remove the roof side rail garnish sub-assembly LH.
8. REMOVE NO. 1 ROOF CARRIER SEAL LH (except Off Road Package)
HINT:
- Perform this procedure only if removing together with the roof rack leg.
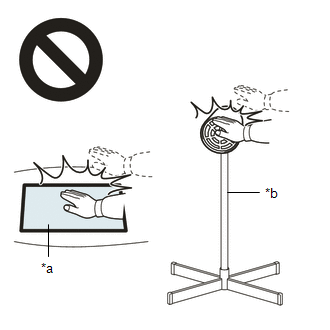
- When removing the No. 1 roof carrier seal LH, if the double-sided tape is difficult to remove, heat the adhesive of the No. 1 roof carrier seal LH using a heat light.
Standard:
|
Item |
Temperature |
|---|---|
|
No. 1 Roof Carrier Seal LH |
20 to 30°C (68 to 86°F) |
CAUTION:
- Do not touch the heat light and heated parts.
- Touching the heat light may result in burns.
- Touching heated parts for a long time may result in burns.
|
*a |
Heated Part |
|
*b |
Heat Light |
NOTICE:
Do not heat the No. 1 roof carrier seal LH excessively.
(a) Remove the 2 No. 1 roof carrier seals LH.
9. REMOVE NO. 2 ROOF CARRIER SEAL LH (except Off Road Package)
HINT:
- Perform this procedure only if removing together with the roof rack leg.
- When removing the No. 2 roof carrier seal LH, if the double-sided tape is difficult to remove, heat the adhesive of the No. 2 roof carrier seal LH using a heat light.
Standard:
|
Item |
Temperature |
|---|---|
|
No. 2 Roof Carrier Seal LH |
20 to 30°C (68 to 86°F) |
CAUTION:
- Do not touch the heat light and heated parts.
- Touching the heat light may result in burns.
- Touching heated parts for a long time may result in burns.
|
*a |
Heated Part |
|
*b |
Heat Light |
NOTICE:
Do not heat the No. 2 roof carrier seal LH excessively.
(a) Remove the 2 No. 2 roof carrier seals LH.
10. REMOVE FRONT ROOF SIDE RAIL PAD LH (except Off Road Package)
HINT:
When removing the front roof side rail pad LH, if the double-sided tape is difficult to remove, heat the adhesive of the front roof side rail pad LH using a heat light.
Standard:
|
Item |
Temperature |
|---|---|
|
Front Roof Side Rail Pad LH |
20 to 30°C (68 to 86°F) |
CAUTION:
- Do not touch the heat light and heated parts.
- Touching the heat light may result in burns.
- Touching heated parts for a long time may result in burns.
|
*a |
Heated Part |
|
*b |
Heat Light |
NOTICE:
Do not heat the front roof side rail pad LH excessively.
(a) Remove the front roof side rail pad LH as shown in the illustration.
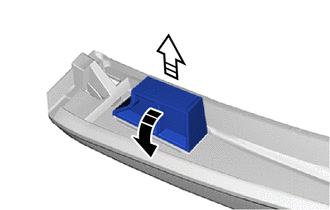
|
|
Remove in this Direction (1) |

|
Remove in this Direction (2) |
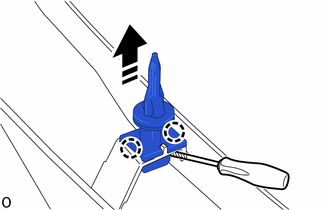
11. REMOVE FRONT ROOF RACK RETAINER LH (except Off Road Package)
(a) except Panoramic Moon Roof:
(1) Using a screwdriver, detach the claw and remove the front roof rack retainer LH.
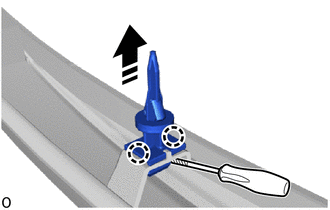
|
|
Remove in this Direction |
|
|
Protective Tape |
HINT:
Tape the screwdriver tip before use.
(b) for Panoramic Moon Roof:
(1) Using a screwdriver, detach the claw and remove the front roof rack retainer LH.
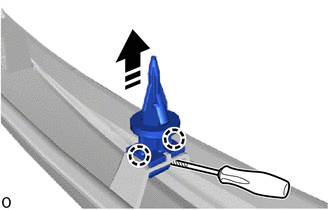
|
|
Remove in this Direction |
|
|
Protective Tape |
HINT:
Tape the screwdriver tip before use.
12. REMOVE REAR ROOF RACK RETAINER LH (except Off Road Package)
(a) for Panoramic Moon Roof:
(1) Detach the guide and remove the 2 rear roof rack retainers LH.
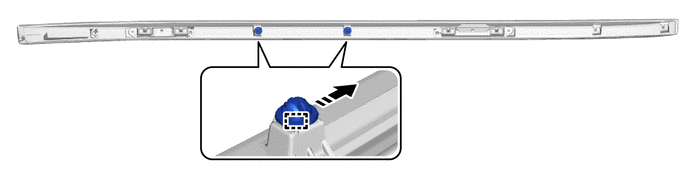
|
|
Remove in this Direction |
- |
- |
13. REMOVE ROOF SIDE RAIL GARNISH SUB-ASSEMBLY LH (for Off Road Package)
(a) Put protective tape around the roof side rail garnish sub-assembly LH.
|
|
Protective Tape |
|
(b) Remove the 4 nuts. |
|
|
(c) Detach the clip in the order shown in the illustration. NOTICE: If the roof side rail garnish sub-assembly LH has been removed, replace the clip with a new one. |
|
(d) Using a needle-nose pliers, detach the front roof rack retainer LH.
(e) Detach the double-sided tape and remove the roof side rail garnish sub-assembly LH.
14. REMOVE NO. 2 ROOF CARRIER SEAL LH (for Off Road Package)
HINT:
When removing the No. 2 roof carrier seal LH, if the double-sided tape is difficult to remove, heat the adhesive of the No. 2 roof carrier seal LH using a heat light.
Standard:
|
Item |
Temperature |
|---|---|
|
No. 2 Roof Carrier Seal LH |
20 to 30°C (68 to 86°F) |
CAUTION:
- Do not touch the heat light and heated parts.
- Touching the heat light may result in burns.
- Touching heated parts for a long time may result in burns.
|
*a |
Heated Part |
|
*b |
Heat Light |
NOTICE:
Do not heat the No. 2 roof carrier seal LH excessively.
(a) Remove the 4 No. 2 roof carrier seals LH.
15. REMOVE FRONT ROOF SIDE RAIL PAD LH (for Off Road Package)
HINT:
When removing the front roof side rail pad LH, if the double-sided tape is difficult to remove, heat the adhesive of the front roof side rail pad LH using a heat light.
Standard:
|
Item |
Temperature |
|---|---|
|
Front Roof Side Rail Pad LH |
20 to 30°C (68 to 86°F) |
CAUTION:
- Do not touch the heat light and heated parts.
- Touching the heat light may result in burns.
- Touching heated parts for a long time may result in burns.
|
*a |
Heated Part |
|
*b |
Heat Light |
NOTICE:
Do not heat the front roof side rail pad LH excessively.
(a) Remove the front roof side rail pad LH as shown in the illustration.

|
|
Remove in this Direction (1) |
|
|
Remove in this Direction (2) |
16. REMOVE FRONT ROOF RACK RETAINER LH (for Off Road Package)
(a) Using a screwdriver, detach the claw and remove the front roof rack retainer LH.
HINT:
Tape the screwdriver tip before use.
|
|
Remove in this Direction |
|
|
Protective Tape |
|
|
|