| Last Modified: 01-30-2024 | 6.11:8.1.0 | Doc ID: RM100000001EF61 |
| Model Year Start: 2019 | Model: RAV4 | Prod Date Range: [11/2018 - 02/2019] |
| Title: EXTERIOR PANELS / TRIM: REAR BUMPER: INSTALLATION; 2019 MY RAV4 RAV4 HV [11/2018 - 02/2019] | ||
INSTALLATION
CAUTION / NOTICE / HINT
HINT:
-
If the bumper is damaged, there is a possibility that the installation area of the blind spot monitor sensor may be deformed and the blind spot monitor system may not operate correctly, so visually inspect the blind spot monitor sensor installation area (frame, stud bolt) to make sure it is not dented or bent.
Click here
![2019 - 2024 MY RAV4 RAV4 HV [11/2018 - ]; PARK ASSIST / MONITORING: BLIND SPOT MONITOR SENSOR: ADJUSTMENT](/t3Portal/stylegraphics/info.gif)
- If the visual inspection finds a problem, check the installation condition of the blind spot monitor sensor, and adjust the installation position of the blind spot monitor sensor as necessary.
-
When the rear bumper is damaged or deformed due to an accident or contact with other objects, etc., or the bumper installation area on the body is repaired, it is necessary to perform ultrasonic sensor detection angle measurement.
Click here
PROCEDURE
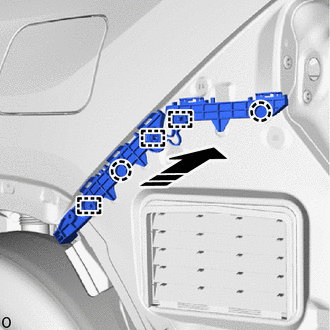
1. INSTALL REAR BUMPER REINFORCEMENT SUB-ASSEMBLY (for Type A)
(a) Attach the guide to set the rear bumper reinforcement sub-assembly.
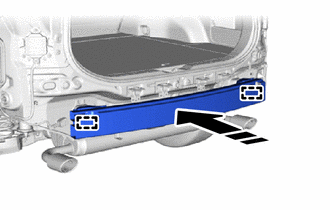

|
Install in this Direction |
|
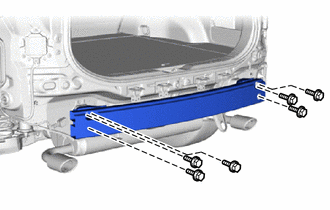
(b) Install the rear bumper reinforcement sub-assembly with the 6 bolts. Torque: 29 N·m {296 kgf·cm, 21 ft·lbf} |
|
2. INSTALL REAR BUMPER REINFORCEMENT SUB-ASSEMBLY (for Type B)
(a) Attach the guide to set the rear bumper reinforcement sub-assembly.
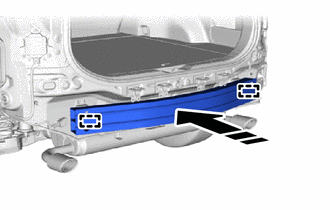
|
|
Install in this Direction |
|
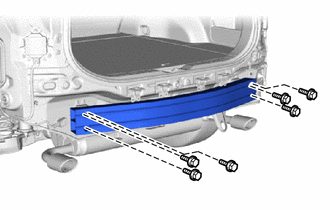
(b) Install the rear bumper reinforcement sub-assembly with the 6 bolts. Torque: 29 N·m {296 kgf·cm, 21 ft·lbf} |
|
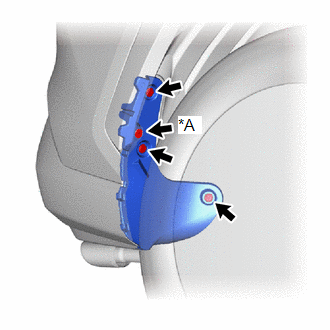
3. INSTALL REAR BUMPER SIDE SUPPORT LH
(a) Attach the guide and claw to install the rear bumper side support LH.
|
|
Install in this Direction |
|
(b) Install the clip. |
|

(c) Install the 2 screws.
4. INSTALL REAR BUMPER SIDE SUPPORT RH
HINT:
Use the same procedure for the RH and LH side.
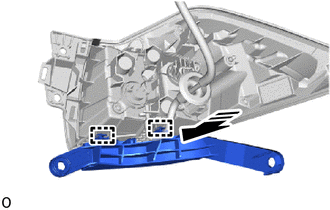
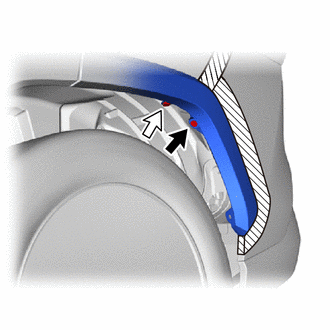
5. INSTALL REAR BUMPER UPPER RETAINER LH
|
|
Install in this Direction |
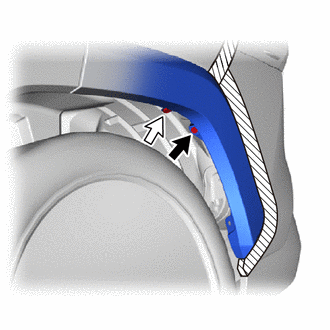
(a) Attach the guide to install the rear bumper upper retainer LH to the rear combination light assembly LH.
6. INSTALL REAR BUMPER UPPER RETAINER RH
HINT:
Use the same procedure for the RH and LH side.
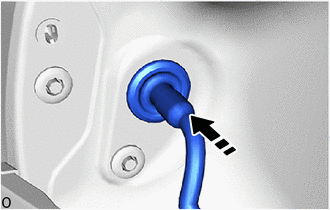
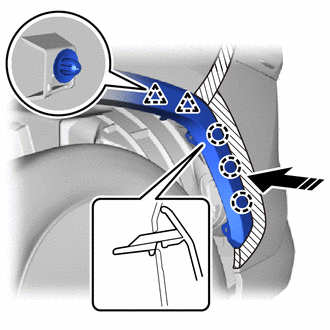
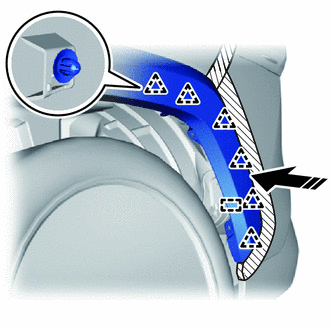
7. INSTALL REAR COMBINATION LIGHT ASSEMBLY LH
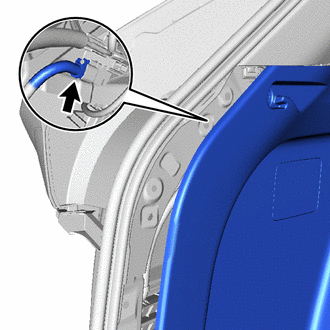
(a) Pass the wire harness into the vehicle and install the grommet.
|
|
Install in this Direction |
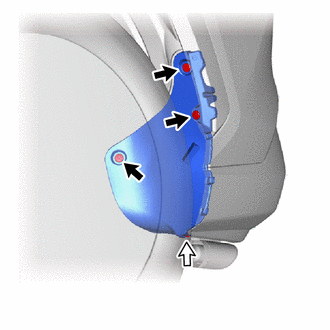
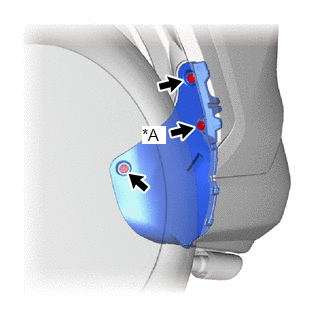
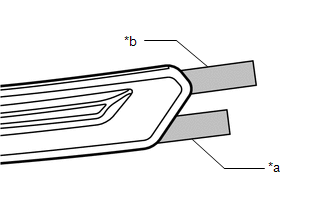
(b) Align the guide and pin to set the rear combination light assembly LH.

|
*a |
Pin |
|
*b |
Guide |
|
|
Push in this Direction |
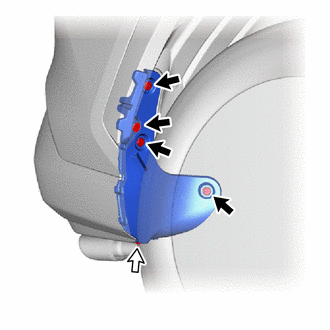
(c) Push the rear combination light assembly LH towards the vehicle front to attach the pin and guide.
(d) Install the 2 screws.
|
(e) Install the 2 screws. |
|
|
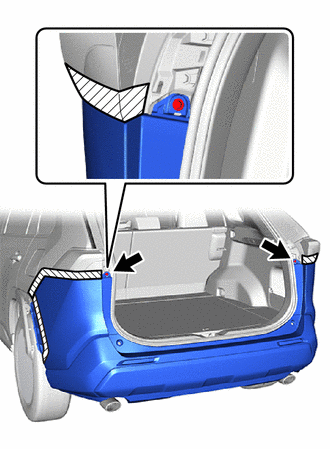
(f) Insert your hand between the deck trim side panel assembly LH and the body and connect the connector. |
|
8. INSTALL REAR COMBINATION LIGHT ASSEMBLY RH
HINT:
Use the same procedure for the RH and LH side.
9. INSTALL DECK TRIM SIDE PANEL ASSEMBLY LH
(a) Return the rear side of the deck trim side panel assembly LH to its original position.
Click here
10. INSTALL DECK TRIM SIDE PANEL ASSEMBLY RH
HINT:
Use the same procedure for the RH and LH side.
11. INSTALL LUGGAGE HOLD BELT STRIKER ASSEMBLY
Click here
12. INSTALL REAR FLOOR FINISH PLATE
Click here
13. INSTALL REAR NO. 3 FLOOR BOARD
Click here
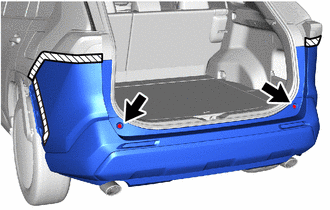
14. INSTALL REAR BUMPER ASSEMBLY
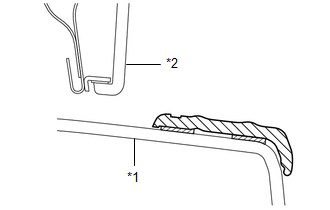
(a) Attach the claw and back door garnish retainer to set the rear bumper assembly.
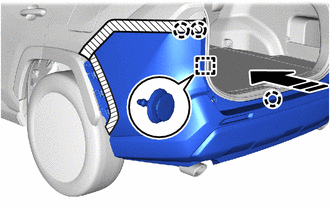
|
|
Install in this Direction |
HINT:
Use the same procedure for the RH and LH side.
(b) Attach the claw.
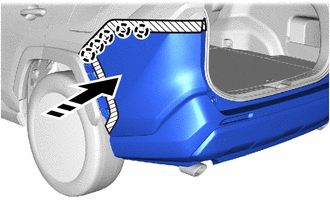
|
|
Install in this Direction |
HINT:
Use the same procedure for the RH and LH side.
|
(c) Install the 2 clips. |
|
|
(d) Install the 2 screws. |
|
(e) except Off Road Package:
|
(1) Install the clip. HINT: Use the same procedure for the RH and LH side. |
|
(f) for Off Road Package:
|
(1) Install the clip. HINT: Use the same procedure for the RH and LH side. |
|
|
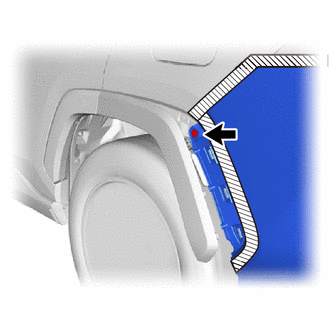
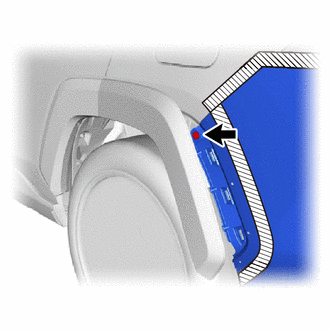
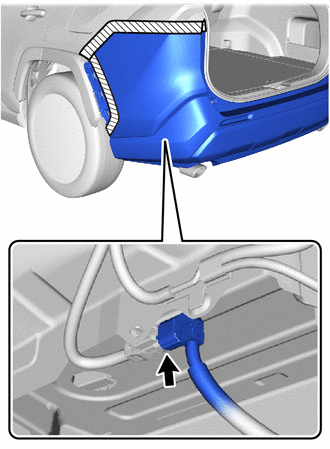
(g) w/ Intuitive Parking Assist System, w/ Hands Free Power Back Door: (1) Connect the connector. |
|
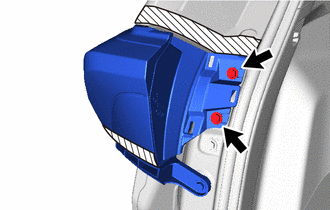
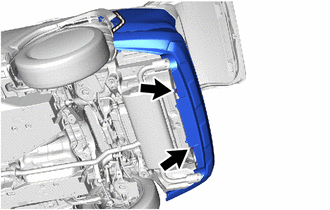
15. INSTALL REAR BUMPER UPPER STOPPER
|
(a) Install the 2 rear bumper upper stoppers. |
|
16. INSTALL REAR COMBINATION LIGHT COVER LH
Click here
17. INSTALL REAR COMBINATION LIGHT COVER RH
HINT:
Use the same procedure for the RH and LH side.
18. INSTALL QUARTER OUTSIDE MOULDING SUB-ASSEMBLY LH
(a) except Off Road Package:
(1) Attach the claw and clip to install the quarter outside moulding sub-assembly LH.
|
|
Install in this Direction |
(2) Install the screw.

|
Screw |

|
Clip |
(3) Install the clip.
(4) Remove the protective tape.
(b) for Off Road Package:
(1) Attach the guide and clip to install the quarter outside moulding sub-assembly LH.
|
|
Install in this Direction |
(2) Install the screw.
|
|
Screw |
|
|
Clip |
(3) Install the clip.
(4) Remove the protective tape.
19. INSTALL QUARTER OUTSIDE MOULDING SUB-ASSEMBLY RH
HINT:
Use the same procedure for the RH and LH side.
20. INSTALL REAR BUMPER SIDE SEAL LH
(a) w/o Mudguard:
|
|
Clip |
|
|
Screw |
(1) Install the rear bumper side seal LH with the 3 clips.
(2) Install the screw.
|
(b) w/ Mudguard: (1) for Short Type: Install the rear bumper side seal LH with the 3 clips. (2) for Long Type: Install the rear bumper side seal LH with the 2 clips. |
|
21. INSTALL REAR BUMPER SIDE SEAL RH
(a) w/o Mudguard:
|
|
Clip |
|
|
Screw |
(1) Install the rear bumper side seal RH with the 4 clips.
(2) Install the screw.
|
(b) w/ Mudguard: (1) for Short Type: Install the rear bumper side seal RH with the 4 clips. (2) for Long Type: Install the rear bumper side seal RH with the 3 clips. |
|
22. INSTALL REAR QUARTER PANEL MUDGUARD LH (w/ Mudguard)
(a) for Short Type:
Click here
(b) for Long Type:
Click here
23. INSTALL REAR QUARTER PANEL MUDGUARD RH (w/ Mudguard)
HINT:
Use the same procedure for the RH and LH side.
24. INSTALL REAR BUMPER PROTECTOR (w/ Bumper Protector)
HINT:
When installing a new rear bumper protector, heat the rear bumper assembly and rear bumper protector using a heat light.
Standard:
|
Item |
Temperature |
|---|---|
|
Rear Bumper Assembly |
15 to 43°C (60 to 109°F) |
|
Rear Bumper Protector |
15 to 43°C (60 to 109°F) |
CAUTION:
- Do not touch the heat light and heated parts.
- Touching the heat light may result in burns.
- Touching heated parts for a long time may result in burns.
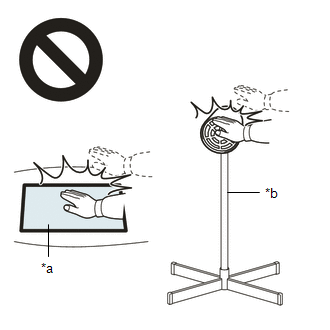
|
*a |
Heated Part |
|
*b |
Heat Light |
NOTICE:
Do not heat the rear bumper assembly and rear bumper protector excessively.
(a) When reusing the rear bumper assembly surface.
(1) Using a heat light, heat the rear bumper assembly surface.
(2) Remove any remaining double-sided tape from the rear bumper assembly.
(3) Wipe off any tape adhesive residue with cleaner.
NOTICE:
- Installing the rear bumper protector with some double-sided tape remaining may cause poor adhesion. Perform this procedure until the tape is sufficiently removed.
- Make sure to use a cloth when removing. Using a screwdriver, etc., may cause damage and poor adhesion.
- Also, clean a new rear bumper assembly surface.
|
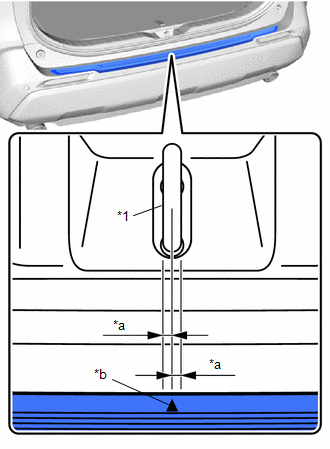
(b) Align the new rear bumper protector with the edge of the rear bumper assembly. |
|
|
(c) Align the arrow at the center of the rear bumper protector to within 3.5 mm (0.137 in.) of the center of the back door lock striker assembly. |
|
|
(d) While holding the rear bumper protector in position, pull off release paper 1. |
|
(e) While holding the rear bumper protector in position, pull off release paper 2 and install the rear bumper protector.
HINT:
Press the rear bumper protector firmly to install it.
25. CONNECT CABLE TO NEGATIVE AUXILIARY BATTERY TERMINAL (w/ Hands Free Power Back Door)
(a) for A25A-FXS:
Click here
(b) for A25A-FKS:
Click here
NOTICE:
When disconnecting the cable, some systems need to be initialized after the cable is reconnected.
Click here
26. INSTALL BATTERY HOLE COVER (for HV Model, w/ Hands Free Power Back Door)
Click here
27. INSTALL REAR NO. 2 FLOOR BOARD
Click here
28. INSTALL DECK BOARD ASSEMBLY (for HV Model, w/ Hands Free Power Back Door)
Click here
29. CHECK KICK DOOR CONTROL SENSOR (w/ Hands Free Power Back Door)
(a) for HV Model:
Click here
(b) for Gasoline Model:
Click here
|
|
|