| Last Modified: 01-30-2024 | 6.11:8.1.0 | Doc ID: RM100000001EBSS |
| Model Year Start: 2019 | Model: RAV4 | Prod Date Range: [11/2018 - 08/2020] |
| Title: SUPPLEMENTAL RESTRAINT SYSTEMS: STEERING PAD: INSTALLATION; 2019 - 2020 MY RAV4 RAV4 HV [11/2018 - 08/2020] | ||
INSTALLATION
PROCEDURE
1. INSTALL HORN BUTTON ASSEMBLY
(a) Check that the ignition switch is off.
(b) Check that the cable is disconnected from the negative (-) auxiliary battery terminal.
CAUTION:
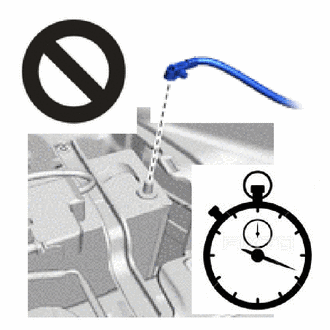
- Wait at least 90 seconds after disconnecting the cable from the negative (-) auxiliary battery terminal to disable the SRS system.
- If the airbag deploys for any reason, it may cause a serious accident.

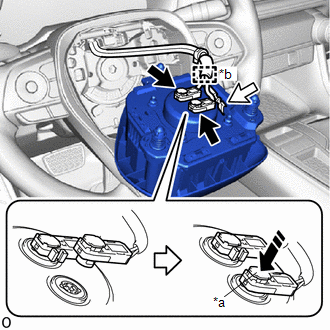
(c) for Dual Type:

|
*a |
Lock Button |
|
*b |
Wire Harness Clamp |

|
Airbag Connector |

|
Horn Connector |

|
Push |
(1) Support the horn button assembly with one hand.
(2) Connect the horn connector and attach the wire harness clamp.
(3) Connect the 2 airbag connectors and push the lock button.
NOTICE:
- When connecting any airbag connector, take care not to damage the airbag wire harness.
- Be sure to connect the connectors to each corresponding color.
- Make sure the lock button is securely locked.
(4) Set the horn button assembly to the steering wheel assembly.
(5) Check that the airbag wire harness and horn wire harness are not pinched.
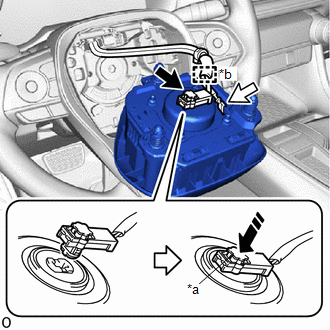
(d) for Single Type:

|
*a |
Lock Button |
|
*b |
Wire Harness Clamp |

|
Airbag Connector |

|
Horn Connector |

|
Push |
(1) Support the horn button assembly with one hand.
(2) Connect the horn connector and attach the wire harness clamp.
(3) Connect the airbag connector and push the lock button.
NOTICE:
- When connecting any airbag connector, take care not to damage the airbag wire harness.
- Make sure the lock button is securely locked.
(4) Set the horn button assembly to the steering wheel assembly.
(5) Check that the airbag wire harness and horn wire harness are not pinched.
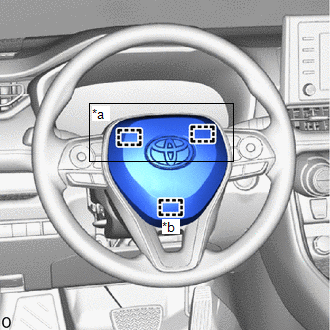
|
(e) Press the horn button assembly with both hands to attach the upper pin to the upper spring. |
|
(f) Press the horn button assembly with both hands to attach the lower pin to the lower spring.
NOTICE:
After installation, try to pull the horn button assembly and check that the horn button assembly is securely installed.
2. CONNECT CABLE TO NEGATIVE AUXILIARY BATTERY TERMINAL
NOTICE:
When disconnecting the cable, some systems need to be initialized after the cable is reconnected.
3. INSTALL BATTERY HOLE COVER (for HV Model)
4. INSTALL REAR NO. 2 FLOOR BOARD (for HV Model)
5. INSTALL DECK BOARD ASSEMBLY (for HV Model)
6. PERFORM DIAGNOSTIC SYSTEM CHECK
7. CHECK SRS WARNING LIGHT
8. PERFORM SYSTEM INITIALIZATION AND CALIBRATION
9. INSPECT HORN BUTTON ASSEMBLY
(a) Make sure that the horn sounds.
If the horn does not sound, inspect the horn system.
|
|
|

![2019 - 2023 MY RAV4 [11/2018 - 10/2023]; MAINTENANCE: A25A-FKS BATTERY: INSTALLATION+](/t3Portal/stylegraphics/info.gif)