- Ultrasonic sensor detection angle
- Steering angle neutral point
- Bumper type registration
- Ultrasonic sensor detection angle registration
| Last Modified: 01-30-2024 | 6.11:8.1.0 | Doc ID: RM100000001E7MC |
| Model Year Start: 2019 | Model: RAV4 | Prod Date Range: [11/2018 - 02/2019] |
| Title: PARK ASSIST / MONITORING: CLEARANCE WARNING ECU: REMOVAL; 2019 MY RAV4 RAV4 HV [11/2018 - 02/2019] | ||
REMOVAL
CAUTION / NOTICE / HINT
The necessary procedures (adjustment, calibration, initialization or registration) that must be performed after parts are removed and installed, or replaced during clearance warning ECU assembly removal/installation are shown below.
|
Replaced Part or Performed Procedure |
Necessary Procedure |
Effect/Inoperative Function when Necessary Procedure not Performed |
Link |
|---|---|---|---|
|
Clearance warning ECU assembly |
|
|
|
PROCEDURE
1. REMOVE CONSOLE BOX ASSEMBLY
Click here
![2019 - 2021 MY RAV4 RAV4 HV [11/2018 - 12/2021]; INTERIOR PANELS / TRIM: FRONT CONSOLE BOX: REMOVAL](/t3Portal/stylegraphics/info.gif)
2. REMOVE FRONT DOOR SCUFF PLATE RH
HINT:
Use the same procedure described for the LH side.
Click here
3. REMOVE COWL SIDE TRIM BOARD RH
Click here
4. REMOVE NO. 2 INSTRUMENT PANEL UNDER COVER SUB-ASSEMBLY
Click here
5. REMOVE GLOVE COMPARTMENT DOOR ASSEMBLY
Click here
6. REMOVE LOWER NO. 2 INSTRUMENT PANEL FINISH PANEL
Click here
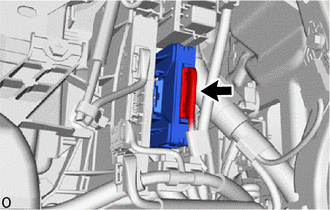
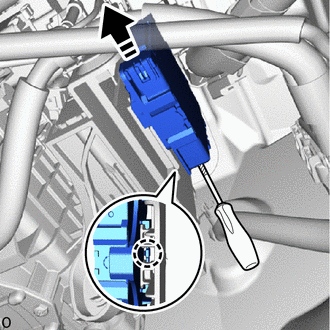
7. REMOVE CLEARANCE WARNING ECU ASSEMBLY
|
(a) Disconnect the 2 connectors. |
|
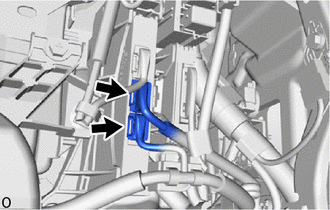
|
(b) Disconnect the connector. |
|
(c) Using a screwdriver, detach the claw and remove the clearance warning ECU assembly as shown in the illustration.

|
Remove in this Direction |

|
Protective Tape |
HINT:
Tape the screwdriver tip before use.
|
|
|