| Last Modified: 01-30-2024 | 6.11:8.1.0 | Doc ID: RM100000001E6IN |
| Model Year Start: 2019 | Model: RAV4 | Prod Date Range: [11/2018 - 10/2019] |
| Title: UB80E (AUTOMATIC TRANSMISSION / TRANSAXLE): TRANSMISSION WIRE: REMOVAL; 2019 MY RAV4 [11/2018 - 10/2019] | ||
REMOVAL
PROCEDURE
1. REMOVE FRONT FENDER FRONT SPLASH SHIELD LH
Click here
![2019 MY RAV4 [11/2018 - 10/2019]; A25A-FKS (ENGINE MECHANICAL): ENGINE ASSEMBLY: REMOVAL+](/t3Portal/stylegraphics/info.gif)
2. REMOVE FRONT FENDER FRONT SPLASH SHIELD RH
Click here
3. REMOVE NO. 1 ENGINE UNDER COVER
Click here
4. REMOVE NO. 2 ENGINE UNDER COVER ASSEMBLY
Click here
5. REMOVE FRONT FENDER APRON SEAL LH
Click here
6. DRAIN AUTOMATIC TRANSAXLE FLUID
|
(a) Remove the refill plug and gasket from the automatic transaxle case sub-assembly. |
|

|
(b) Using a 10 mm hexagon socket wrench, remove the overflow plug and gasket from the transaxle housing. |
|
|
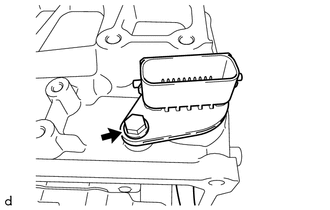
(c) Using a 6 mm hexagon socket wrench, remove the No. 1 transmission oil filler tube from the transaxle housing and drain the automatic transaxle fluid. |
|
(d) Using a 6 mm hexagon socket wrench, install the No. 1 transmission oil filler tube to the transaxle housing.
Torque:
1.7 N·m {17 kgf·cm, 15 in·lbf}
(e) Using a 10 mm hexagon socket wrench, temporarily install the gasket and overflow plug to the transaxle housing.
HINT:
Reuse the old gasket as the overflow plug will be removed again to adjust the automatic transaxle fluid level.
(f) Temporarily install the gasket and refill plug to avoid automatic transaxle fluid spillage.
HINT:
Reuse the old gasket as the refill plug will be removed again to adjust the automatic transaxle fluid level.
7. REMOVE VACUUM SWITCHING VALVE (for Active Control Engine Mount System)
Click here
8. REMOVE FRONT ENGINE MOUNTING INSULATOR
Click here
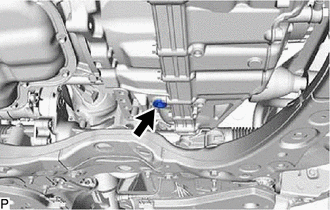
9. SEPARATE OIL COOLER UNION SUB-ASSEMBLY
|
(a) Remove the bolt to separate the oil cooler union sub-assembly bracket portion from the automatic transaxle case sub-assembly. |
|
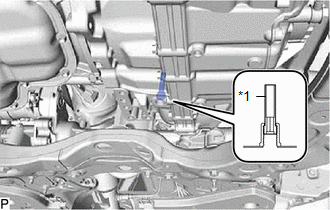
(b) Remove the oil cooler union bolt and 2 gaskets to separate the oil cooler union sub-assembly from the automatic transaxle case sub-assembly.
10. REMOVE TRANSMISSION CASE SIDE COVER
|
(a) Remove the 10 bolts and transmission case side cover from the automatic transaxle case sub-assembly. |
|
11. REMOVE TRANSMISSION WIRE
|
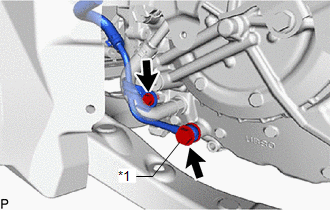
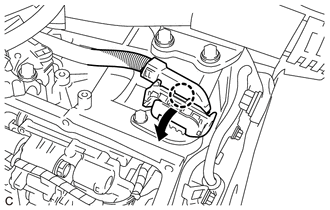
(a) Disengage the claw, rotate the lever and disconnect the transmission wire connector. |
|
|
(b) Disengage the clamp to disconnect the transmission wire from the solenoid lock plate. |
|
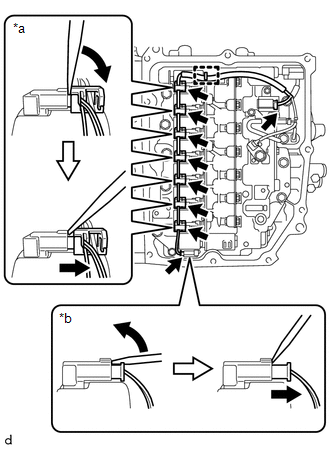
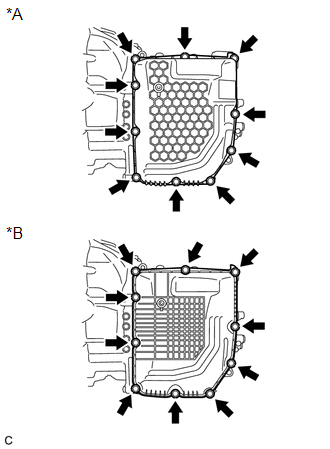
(c) Disconnect the 9 solenoid valve connectors.
HINT:
- Using a screwdriver, disconnect the solenoid valve connector (A) using the procedure shown in the illustration.
- Using a screwdriver, disconnect the solenoid valve connector (B) using the procedure shown in the illustration.
|
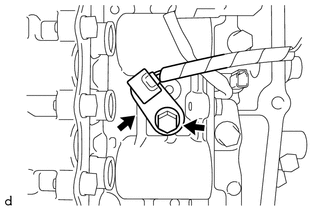
(d) Remove the bolt and temperature sensor clamp and disconnect the temperature sensor from the transmission valve body assembly. |
|
|
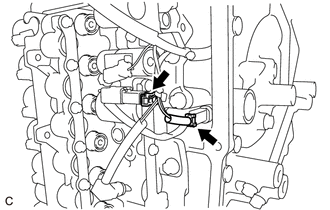
(e) Disconnect the transmission revolution sensor (NT) connector and transmission revolution sensor (NC) connector. |
|
|
(f) Remove the bolt and transmission wire from the automatic transaxle case sub-assembly. |
|
|
|
|