| Last Modified: 08-21-2023 | 6.11:8.1.0 | Doc ID: RM100000001YZCH |
| Model Year Start: 2022 | Model: Avalon | Prod Date Range: [08/2021 - ] |
| Title: MAINTENANCE: 2GR-FKS OIL AND OIL FILTER: REPLACEMENT; 2022 MY Avalon [08/2021 - ] | ||
REPLACEMENT
CAUTION / NOTICE / HINT
CAUTION:
- Prolonged and repeated contact with engine oil will result in the removal of natural oils from the skin, leading to dryness, irritation and dermatitis. In addition, used engine oil contains potentially harmful contaminants which may cause skin cancer.
- Wear protective clothing and gloves. Avoid contact with used oil. If contact occurs, wash your skin thoroughly with soap or waterless hand cleaner. Never use gasoline, thinners, or solvents to wash the skin.
- In order to protect the environment, dispose of used engine oil and used engine oil filters at designated disposal sites only.
PROCEDURE
1. REMOVE FRONT WHEEL OPENING EXTENSION PAD LH
Click here
![2022 MY Avalon [08/2021 - ]; 2GR-FKS (ENGINE MECHANICAL): ENGINE ASSEMBLY: REMOVAL+](/t3Portal/stylegraphics/info.gif)
2. REMOVE FRONT WHEEL OPENING EXTENSION PAD RH
Click here
3. REMOVE NO. 1 ENGINE UNDER COVER
Click here
4. REMOVE REAR ENGINE UNDER COVER RH
Click here
5. DRAIN ENGINE OIL
(a) Remove the oil filler cap sub-assembly.
(b) Remove the oil pan drain plug and gasket, and drain the engine oil into a container.
(c) Clean the oil pan drain plug.
(d) Install a new gasket to the oil pan drain plug.
(e) Install the oil pan drain plug.
Torque:
40 N·m {408 kgf·cm, 30 ft·lbf}
6. REMOVE OIL FILTER CAP ASSEMBLY
|
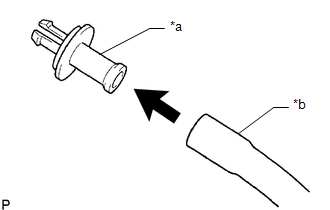
(a) Connect a hose with an inside diameter of 15 mm (0.591 in.) to the pipe. |
|
|
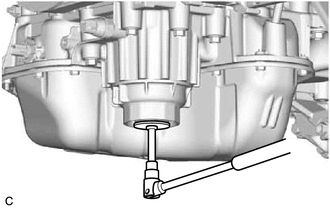
(b) Remove the oil filter drain plug from the oil filter cap assembly. |
|
|
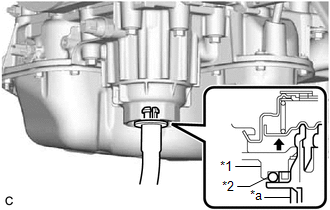
(c) Insert the pipe with hose into the oil filter cap assembly. NOTICE: Be sure to insert the pipe with the O-ring installed to the oil filter cap assembly. HINT: Place the hose end into a container before draining the engine oil from the hose. |
|
|
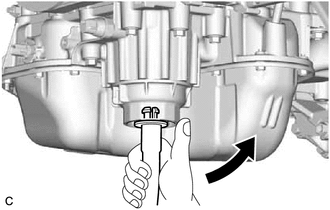
(d) Make sure that the engine oil is completely drained, and remove the pipe with hose and O-ring. HINT: Pull the pipe with hose as shown in the illustration to remove it. |
|
|
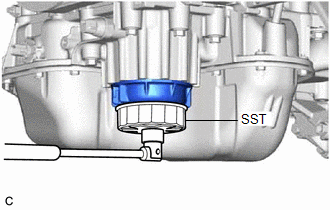
(e) Using SST, remove the oil filter cap assembly. SST: 09228-06502 |
|
|
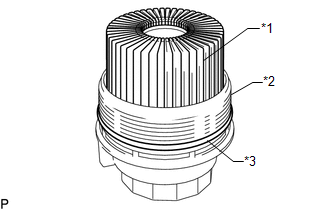
(f) Remove the oil filter element and O-ring from the oil filter cap assembly. NOTICE: Do not use any tools to remove the O-ring in order to prevent the oil filter cap assembly from being damaged. Be sure to remove it by hand. |
|
7. INSTALL OIL FILTER CAP ASSEMBLY
(a) Clean the inside of the oil filter cap assembly, the threads and O-ring groove.
|
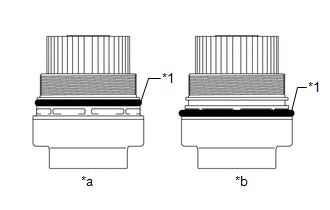
(b) Apply a small amount of engine oil to a new O-ring and install it to the oil filter cap assembly. NOTICE:
|
|
(c) Set a new oil filter element in the oil filter cap assembly.
(d) Remove any dirt or foreign matter from the installation surface of the engine.
(e) Apply a small amount of engine oil to the O-ring again and install the oil filter cap assembly.
NOTICE:
Make sure that the O-ring does not get caught between the parts.
|
(f) Using SST, tighten the oil filter cap assembly. SST: 09228-06502 Torque: 25 N·m {255 kgf·cm, 18 ft·lbf} NOTICE:
|
|

|
(g) Apply a small amount of engine oil to a new O-ring and install it to the oil filter cap assembly. NOTICE: Remove any dirt or foreign matter from the installation surface. |
|
(h) Install the oil filter drain plug to the oil filter cap assembly.
Torque:
12.5 N·m {127 kgf·cm, 9 ft·lbf}
NOTICE:
Make sure that the O-ring does not get caught between the parts.
8. ADD ENGINE OIL
|
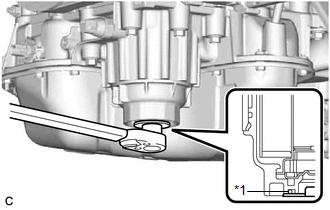
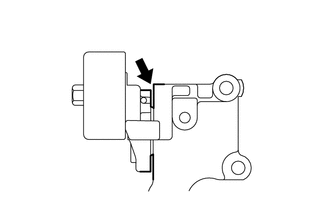
(a) Add clean engine oil and install the oil filler cap sub-assembly. NOTICE: Do not allow engine oil to adhere to the moving parts of the belt tensioner, as this may cause malfunctions. If engine oil is on the location indicated by the arrow, replace the belt tensioner. Standard Oil Grade:
Standard Capacity:
|
|
9. INSPECT FOR ENGINE OIL LEAK
(a) Start the engine. Make sure that there are no engine oil leaks from the area that was worked on.
10. CHECK ENGINE OIL LEVEL
Click here
11. INSTALL REAR ENGINE UNDER COVER RH
Click here
12. INSTALL NO. 1 ENGINE UNDER COVER
Click here
13. INSTALL FRONT WHEEL OPENING EXTENSION PAD LH
Click here
14. INSTALL FRONT WHEEL OPENING EXTENSION PAD RH
Click here
|
|
|