| 
                     
                        | Last Modified: 08-21-2023 | 6.11:8.1.0 | Doc ID: RM100000001YOJJ |  
                        | Model Year Start: 2022 | Model: Avalon HV | Prod Date Range: [08/2021 -                    
                                       ] |  
                        | Title: HYBRID / BATTERY CONTROL: FRAME WIRE: REMOVAL; 2022 MY Avalon HV [08/2021 -        ] |  REMOVALCAUTION / NOTICE / HINTThe necessary procedures (adjustment, calibration, initialization or registration) that must be performed after parts are removed and installed, or replaced during HV floor under wire removal/installation are shown below. Necessary Procedures After Parts Removed/Installed/Replaced


                           | Replaced Part or Performed Procedure | Necessary Procedure | Effect/Inoperative Function when Necessary Procedure not Performed | Link |  
                           
                         
                           | Auxiliary battery terminal is disconnected/reconnected | Perform steering sensor zero point calibration | Lane Tracing Assist System | 


                                          ![2022 MY Avalon Avalon HV [08/2021 -        ]; PRE-COLLISION: PRE-COLLISION SYSTEM: INITIALIZATION](/t3Portal/stylegraphics/info.gif)  |  
                           | Pre-collision system |  
                           | Intelligent clearance sonar system* |  
                           | Lighting System (for HV Model with Cornering Light) |  
                           | Memorize steering angle neutral point | Parking assist monitor system | 


                                          ![2019 - 2022 MY Avalon HV [04/2018 -        ]; PARK ASSIST / MONITORING: PARKING ASSIST MONITOR SYSTEM(for HV Model): INITIALIZATION](/t3Portal/stylegraphics/info.gif)  |  
                           | Panoramic view monitor system | 


                                          ![2019 - 2022 MY Avalon HV [04/2018 -        ]; PARK ASSIST / MONITORING: PANORAMIC VIEW MONITOR SYSTEM (for HV Model): INITIALIZATION](/t3Portal/stylegraphics/info.gif)  |  
                           | 
                                 
                                    
Replacement of air fuel ratio sensor
Gas leak from exhaust system is repaired
 | Inspection After Repair | 
                                 
                                    
Poor idle, etc.
Engine start function, etc.
 | 


                                          ![2022 MY Avalon HV [08/2021 -        ]; A25A-FXS (ENGINE CONTROL): SFI SYSTEM: INITIALIZATION](/t3Portal/stylegraphics/info.gif)  |  NOTICE: After turning the power switch off, waiting time may be required before disconnecting the cable from the negative (-) auxiliary battery terminal. Therefore, make sure to read the disconnecting the cable from the negative (-) auxiliary battery terminal notices before proceeding with work. Click here
                        
                           
                              ![2019 - 2022 MY Avalon Avalon HV [04/2018 -        ]; INTRODUCTION: REPAIR INSTRUCTION: PRECAUTION](/t3Portal/stylegraphics/info.gif)  PROCEDURE1. REMOVE SERVICE PLUG GRIP Click here
                        
                           
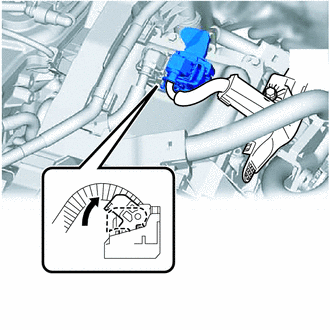
                              ![2022 MY Avalon HV [08/2021 -        ]; HYBRID / BATTERY CONTROL: SERVICE PLUG GRIP: REMOVAL](/t3Portal/stylegraphics/info.gif)  2. DISCONNECT ENGINE ROOM MAIN WIRE CAUTION: Be sure to wear insulated gloves. NOTICE: Do not allow any foreign matter or water to enter the inverter with converter assembly. 
                     
                        
                           | (a) Move the lock lever while pushing the lock on the connector, and disconnect the inverter with converter assembly connector. 
                                 NOTICE: 
                                    
Do not damage the terminals, connector housing or inverter with converter assembly during disconnection.
Cover the hole where the cable was connected with tape (non-residue type) or equivalent to prevent entry of foreign matter.
Insulate the disconnected terminals with insulating tape.
Do not touch the waterproof seal or terminals of the connector.
 |  |  3. REMOVE CONNECTOR COVER ASSEMBLY Click here
                        
                           
                              ![2022 MY Avalon HV [08/2021 -        ]; HYBRID / BATTERY CONTROL: INVERTER WITH CONVERTER: REMOVAL+](/t3Portal/stylegraphics/info.gif)  4. CHECK TERMINAL VOLTAGE Click here
                        
                           
                              ![2022 MY Avalon HV [08/2021 -        ]; HYBRID / BATTERY CONTROL: INVERTER WITH CONVERTER: REMOVAL+](/t3Portal/stylegraphics/info.gif)  5. TEMPORARILY INSTALL CONNECTOR COVER ASSEMBLY Click here
                        
                           
                              ![2022 MY Avalon HV [08/2021 -        ]; HYBRID / BATTERY CONTROL: INVERTER WITH CONVERTER: REMOVAL+](/t3Portal/stylegraphics/info.gif)  6. DISCONNECT FLOOR UNDER WIRE Click here
                        
                           
                              ![2022 MY Avalon HV [08/2021 -        ]; HYBRID / BATTERY CONTROL: INVERTER WITH CONVERTER: REMOVAL+](/t3Portal/stylegraphics/info.gif)  7. DISCONNECT REAR CENTER SEAT OUTER BELT ASSEMBLY Click here
                        
                           
                              ![2022 MY Avalon Avalon HV [08/2021 -        ]; SEAT: REAR SEAT ASSEMBLY: REMOVAL+](/t3Portal/stylegraphics/info.gif)  8. REMOVE REAR SEAT CUSHION ASSEMBLY Click here
                        
                           
                              ![2022 MY Avalon Avalon HV [08/2021 -        ]; SEAT: REAR SEAT ASSEMBLY: REMOVAL+](/t3Portal/stylegraphics/info.gif)  9. REMOVE REAR SEAT CUSHION LOCK HOOK Click here
                        
                           
                              ![2022 MY Avalon Avalon HV [08/2021 -        ]; SEAT: REAR SEAT ASSEMBLY: REMOVAL+](/t3Portal/stylegraphics/info.gif)  10. REMOVE REAR DOOR SCUFF PLATE LH Click here
                        
                           
                              ![2022 MY Avalon Avalon HV [08/2021 -        ]; INTERIOR PANELS / TRIM: ROOF HEADLINING: REMOVAL+](/t3Portal/stylegraphics/info.gif)  11. REMOVE REAR UNDER SIDE COVER LH Click here
                        
                           
                              ![2019 - 2022 MY Avalon HV [04/2018 -        ]; HYBRID / BATTERY CONTROL: BATTERY BLOWER: REMOVAL+](/t3Portal/stylegraphics/info.gif)  12. REMOVE REAR DOOR SCUFF PLATE RH HINT: Use the same procedure as for the LH side. 13. REMOVE REAR UNDER SIDE COVER RH Click here
                        
                           
                              ![2019 - 2022 MY Avalon HV [04/2018 -        ]; HYBRID / BATTERY CONTROL: BATTERY BLOWER: REMOVAL+](/t3Portal/stylegraphics/info.gif)  14. REMOVE REAR UNDER COVER Click here
                        
                           
                              ![2019 - 2022 MY Avalon HV [04/2018 -        ]; HYBRID / BATTERY CONTROL: BATTERY BLOWER: REMOVAL+](/t3Portal/stylegraphics/info.gif)  15. REMOVE REAR SEAT CUSHION LEG SUB-ASSEMBLY Click here
                        
                           
                              ![2019 - 2022 MY Avalon HV [04/2018 -        ]; HYBRID / BATTERY CONTROL: BATTERY BLOWER: REMOVAL+](/t3Portal/stylegraphics/info.gif)  16. REMOVE NO. 1 HV BATTERY COVER PANEL RH Click here
                        
                           
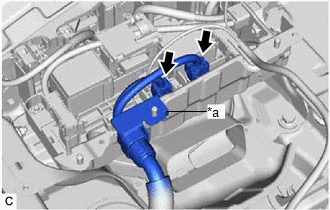
                              ![2022 MY Avalon HV [08/2021 -        ]; HYBRID / BATTERY CONTROL: HV BATTERY (for LITHIUM-ION BATTERY): REMOVAL+](/t3Portal/stylegraphics/info.gif)  17. DISCONNECT FLOOR UNDER WIRE CAUTION: Be sure to wear insulated gloves. 
                     
                        
                           | (a) Disconnect the 2 HV battery junction block assembly connectors. NOTICE: Insulate each disconnected high-voltage connector with insulating tape. Wrap the connector from the wire harness side to the end of the connector. |  |  (b) Disconnect the shield ground from the HV battery. 
                     
                        
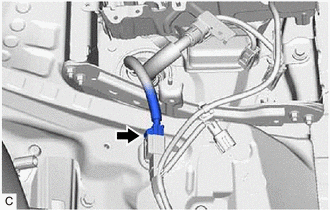
                           | (c) Disconnect the floor wire connector. |  |  18. REMOVE FRONT EXHAUST PIPE ASSEMBLY Click here
                        
                           
                              ![2019 - 2022 MY Avalon HV [04/2018 -        ]; A25A-FXS (INTAKE / EXHAUST): EXHAUST PIPE: REMOVAL](/t3Portal/stylegraphics/info.gif)  19. REMOVE EXHAUST MANIFOLD Click here
                        
                           
                              ![2019 - 2022 MY Avalon HV [04/2018 -        ]; A25A-FXS (INTAKE / EXHAUST): EXHAUST MANIFOLD: REMOVAL](/t3Portal/stylegraphics/info.gif)  20. REMOVE NO. 1 FLOOR UNDER COVER Click here
                        
                           
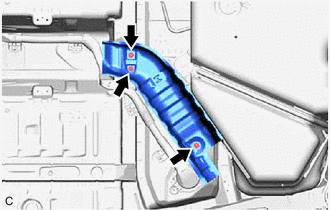
                              ![2022 MY Avalon Avalon HV [08/2021 -        ]; REAR SUSPENSION: REAR TRAILING ARM: REMOVAL+](/t3Portal/stylegraphics/info.gif)  21. REMOVE CENTER NO. 2 FLOOR HEAT INSULATOR 
                     
                        
                           | (a) Remove the 3 nuts and center No. 2 floor heat insulator. |  |  22. DISCONNECT TRANSMISSION CONTROL CABLE ASSEMBLY 
                     
                        
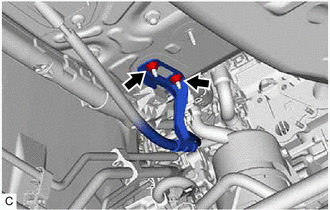
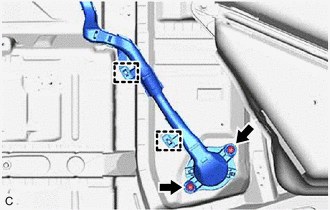
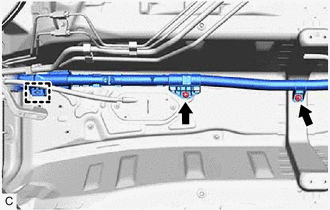
                           | (a) Remove the 2 nuts and disconnect the transmission control cable assembly. |  |  23. REMOVE FLOOR UNDER WIRE CAUTION: Be sure to wear insulated gloves. NOTICE: Insulate the disconnected connectors with insulating tape. (b) Remove the 2 clamps. NOTICE: If the clamps are removed forcibly, the stud bolts may be damaged. 
                     
                        
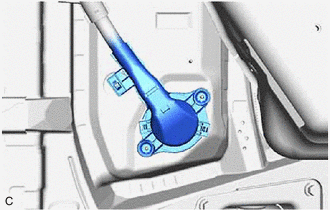
                           | (c) Disengage the grommet and pull out the HV floor under wire from the floor panel hole. |  |  
                     
                        
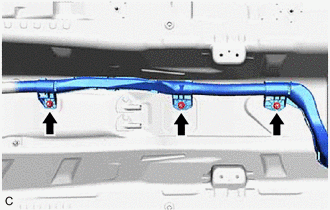
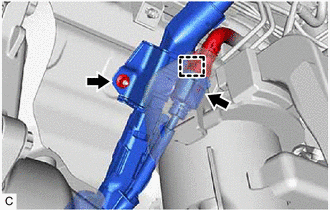
                           | (e) Remove the 2 nuts and clamp. NOTICE: If the clamp is removed forcibly, the stud bolt may be damaged. |  |  (g) Disconnect the HV floor under wire connector. (h) Remove the nut and HV floor under wire. |