| Last Modified: 08-21-2023 | 6.11:8.1.0 | Doc ID: RM100000001RUHE |
| Model Year Start: 2021 | Model: Avalon HV | Prod Date Range: [08/2020 - ] |
| Title: INTERIOR PANELS / TRIM: FRONT CONSOLE BOX: INSTALLATION; 2021 - 2022 MY Avalon Avalon HV [08/2020 - ] | ||
INSTALLATION
PROCEDURE
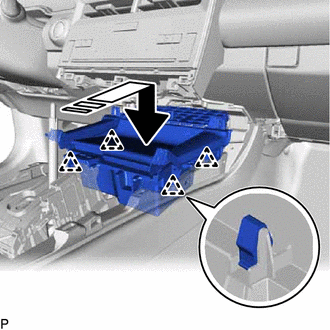
1. INSTALL CONSOLE ASSEMBLY
(a) Engage the 2 clips as shown in the illustration.


|
Install in this Direction |
(b) Install the console box assembly with the 4 bolts and 2 screws.
(c) Connect the 2 connectors.
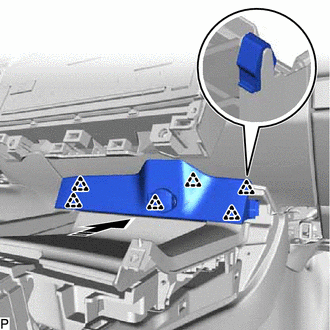
2. INSTALL UPPER FRONT CONSOLE PANEL SUB-ASSEMBLY
(a) Engage the clamp and connect the connector.
(b) Engage the 4 clips as shown in the illustration to install the upper front console panel sub-assembly.
|
|
Install in this Direction |
3. INSTALL CONSOLE BOX BEZEL
(a) Connect the connector.
(b) Engage the 6 clips as shown in the illustration to install the console box bezel.
|
|
Install in this Direction |
4. INSTALL INSTRUMENT PANEL FINISH PANEL END LH
(a) Engage the guide, 2 claws and clip as shown in the illustration to install the instrument panel finish panel end LH.
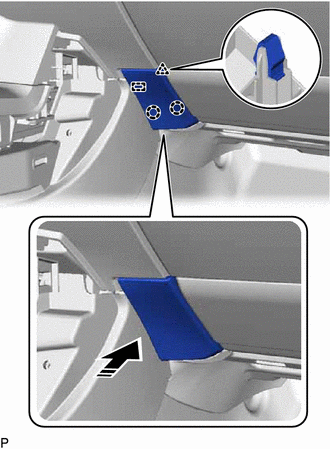
|
|
Install in this Direction |
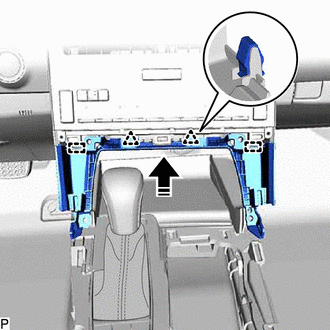
5. INSTALL REAR UPPER CONSOLE PANEL SUB-ASSEMBLY
(a) Connect the 2 connectors.
(b) Engage the 7 clips as shown in the illustration to install the rear upper console panel sub-assembly.

|
|
Install in this Direction |
6. INSTALL SHIFT LEVER KNOB SUB-ASSEMBLY
for UA80E: : Click here
![2019 - 2022 MY Avalon [04/2018 - ]; UA80E (AUTOMATIC TRANSMISSION / TRANSAXLE): SHIFT LEVER KNOB: INSTALLATION+](/t3Portal/stylegraphics/info.gif)
for UB80F: Click here
for P710: Click here
7. INSTALL CENTER INSTRUMENT CLUSTER FINISH PANEL SUB-ASSEMBLY
(a) Engage the 2 guides and 2 clips as shown in the illustration.
|
|
Install in this Direction |
(b) Install the center instrument cluster finish panel sub-assembly with the 4 screws.
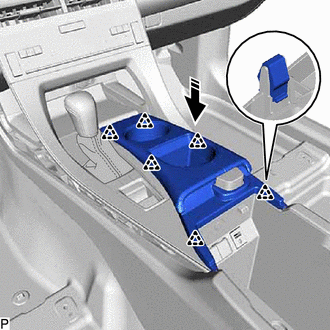
8. INSTALL CONSOLE BOX POCKET SUB-ASSEMBLY
(a) Engage the 12 clips as shown in the illustration to install the console box pocket sub-assembly.
|
|
Install in this Direction (1) |

|
Install in this Direction (2) |
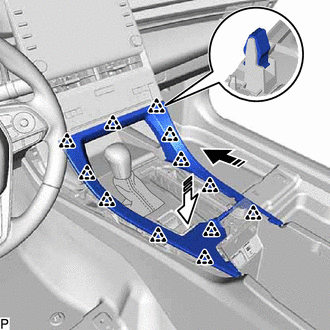
9. INSTALL FRONT CONSOLE UPPER PANEL GARNISH
(a) Engage the 2 clamps and connect the 4 connectors.
(b) Engage the 6 clips as shown in the illustration to install the front console upper panel garnish.
|
|
Install in this Direction |
10. INSTALL LOWER INSTRUMENT PANEL FINISH PANEL RH
(a) Engage the 8 clips as shown in the illustration to install the lower instrument panel finish panel RH.
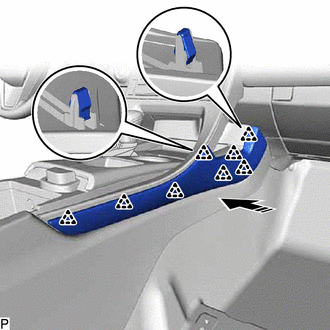
|
|
Install in this Direction |
11. INSTALL LOWER INSTRUMENT PANEL FINISH PANEL LH
(a) Engage the 9 clips as shown in the illustration to install the lower instrument panel finish panel LH.
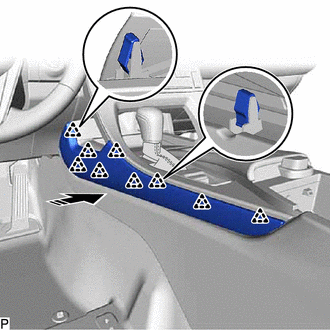
|
|
Install in this Direction |
12. INSTALL CONSOLE BOX CARPET
(a) Install the console box carpet.
13. INSTALL CONSOLE BOX POCKET
(a) Install the console box pocket.
|
|
|