| 
                     
                        | Last Modified: 08-21-2023 | 6.11:8.1.0 | Doc ID: RM100000001R097 |  
                        | Model Year Start: 2021 | Model: Avalon HV | Prod Date Range: [08/2020 - 08/2021] |  
                        | Title: WINDOW / GLASS: WINDSHIELD GLASS: REMOVAL; 2021 MY Avalon Avalon HV [08/2020 - 08/2021] |  REMOVALCAUTION / NOTICE / HINTThe necessary procedures (adjustment, calibration, initialization or registration) that must be performed after parts are removed and installed, or replaced during windshield glass sub-assembly removal/installation are shown below. Necessary Procedure After Parts Removed/Installed/Replaced (for Gasoline Model)


                           | Replaced Part or Performed Procedure | Necessary Procedure | Effect/Inoperative Function when Necessary Procedure not Performed | Link |  
                           
                         
                           | 
                                 
                                    
Forward recognition camera
Windshield glass
 | Adjust forward recognition camera | 
                                 
                                    
Dynamic Radar Cruise Control System
Front Camera System
Lane Departure Alert System (w/ Steering Control)
Pre-collision System
Lighting System (EXT)
 | 


                                          ![2019 - 2021 MY Avalon Avalon HV [04/2018 - 08/2021]; CRUISE CONTROL: FRONT CAMERA: ADJUSTMENT (SEQUENTIAL RECOGNITION)](/t3Portal/stylegraphics/info.gif)  |  
                           | Inner rear view mirror assembly* | Register codes in the garage door opener system | Garage door opener system | 


                                          ![2019 - 2022 MY Avalon [04/2018 -        ]; GARAGE DOOR OPENER: GARAGE DOOR OPENER SYSTEM(for Gasoline Model): REGISTRATION](/t3Portal/stylegraphics/info.gif)  |  
                           | Front passenger seat | Zero point calibration (Occupant classification system) | 
                                 
                                    
Occupant classification system
Passenger airbag ON/OFF indicator
Airbag system (Front passenger side)
Seat belt warning system (Front passenger)
 | 


                                          ![2019 - 2022 MY Avalon [04/2018 -        ]; SUPPLEMENTAL RESTRAINT SYSTEMS: OCCUPANT CLASSIFICATION SYSTEM (for Gasoline Model): INITIALIZATION](/t3Portal/stylegraphics/info.gif)  |  Necessary Procedure After Parts Removed/Installed/Replaced (for HV Model)


                           | Replaced Part or Performed Procedure | Necessary Procedure | Effect/Inoperative Function when Necessary Procedure not Performed | Link |  
                           
                         
                           | 
                                 
                                    
Forward recognition camera
Windshield glass
 | Adjust forward recognition camera | 
                                 
                                    
Dynamic Radar Cruise Control System
Front Camera System
Lane Departure Alert System (w/ Steering Control)
Pre-collision System
Lighting System (EXT)
 | 


                                          ![2019 - 2021 MY Avalon Avalon HV [04/2018 - 08/2021]; CRUISE CONTROL: FRONT CAMERA: ADJUSTMENT (SEQUENTIAL RECOGNITION)](/t3Portal/stylegraphics/info.gif)  |  
                           | Inner rear view mirror assembly* | Register codes in the garage door opener system | Garage door opener system | 


                                          ![2019 - 2022 MY Avalon HV [04/2018 -        ]; GARAGE DOOR OPENER: GARAGE DOOR OPENER SYSTEM(for HV Model): REGISTRATION](/t3Portal/stylegraphics/info.gif)  |  
                           | Front passenger seat | Zero point calibration (Occupant classification system) | 
                                 
                                    
Occupant classification system
Passenger airbag ON/OFF indicator
Airbag system (Front passenger side)
Seat belt warning system (Front passenger)
 | 


                                          ![2019 - 2022 MY Avalon HV [04/2018 -        ]; SUPPLEMENTAL RESTRAINT SYSTEMS: OCCUPANT CLASSIFICATION SYSTEM (for HV Model): INITIALIZATION](/t3Portal/stylegraphics/info.gif)  |  NOTICE: When replacing the windshield glass of a vehicle equipped with a forward recognition camera, make sure to use a Toyota genuine part. If a non-Toyota genuine part is used, the forward recognition camera may not be able to be installed due to a missing bracket. Also, the dynamic radar cruise control system, lane departure alert system, pre-collision system, front camera system or automatic high beam system may not operate properly due to a difference in the transmissivity or black ceramic border. PROCEDURE1. REMOVE LOWER WINDSHIELD OUTSIDE MOULDING LH Click here
                        
                           
                              ![2019 - 2022 MY Avalon Avalon HV [04/2018 -        ]; EXTERIOR PANELS / TRIM: WINDSHIELD OUTSIDE MOULDING: REMOVAL](/t3Portal/stylegraphics/info.gif)  2. REMOVE LOWER WINDSHIELD OUTSIDE MOULDING RH HINT: Use the same procedure as for the LH side. 3. REMOVE FRONT WIPER ARM HEAD CAP Click here
                        
                           
                              ![2019 - 2022 MY Avalon Avalon HV [04/2018 -        ]; WIPER / WASHER: FRONT WIPER MOTOR: REMOVAL+](/t3Portal/stylegraphics/info.gif)  4. REMOVE FRONT WIPER ARM AND BLADE ASSEMBLY LH Click here
                        
                           
                              ![2019 - 2022 MY Avalon Avalon HV [04/2018 -        ]; WIPER / WASHER: FRONT WIPER MOTOR: REMOVAL+](/t3Portal/stylegraphics/info.gif)  5. REMOVE FRONT WIPER ARM AND BLADE ASSEMBLY RH Click here
                        
                           
                              ![2019 - 2022 MY Avalon Avalon HV [04/2018 -        ]; WIPER / WASHER: FRONT WIPER MOTOR: REMOVAL+](/t3Portal/stylegraphics/info.gif)  6. REMOVE FRONT FENDER TO COWL SIDE SEAL LH Click here
                        
                           
                              ![2019 - 2022 MY Avalon Avalon HV [04/2018 -        ]; WIPER / WASHER: FRONT WIPER MOTOR: REMOVAL+](/t3Portal/stylegraphics/info.gif)  7. REMOVE FRONT FENDER TO COWL SIDE SEAL RH HINT: Use the same procedure as for the LH side. 8. REMOVE COWL TOP VENTILATOR LOUVER SUB-ASSEMBLY Click here
                        
                           
                              ![2019 - 2022 MY Avalon Avalon HV [04/2018 -        ]; WIPER / WASHER: FRONT WIPER MOTOR: REMOVAL+](/t3Portal/stylegraphics/info.gif)  9. REMOVE INNER REAR VIEW MIRROR ASSEMBLY Click here
                        
                           
                              ![2019 - 2022 MY Avalon Avalon HV [04/2018 -        ]; MIRROR (INT): INNER REAR VIEW MIRROR: REMOVAL](/t3Portal/stylegraphics/info.gif)  10. REMOVE FORWARD RECOGNITION CAMERA Click here
                        
                           
                              ![2019 - 2021 MY Avalon Avalon HV [04/2018 - 08/2021]; CRUISE CONTROL: FRONT CAMERA: REMOVAL](/t3Portal/stylegraphics/info.gif)  11. REMOVE ROOF HEADLINING ASSEMBLY Click here
                        
                           
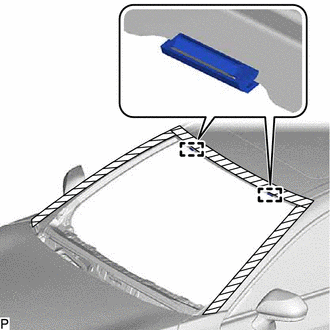
                              ![2021 MY Avalon Avalon HV [08/2020 - 08/2021]; INTERIOR PANELS / TRIM: ROOF HEADLINING: REMOVAL](/t3Portal/stylegraphics/info.gif)  12. REMOVE WINDSHIELD GLASS SUB-ASSEMBLY (a) Apply protective tape to the area around the installation position of the windshield glass sub-assembly on the vehicle body to prevent it from being scratched.   
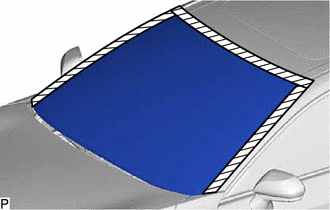


                           |   | Protective Tape |  
                     
                        
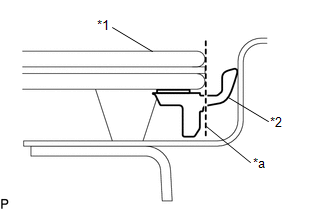
                           | (b) Using a knife, cut off the windshield outside moulding as shown in the illustration. | 
                                 
                                    |   |  
                                    | 


                                                | *1 | Windshield Glass |  
                                                | *2 | Windshield Outside Moulding |  
                                                | *a | Cut |  |  |  
                     
                        
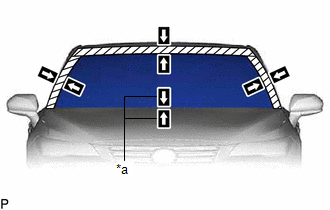
                           | (c) Place matchmarks on the windshield glass sub-assembly and vehicle body at the locations indicated in the illustration. HINT: Matchmarks are not necessary if the windshield glass is not going to be reused. |  |  (d) When using a windshield knife: (1) Apply soapy water to the area around the adhesive. (2) Insert a windshield knife into the adhesive between the windshield glass sub-assembly and vehicle body.   
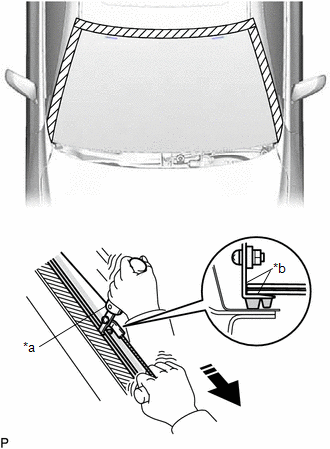


                           | *a | Windshield Knife |  
                           | *b | Aligned with Windshield Glass Sub-assembly |  
                           |   | Pull |  (3) While keeping the windshield knife perpendicular to the outer surface of the windshield glass sub-assembly, cut the adhesive by pulling the windshield knife around the windshield glass sub-assembly. 
                     NOTICE: 
                        
Do not pry the windshield glass sub-assembly with the windshield knife.
Do not use a windshield knife to cut the adhesive on the lower side of the windshield glass sub-assembly.
When separating the windshield glass sub-assembly, be careful not to damage the paint or interior and exterior ornaments.
 HINT: Insert the windshield knife in an area where the gap between windshield glass sub-assembly and vehicle body is large. (e) When using piano wire: 
                     
                        
                           | (1) Pass a piano wire between the vehicle body and windshield glass sub-assembly from the interior. | 
                                 
                                    |   |  
                                    | 


                                                | *1 | Windshield Glass Stopper |  
                                                | *2 | Front Window Inner Center Moulding |  
                                                | *a | Piano Wire |  |  |  (2) Tie both wire ends to wooden blocks or similar objects that can serve as handles. (3) Cut the adhesive by pulling the piano wire around the windshield glass sub-assembly. 
                     NOTICE: 
                        
When separating the windshield glass sub-assembly, be careful not to damage the paint or interior and exterior ornaments.
To prevent the safety pad from being scratched when removing the windshield glass sub-assembly, place a plastic sheet between the piano wire and safety pad.
Be careful not to damage the front window inner center moulding.
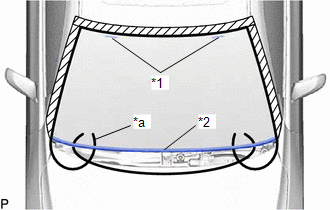
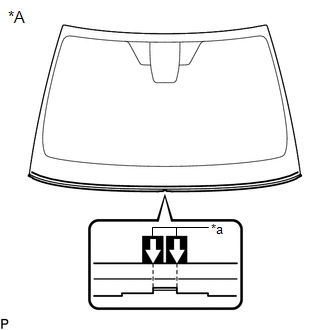
 (f) Disengage the windshield glass stoppers.   
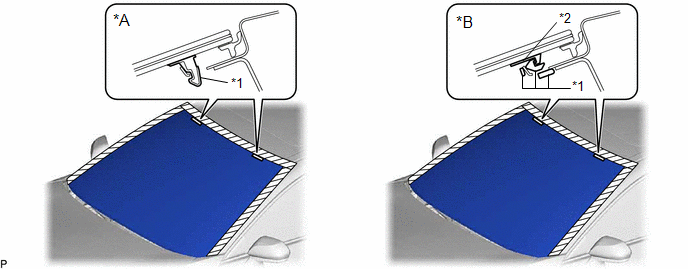


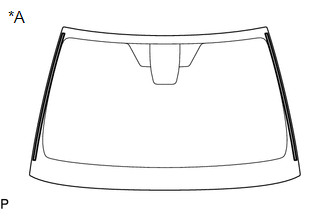
                           | *A | for 1-piece Type | *B | for 2-piece Type |  
                           | *1 | No. 1 Windshield Glass Stopper | *2 | No. 2 Windshield Glass Stopper |  
                     NOTICE: 
                        
The No. 1 windshield glass stoppers and No. 2 windshield glass stoppers are installed to the windshield glass sub-assembly as shown in the illustration. Be careful not to damage the windshield glass sub-assembly when cutting the adhesive.
To prevent the windshield glass sub-assembly from falling when performing this operation, be sure to hold the windshield glass sub-assembly using suction cups.
 HINT: Depending on the vehicle, either 1-piece type or 2-piece type stoppers may be present. (g) Using suction cups, remove the windshield glass sub-assembly. 
                     NOTICE: 
                        
Be careful not to drop the windshield glass sub-assembly.
Leave as much adhesive on the vehicle body as possible when removing the windshield glass sub-assembly.
 13. REMOVE WINDOW GLASS ADHESIVE DAM (a) When reusing the windshield glass: 
                     
                        
                           | (1) Using a scraper, remove the window glass adhesive dam. 
                                 NOTICE: 
                                    
Be careful not to damage the windshield glass.
Be sure to replace the window glass adhesive dam with a new one.
 |  |  14. REMOVE NO. 2 WINDOW GLASS ADHESIVE DAM (a) When reusing the windshield glass: 
                     
                        
                           | (1) Using a scraper, remove the 2 No. 2 window glass adhesive dams. 
                                 NOTICE: 
                                    
Be careful not to damage the windshield glass.
Be sure to replace the No. 2 window glass adhesive dams with  new ones.
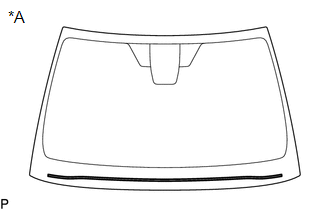
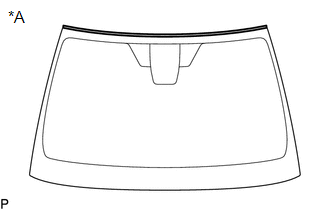
 |  |  15. REMOVE WINDSHIELD OUTSIDE MOULDING (a) When reusing the windshield glass: 
                     
                        
                           | (1) Using a scraper, remove the windshield outside moulding. 
                                 NOTICE: 
                                    
Be careful not to damage the windshield glass.
Be sure to replace the windshield outside moulding with a new one.
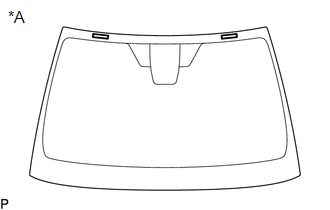
 |  |  16. REMOVE NO. 1 WINDSHIELD GLASS STOPPER (for 1-piece Type) (a) When reusing the windshield glass: 
                     
                        
                           | (1) Using a scraper, remove the 2 No. 1 windshield glass stoppers. 
                                 NOTICE: 
                                    
Be careful not to damage the windshield glass.
Be sure to replace the 1-piece type No. 1 windshield glass stoppers with new 2-piece type No. 1 and No. 2 windshield glass stoppers.
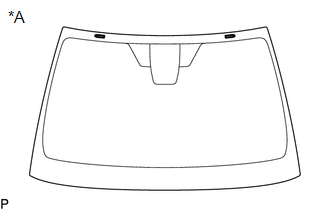
 |  |  17. REMOVE NO. 2 WINDSHIELD GLASS STOPPER (for 2-piece Type) (a) When reusing the windshield glass: 
                     
                        
                           | (1) Using a scraper, remove the 2 No. 2 windshield glass stoppers. 
                                 NOTICE: 
                                    
Be careful not to damage the windshield glass.
Be sure to replace the No. 2 windshield glass stoppers with new ones.
 |  |  18. REMOVE NO. 1 WINDSHIELD GLASS STOPPER (for 2-piece Type) 
                     
                        
                           | (a) Remove the 2 No. 1 windshield glass stoppers from the vehicle body. NOTICE: Be sure to replace the No. 1 windshield glass stoppers with new ones. |  |  19. REMOVE FRONT WINDOW INNER CENTER MOULDING HINT: Perform the following procedure only when replacement of the front window inner center moulding is necessary. 
                     
                        
                           | (a) Place matchmarks on the windshield glass at the locations indicated in the illustration. | 
                                 
                                    |   |  
                                    | 


                                                | *A | Back Side |  
                                                | *a | Matchmark |  |  |  (b) Using a scraper, remove the front window inner center moulding. 
                     NOTICE: 
                        
Be careful not to damage the windshield glass.
Be sure to replace the front window inner center moulding with a new one.
 20. CLEAN WINDSHIELD GLASS (a) When reusing the windshield glass: 
                     
                        
                           | (1) Using a scraper, remove any remaining adhesive dam and adhesive residue from the windshield glass. NOTICE: Be careful not to damage the windshield glass. |  |  (2) Clean the outer circumference of the windshield glass with a non-residue solvent. 
                     NOTICE: 
                        
Do not touch the windshield glass surface after cleaning it.
Even if using a new windshield glass, clean it with a non-residue solvent.
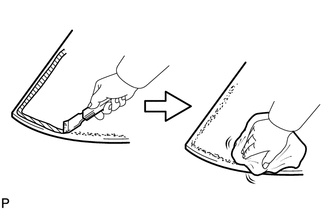
 21. CLEAN VEHICLE BODY (a) Clean and shape the contact surface of the vehicle body. (1) Using a knife, cut off any excess adhesive on the contact surface of the vehicle body as shown in the illustration.   
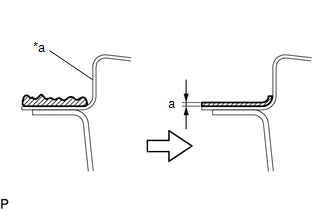


                           | *a | Vehicle Body |  
                           |   | Adhesive |  Standard Dimension:  


                           | Area | Dimension |  
                           | a | 1.0 mm (0.0394 in.) or more |  NOTICE: Be careful not to damage the vehicle body. HINT: Leave approximately 1.0 mm (0.0394 in.) of adhesive on the vehicle body. (2) Clean the contact surface of the vehicle body with a piece of cloth saturated with non-residue solvent. HINT: Even if all of the adhesive has been removed, clean the vehicle body. |