| 
                     
                        | Last Modified: 08-21-2023 | 6.11:8.1.0 | Doc ID: RM100000001PX3I |  
                        | Model Year Start: 2021 | Model: Avalon | Prod Date Range: [08/2020 -                    
                                       ] |  
                        | Title: A25A-FKS (ENGINE CONTROL): VACUUM SWITCHING VALVE (for Engine Mounting): REMOVAL; 2021 - 2022 MY Avalon [08/2020 -        ] |  REMOVALPROCEDURE1. REMOVE COOL AIR INTAKE DUCT SEAL Click here
                        
                           
                              ![2019 - 2021 MY Avalon Avalon HV [04/2018 - 08/2021]; EXTERIOR PANELS / TRIM: FRONT BUMPER: REMOVAL+](/t3Portal/stylegraphics/info.gif)  ![2022 MY Avalon Avalon HV [08/2021 -        ]; EXTERIOR PANELS / TRIM: FRONT BUMPER: REMOVAL+](/t3Portal/stylegraphics/info.gif)  2. REMOVE NO. 1 ENGINE COVER SUB-ASSEMBLY Click here
                        
                           
                              ![2021 - 2022 MY Avalon [08/2020 -        ]; A25A-FKS (ENGINE MECHANICAL): ENGINE ASSEMBLY: REMOVAL+](/t3Portal/stylegraphics/info.gif)  3. REMOVE INLET AIR CLEANER ASSEMBLY Click here
                        
                           
                              ![2021 - 2022 MY Avalon [08/2020 -        ]; A25A-FKS (ENGINE MECHANICAL): ENGINE ASSEMBLY: REMOVAL+](/t3Portal/stylegraphics/info.gif)  4. REMOVE AIR CLEANER ASSEMBLY WITH AIR CLEANER HOSE Click here
                        
                           
                              ![2021 - 2022 MY Avalon [08/2020 -        ]; A25A-FKS (ENGINE MECHANICAL): ENGINE ASSEMBLY: REMOVAL+](/t3Portal/stylegraphics/info.gif)  
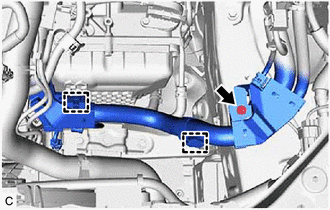
5. REMOVE VACUUM SWITCHING VALVE (for Active Control Engine Mount System) 
                     
                        
                           | (a) Remove the bolt and disengage the 2 wire harness clamps to separate the engine wire. |  |  
                     
                        
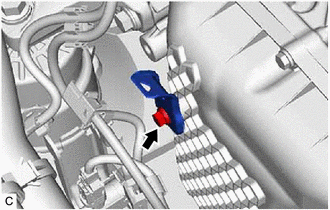
                           | (b) Remove the bolt and wire harness clamp bracket from the transmission case side cover. |  |  
                     
                        
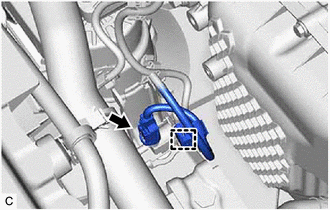
                           | (c) Disengage the wire harness clamp and disconnect the vacuum switching valve (for active control engine mount system) connector. |  |  
                     
                        
                           | (d) Disconnect the 3 vacuum hoses from the vacuum switching valve (for active control engine mount system). |  |  
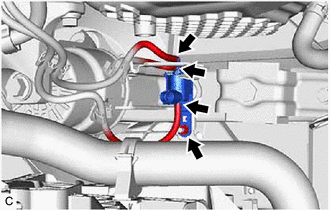
(e) Remove the nut and vacuum switching valve (for active control engine mount system) from the front engine mounting insulator. |