| Last Modified: 08-21-2023 | 6.11:8.1.0 | Doc ID: RM100000001B4FH |
| Model Year Start: 2019 | Model: Avalon HV | Prod Date Range: [04/2018 - ] |
| Title: A25A-FXS (ENGINE CONTROL): ECM: INSTALLATION; 2019 - 2022 MY Avalon HV [04/2018 - ] | ||
INSTALLATION
PROCEDURE
1. INSTALL NO. 2 ECM BRACKET
(a) Install the No. 2 ECM bracket to the ECM with the 2 screws.
Torque:
4.5 N·m {46 kgf·cm, 40 in·lbf}
2. INSTALL NO. 1 ECM BRACKET
(a) Install the No. 1 ECM bracket to the ECM with the 2 screws.
Torque:
4.5 N·m {46 kgf·cm, 40 in·lbf}
3. INSTALL ECM
|
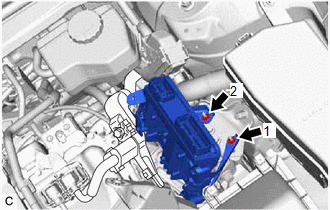
(a) Install the ECM with the 2 nuts in the order shown in the illustration. Torque: 8.0 N·m {82 kgf·cm, 71 in·lbf} NOTICE: If the ECM has been struck or dropped, replace it. |
|
|
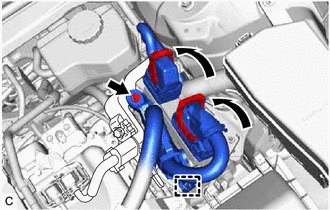
(b) Engage the clamp. |
|
(c) Install the engine wire to the No. 2 ECM bracket with the bolt.
Torque:
10 N·m {102 kgf·cm, 7 ft·lbf}
(d) Connect the 2 ECM connectors and rotate the 2 levers to lock them.
NOTICE:
- When connecting the ECM connectors, make sure that the connecting parts of the ECM connectors are free of dirt, water and other foreign matter.
- Be sure to securely connect the ECM connectors.
4. CONNECT CABLE TO NEGATIVE AUXILIARY BATTERY TERMINAL
5. INSTALL LUGGAGE TRIM SERVICE HOLE COVER
6. PERFORM INITIALIZATION
|
|
|


![2019 - 2022 MY Avalon HV [04/2018 - ]; MAINTENANCE: A25A-FXS AUXILIARY BATTERY: INSTALLATION+](/t3Portal/stylegraphics/info.gif)