| Last Modified: 08-21-2023 | 6.11:8.1.0 | Doc ID: RM100000001B3S7 |
| Model Year Start: 2019 | Model: Avalon HV | Prod Date Range: [04/2018 - 08/2020] |
| Title: HYBRID / BATTERY CONTROL: HV BATTERY (for NICKEL METAL HYDRIDE BATTERY): INSTALLATION; 2019 - 2020 MY Avalon HV [04/2018 - 08/2020] | ||
INSTALLATION
PROCEDURE
1. INSTALL NO. 1 HV BATTERY INTAKE DUCT LH
2. INSTALL NO. 2 HYBRID BATTERY SHIELD SUB-ASSEMBLY
3. INSTALL HV BATTERY JUNCTION BLOCK ASSEMBLY
4. INSTALL HYBRID BATTERY TERMINAL BLOCK
5. INSTALL BATTERY VOLTAGE SENSOR
6. INSTALL NO. 1 HV BATTERY SHIELD PANEL
7. INSTALL UPPER HV BATTERY COVER SUB-ASSEMBLY
8. TEMPORARILY INSTALL NO. 4 HV BATTERY END PLATE SUB-ASSEMBLY
CAUTION:
Be sure to wear insulated gloves.
(a) Temporarily install the No. 4 HV battery end plate sub-assembly to the HV battery with the 2 bolts and 2 nuts.
(b) Fully tighten the 2 nuts.
Torque:
19 N·m {194 kgf·cm, 14 ft·lbf}
9. INSTALL NO. 5 HV BATTERY END PLATE SUB-ASSEMBLY
CAUTION:
Be sure to wear insulated gloves.
(a) Install the No. 5 HV battery end plate sub-assembly to the HV battery with the 12 nuts.
Torque:
19 N·m {194 kgf·cm, 14 ft·lbf}
10. INSTALL NO. 4 HV BATTERY SHIELD SUB-ASSEMBLY
CAUTION:
Be sure to wear insulated gloves.
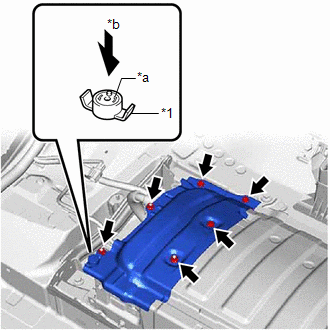
(a) Install the No. 4 HV battery shield sub-assembly to the HV battery with the 4 nuts.
Torque:
19 N·m {194 kgf·cm, 14 ft·lbf}
11. INSTALL NO. 3 HV BATTERY SHIELD SUB-ASSEMBLY
CAUTION:
Be sure to wear insulated gloves.
(a) Install the No. 3 HV battery shield sub-assembly to the HV battery with the 4 nuts.
Torque:
19 N·m {194 kgf·cm, 14 ft·lbf}
12. INSTALL NO. 4 HV BATTERY END PLATE SUB-ASSEMBLY
CAUTION:
Be sure to wear insulated gloves.
(a) Fully tighten the 2 bolts.
Torque:
19 N·m {194 kgf·cm, 14 ft·lbf}
13. INSTALL HV BATTERY
CAUTION:
Be sure to wear insulated gloves.
|
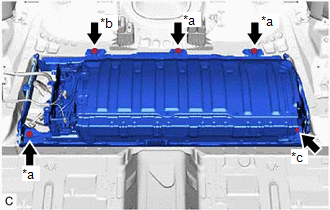
(a) Install the HV battery to the vehicle body with the 3 bolts (A), bolt (B) and bolt (C). Torque: 19 N·m {194 kgf·cm, 14 ft·lbf} NOTICE:
|
|
14. CONNECT FLOOR WIRE
CAUTION:
Be sure to wear insulated gloves.
(a) Connect the battery voltage sensor connector.
(b) Engage the clamp.
15. INSTALL NO. 1 HYBRID BATTERY EXHAUST DUCT
CAUTION:
Be sure to wear insulated gloves.
(a) Engage the claw to install the No. 1 hybrid battery exhaust duct to the HV battery.
(b) Install the clip.
16. CONNECT FLOOR WIRE
CAUTION:
Be sure to wear insulated gloves.
(a) Engage the 2 clamps.
17. INSTALL NO. 1 INDOOR ELECTRICAL KEY ANTENNA ASSEMBLY
18. CONNECT FLOOR WIRE
CAUTION:
Be sure to wear insulated gloves.
(a) Connect the HV battery junction block assembly connector.
(b) Connect the electric vehicle battery plug assembly connector.
(c) Engage the clamp.
19. CONNECT HV FLOOR UNDER WIRE
CAUTION:
Be sure to wear insulated gloves.
(a) Connect the floor wire connector.
|
(b) Connect the shield ground to the HV battery. |
|
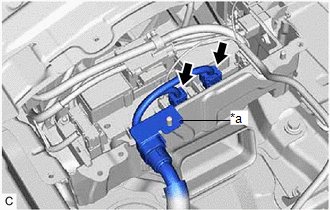
(c) Connect the 2 HV battery junction block assembly connectors.
NOTICE:
Make sure that the connectors are connected securely.
20. INSTALL NO. 1 HV BATTERY COVER PANEL RH
CAUTION:
Be sure to wear insulated gloves.
|
(a) Install the No. 1 HV battery cover panel RH to the HV battery with the 3 bolts and 3 nuts. Torque: 7.5 N·m {76 kgf·cm, 66 in·lbf} |
|
(b) Install the battery cover lock striker, then push the button to lock it.
21. INSTALL BATTERY COOLING BLOWER ASSEMBLY
22. INSTALL SERVICE PLUG GRIP
23. PERFORM INITIALIZATION
|
|
|
![2019 - 2020 MY Avalon HV [04/2018 - 08/2020]; HYBRID / BATTERY CONTROL: HV BATTERY THERMISTOR (for NICKEL METAL HYDRIDE BATTERY): INSTALLATION+](/t3Portal/stylegraphics/info.gif)


