| 
                     
                        | Last Modified: 08-21-2023 | 6.11:8.1.0 | Doc ID: RM100000001AYY0 |  
                        | Model Year Start: 2019 | Model: Avalon HV | Prod Date Range: [04/2018 - 08/2021] |  
                        | Title: HEATING / AIR CONDITIONING: COMPRESSOR (for A25A-FXS): REMOVAL; 2019 - 2021 MY Avalon HV [04/2018 - 08/2021] |  REMOVALCAUTION / NOTICE / HINTThe necessary procedures (adjustment, calibration, initialization or registration) that must be performed after parts are removed and installed, or replaced during compressor with motor assembly removal/installation are shown below. Necessary Procedure After Parts Removed/Installed/Replaced


                           | Replaced Part or Performed Procedure | Necessary Procedures | Effect/Inoperative Function when Necessary Procedure not Performed | Link |  
                           
                         
                           | Disconnect cable from negative auxiliary battery terminal | Perform steering sensor zero point calibration | Lane departure alert system (w/ Steering Control) | 


                                          ![2019 - 2021 MY Avalon HV [04/2018 - 08/2021]; PRE-COLLISION: PRE-COLLISION SYSTEM (for HV Model): INITIALIZATION](/t3Portal/stylegraphics/info.gif)  |  
                           | Pre-collision system |  
                           | Intelligent clearance sonar system*1 |  
                           | Lighting system (for Gasoline Model with Cornering Light) |  
                           | Memorize steering angle neutral point | Parking assist monitor system | 


                                          ![2019 - 2022 MY Avalon HV [04/2018 -        ]; PARK ASSIST / MONITORING: PARKING ASSIST MONITOR SYSTEM(for HV Model): INITIALIZATION](/t3Portal/stylegraphics/info.gif)  |  
                           | Panoramic view monitor system | 


                                          ![2019 - 2022 MY Avalon HV [04/2018 -        ]; PARK ASSIST / MONITORING: PANORAMIC VIEW MONITOR SYSTEM (for HV Model): INITIALIZATION](/t3Portal/stylegraphics/info.gif)  |  
                           | Front television camera assembly, front bumper assembly or radiator grille | 
                                 
                                    
Television camera view adjustment
Television camera assembly optical axis adjustment (Back camera position setting)*2
 | Panoramic view monitor system | 


                                          ![2019 - 2022 MY Avalon HV [04/2018 -        ]; PARK ASSIST / MONITORING: PANORAMIC VIEW MONITOR SYSTEM (for HV Model): INITIALIZATION](/t3Portal/stylegraphics/info.gif) for Initialization 


                                          ![2019 - 2022 MY Avalon HV [04/2018 -        ]; PARK ASSIST / MONITORING: PANORAMIC VIEW MONITOR SYSTEM (for HV Model): CALIBRATION](/t3Portal/stylegraphics/info.gif) for Calibration |  
                           | Front bumper assembly | 
                                 
                                    
Measurement of ultrasonic sensor detection angle
Ultrasonic sensor detection angle registration
 | 
                                 
                                    
Intelligent clearance sonar system
Intuitive parking assist system
 | 


                                          ![2019 - 2022 MY Avalon HV [04/2018 -        ]; PARK ASSIST / MONITORING: INTELLIGENT CLEARANCE SONAR SYSTEM (for HV Model): CALIBRATION](/t3Portal/stylegraphics/info.gif)  |  
                           | 
                                 
                                    
Headlight assembly
Headlight ECU sub-assembly
 | Synchronize the vehicle information | Lighting system (for HV Model with Cornering Light) | 


                                          ![2019 - 2022 MY Avalon HV [04/2018 -        ]; LIGHTING (EXT): LIGHTING SYSTEM (for HV Model with Cornering Light): INITIALIZATION](/t3Portal/stylegraphics/info.gif)  |  
                           | 
                                 
                                    
Swing grill actuator assembly
Radiator shutter sub-assembly
 | Change grille shutter control mode and/or perform initialization | Grille Shutter System | 


                                          ![2019 - 2021 MY Avalon Avalon HV [04/2018 - 08/2021]; EXTERIOR PANELS / TRIM: GRILLE SHUTTER SYSTEM: INITIALIZATION](/t3Portal/stylegraphics/info.gif)  |  NOTICE: After turning the power switch off, waiting time may be required before disconnecting the cable from the negative (-) auxiliary battery terminal. Therefore, make sure to read the disconnecting the cable from the negative (-) auxiliary battery terminal notices before proceeding with work. Click here
                        
                           
                              ![2019 - 2022 MY Avalon Avalon HV [04/2018 -        ]; INTRODUCTION: REPAIR INSTRUCTION: PRECAUTION](/t3Portal/stylegraphics/info.gif)  PROCEDURE1. RECOVER REFRIGERANT FROM REFRIGERATION SYSTEM Click here
                        
                           
                              ![2019 - 2022 MY Avalon Avalon HV [04/2018 -        ]; HEATING / AIR CONDITIONING: REFRIGERANT: REPLACEMENT+](/t3Portal/stylegraphics/info.gif)  2. REMOVE SERVICE PLUG GRIP Click here
                        
                           
                              ![2019 - 2020 MY Avalon HV [04/2018 - 08/2020]; HYBRID / BATTERY CONTROL: SERVICE PLUG GRIP: REMOVAL](/t3Portal/stylegraphics/info.gif)  ![2021 MY Avalon HV [08/2020 - 08/2021]; HYBRID / BATTERY CONTROL: SERVICE PLUG GRIP: REMOVAL](/t3Portal/stylegraphics/info.gif)  3. CHECK TERMINAL VOLTAGE (a) Disconnect the engine room main wire. Click here
                        
                           
                              ![2019 - 2020 MY Avalon HV [04/2018 - 08/2020]; HYBRID / BATTERY CONTROL: FRAME WIRE: REMOVAL+](/t3Portal/stylegraphics/info.gif)  ![2021 MY Avalon HV [08/2020 - 08/2021]; HYBRID / BATTERY CONTROL: FRAME WIRE: REMOVAL+](/t3Portal/stylegraphics/info.gif)  (b) Remove the connector cover assembly. Click here
                        
                           
                              ![2019 - 2020 MY Avalon HV [04/2018 - 08/2020]; HYBRID / BATTERY CONTROL: INVERTER WITH CONVERTER: REMOVAL+](/t3Portal/stylegraphics/info.gif)  ![2021 MY Avalon HV [08/2020 - 08/2021]; HYBRID / BATTERY CONTROL: INVERTER WITH CONVERTER: REMOVAL+](/t3Portal/stylegraphics/info.gif)  (c) Check the terminal voltage. Click here
                        
                           
                              ![2019 - 2020 MY Avalon HV [04/2018 - 08/2020]; HYBRID / BATTERY CONTROL: INVERTER WITH CONVERTER: REMOVAL+](/t3Portal/stylegraphics/info.gif)  ![2021 MY Avalon HV [08/2020 - 08/2021]; HYBRID / BATTERY CONTROL: INVERTER WITH CONVERTER: REMOVAL+](/t3Portal/stylegraphics/info.gif)  (d) Install the connector cover assembly. Click here
                        
                           
                              ![2019 - 2020 MY Avalon HV [04/2018 - 08/2020]; HYBRID / BATTERY CONTROL: HV BATTERY (for NICKEL METAL HYDRIDE BATTERY): REMOVAL+](/t3Portal/stylegraphics/info.gif)  ![2021 MY Avalon HV [08/2020 - 08/2021]; HYBRID / BATTERY CONTROL: HV BATTERY (for LITHIUM-ION BATTERY): REMOVAL+](/t3Portal/stylegraphics/info.gif)  (e) Connect the engine room main wire. Click here
                        
                           
                              ![2019 - 2020 MY Avalon HV [04/2018 - 08/2020]; HYBRID / BATTERY CONTROL: FRAME WIRE: INSTALLATION+](/t3Portal/stylegraphics/info.gif)  ![2021 - 2022 MY Avalon HV [08/2020 -        ]; HYBRID / BATTERY CONTROL: FRAME WIRE: INSTALLATION+](/t3Portal/stylegraphics/info.gif)  4. REMOVE RADIATOR ASSEMBLY Click here
                        
                           
                              ![2019 - 2021 MY Avalon HV [04/2018 - 08/2021]; A25A-FXS (COOLING): RADIATOR: REMOVAL](/t3Portal/stylegraphics/info.gif)  5. DISCONNECT SUCTION HOSE SUB-ASSEMBLY 
                     
                        
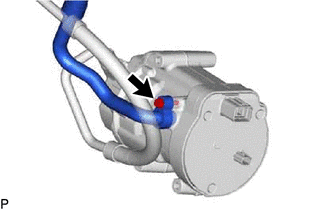
                           | (a) Remove the bolt and disconnect the suction hose sub-assembly from the compressor with motor assembly. |  |  (b) Remove the O-ring from the suction hose sub-assembly. NOTICE: Seal the openings of the disconnected parts using vinyl tape to prevent moisture and foreign matter from entering them. 6. DISCONNECT NO. 1 COOLER REFRIGERANT DISCHARGE HOSE SUB-ASSEMBLY 
                     
                        
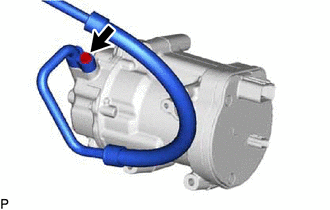
                           | (a) Remove the bolt and disconnect the No. 1 cooler refrigerant discharge hose sub-assembly from the compressor with motor assembly. |  |  (b) Remove the O-ring from the No. 1 cooler refrigerant discharge hose sub-assembly. NOTICE: Seal the openings of the disconnected parts using vinyl tape to prevent moisture and foreign matter from entering them. 7. REMOVE COMPRESSOR WITH MOTOR ASSEMBLY (a) Using a screwdriver, slide the green-colored lock of the connector (A) as shown in the illustration to release it and disconnect the connector.   
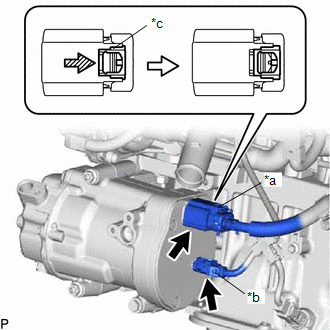


                           | *a | Connector (A) |  
                           | *b | Connector (B) |  
                           | *c | Green-colored Lock |  
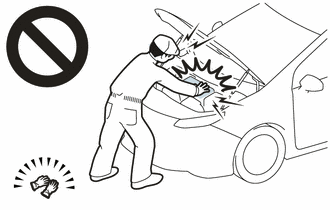
                           |   | Slide |  CAUTION: Make sure to wear insulated gloves. NOTICE: Insulate the disconnected terminals and connector with insulating tape. (b) Disconnect the connector (B). (c) Remove the bolt and 2 nuts.   
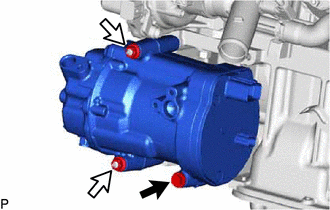


                           |   | Bolt |  
                           |   | Nut |  
                     
                        
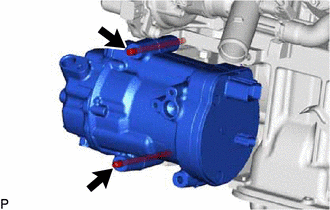
                           | (d) Using an E8 "TORX" socket wrench, remove the 2 stud bolts and compressor with motor assembly. |  |  |