| Last Modified: 08-21-2023 | 6.11:8.1.0 | Doc ID: RM100000001AYQM |
| Model Year Start: 2019 | Model: Avalon HV | Prod Date Range: [04/2018 - ] |
| Title: MIRROR (EXT): OUTER REAR VIEW MIRROR COVER: REMOVAL; 2019 - 2022 MY Avalon Avalon HV [04/2018 - ] | ||
REMOVAL
CAUTION / NOTICE / HINT
HINT:
- Use the same procedure for the RH side and LH side.
- The following procedure is for the LH side.
PROCEDURE
1. REMOVE OUTER MIRROR
Click here
![2019 - 2022 MY Avalon Avalon HV [04/2018 - ]; MIRROR (EXT): OUTER REAR VIEW MIRROR GLASS: REMOVAL+](/t3Portal/stylegraphics/info.gif)
2. REMOVE OUTER MIRROR COVER
(a) Pull the outer mirror cover as shown in the illustration to disengage the 3 claws.
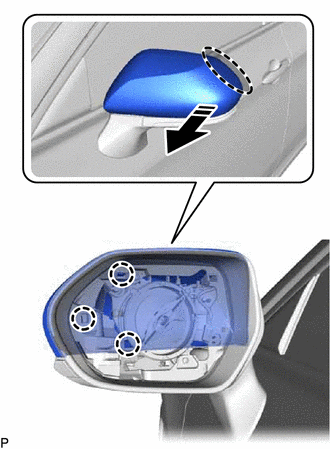

|
Place Hand Here |

|
Pull in this Direction |
NOTICE:
As the claws may be damaged, make sure not to apply force in any direction other than shown in the illustration.
HINT:
If it is difficult to disengage the claws, disengage them using a screwdriver with its tip wrapped with protective tape.
(b) Pull the outer mirror cover as shown in the illustration to disengage the 3 claws and remove the outer mirror cover.
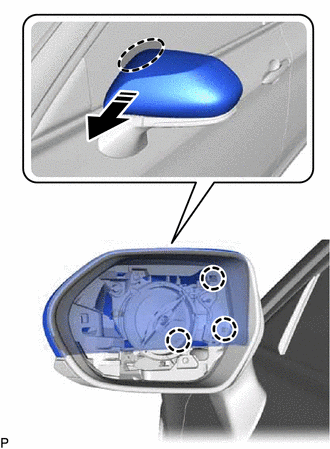
|
|
Place Hand Here |
|
|
Pull in this Direction |
NOTICE:
As the claws may be damaged, make sure not to apply force in any direction other than shown in the illustration.
HINT:
If it is difficult to disengage the claws, disengage them using a screwdriver with its tip wrapped with protective tape.
|
|
|