| 
                     
                        | Last Modified: 08-21-2023 | 6.11:8.1.0 | Doc ID: RM100000001AY0Z |  
                        | Model Year Start: 2019 | Model: Avalon HV | Prod Date Range: [04/2018 -                    
                                       ] |  
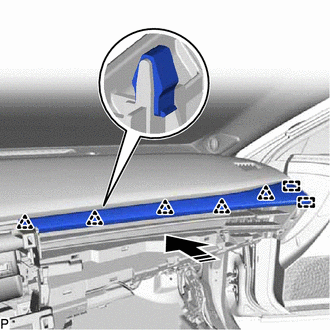
                        | Title: INTERIOR PANELS / TRIM: INSTRUMENT PANEL SAFETY PAD: INSTALLATION; 2019 - 2022 MY Avalon Avalon HV [04/2018 -        ] |  INSTALLATIONPROCEDURE1. INSTALL INSTRUMENT PANEL SAFETY PAD SUB-ASSEMBLY (a) Engage the 5 guides as shown in the illustration to temporarily install the instrument panel safety pad sub-assembly.   
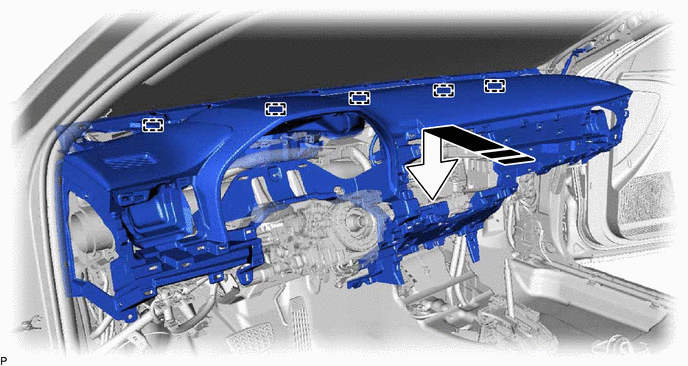


                           |   | Install in this Direction | - | - |  
                     NOTICE: 
                        
Do not damage the instrument panel safety pad sub-assembly.
Do not allow the wire harnesses to interfere with the surrounding parts.
 (b) Install the instrument panel safety pad sub-assembly with the 4 bolts <B>, 2 bolts <A> and nut <E>. Torque:  Bolt<A> :   20 N·m {204 kgf·cm, 15 ft·lbf} (c) Install the 2 clips. (d) Engage each clamp. (e) Connect each connector. (f) Engage the 2 claws to connect the cooler (room temp. sensor) thermistor. 2. CONNECT NO. 2 INSTRUMENT PANEL WIRE Click here
                        
                           
                              ![2019 - 2022 MY Avalon Avalon HV [04/2018 -        ]; SUPPLEMENTAL RESTRAINT SYSTEMS: FRONT PASSENGER AIRBAG ASSEMBLY: INSTALLATION+](/t3Portal/stylegraphics/info.gif)  3. INSTALL TURN SIGNAL SWITCH Click here
                        
                           
                              ![2019 - 2022 MY Avalon Avalon HV [04/2018 -        ]; LIGHTING (EXT): HEADLIGHT DIMMER SWITCH: INSTALLATION+](/t3Portal/stylegraphics/info.gif)  4. INSTALL WINDSHIELD WIPER SWITCH ASSEMBLY Click here
                        
                           
                              ![2019 - 2022 MY Avalon Avalon HV [04/2018 -        ]; WIPER / WASHER: WIPER SWITCH: INSTALLATION+](/t3Portal/stylegraphics/info.gif)  5. INSTALL UPPER STEERING COLUMN COVER for Manual Tilt and Manual Telescopic Steering Column: Click here
                        
                           
                              ![2019 - 2022 MY Avalon Avalon HV [04/2018 -        ]; STEERING COLUMN: STEERING COLUMN ASSEMBLY (for Manual Tilt and Manual Telescopic Steering Column): INSTALLATION+](/t3Portal/stylegraphics/info.gif)  for Power Tilt and Power Telescopic Steering Column: Click here
                        
                           
                              ![2019 - 2022 MY Avalon Avalon HV [04/2018 -        ]; STEERING COLUMN: STEERING COLUMN ASSEMBLY (for Power Tilt and Power Telescopic Steering Column): INSTALLATION+](/t3Portal/stylegraphics/info.gif)  6. INSTALL LOWER STEERING COLUMN COVER for Manual Tilt and Manual Telescopic Steering Column: Click here
                        
                           
                              ![2019 - 2022 MY Avalon Avalon HV [04/2018 -        ]; STEERING COLUMN: STEERING COLUMN ASSEMBLY (for Manual Tilt and Manual Telescopic Steering Column): INSTALLATION+](/t3Portal/stylegraphics/info.gif)  for Power Tilt and Power Telescopic Steering Column: Click here
                        
                           
                              ![2019 - 2022 MY Avalon Avalon HV [04/2018 -        ]; STEERING COLUMN: STEERING COLUMN ASSEMBLY (for Power Tilt and Power Telescopic Steering Column): INSTALLATION+](/t3Portal/stylegraphics/info.gif)  7. ALIGN FRONT WHEELS FACING STRAIGHT AHEAD 8. INSPECT AND ADJUST SPIRAL CABLE WITH SENSOR SUB-ASSEMBLY Click here
                        
                           
                              ![2019 - 2020 MY Avalon Avalon HV [04/2018 - 08/2020]; SUPPLEMENTAL RESTRAINT SYSTEMS: SPIRAL CABLE: INSTALLATION+](/t3Portal/stylegraphics/info.gif)  ![2021 - 2022 MY Avalon Avalon HV [08/2020 -        ]; SUPPLEMENTAL RESTRAINT SYSTEMS: SPIRAL CABLE: INSTALLATION+](/t3Portal/stylegraphics/info.gif)  9. INSTALL STEERING WHEEL ASSEMBLY Click here
                        
                           
                              ![2019 - 2020 MY Avalon Avalon HV [04/2018 - 08/2020]; STEERING COLUMN: STEERING WHEEL: INSTALLATION+](/t3Portal/stylegraphics/info.gif)  ![2021 - 2022 MY Avalon Avalon HV [08/2020 -        ]; STEERING COLUMN: STEERING WHEEL: INSTALLATION+](/t3Portal/stylegraphics/info.gif)  10. CHECK STEERING WHEEL CENTER POINT 11. INSTALL HORN BUTTON ASSEMBLY Click here
                        
                           
                              ![2019 - 2020 MY Avalon Avalon HV [04/2018 - 08/2020]; SUPPLEMENTAL RESTRAINT SYSTEMS: STEERING PAD: INSTALLATION](/t3Portal/stylegraphics/info.gif)  ![2021 - 2022 MY Avalon Avalon HV [08/2020 -        ]; SUPPLEMENTAL RESTRAINT SYSTEMS: STEERING PAD: INSTALLATION](/t3Portal/stylegraphics/info.gif)  12. INSTALL FRONT NO. 2 SPEAKER ASSEMBLY (for RH Side) Click here
                        
                           
                              ![2019 - 2022 MY Avalon Avalon HV [04/2018 -        ]; AUDIO / VIDEO: INSTRUMENT PANEL SPEAKER: INSTALLATION+](/t3Portal/stylegraphics/info.gif)  13. INSTALL FRONT NO. 4 SPEAKER ASSEMBLY (for 14 Speakers) Click here
                        
                           
                              ![2019 - 2022 MY Avalon Avalon HV [04/2018 -        ]; AUDIO / VIDEO: INSTRUMENT PANEL SPEAKER: INSTALLATION+](/t3Portal/stylegraphics/info.gif)  14. INSTALL FRONT NO. 2 SPEAKER ASSEMBLY (for LH Side) Click here
                        
                           
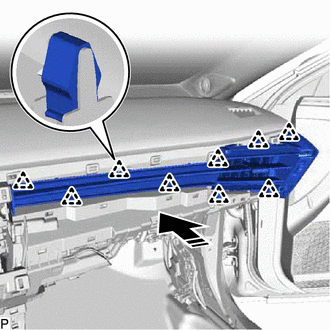
                              ![2019 - 2022 MY Avalon Avalon HV [04/2018 -        ]; AUDIO / VIDEO: INSTRUMENT PANEL SPEAKER: INSTALLATION+](/t3Portal/stylegraphics/info.gif)  15. INSTALL NO. 1 DEFROSTER NOZZLE GARNISH (a) Connect the connector. (b) Engage the 9 guides, 9 clips and 2 claws as shown in the illustration to install the No. 1 defroster nozzle garnish.   
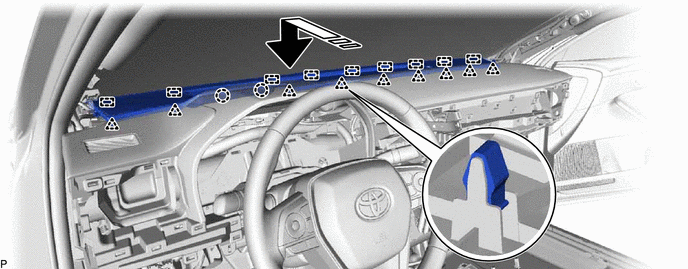


                           |   | Install in this Direction | - | - |  16. INSTALL FRONT PILLAR GARNISH RH HINT: Use the same procedure as for the LH side. Click here
                        
                           
                              ![2019 - 2020 MY Avalon Avalon HV [04/2018 - 08/2020]; INTERIOR PANELS / TRIM: ROOF HEADLINING: INSTALLATION+](/t3Portal/stylegraphics/info.gif)  ![2021 - 2022 MY Avalon Avalon HV [08/2020 -        ]; INTERIOR PANELS / TRIM: ROOF HEADLINING: INSTALLATION+](/t3Portal/stylegraphics/info.gif)  17. INSTALL FRONT PILLAR GARNISH LH Click here
                        
                           
                              ![2019 - 2020 MY Avalon Avalon HV [04/2018 - 08/2020]; INTERIOR PANELS / TRIM: ROOF HEADLINING: INSTALLATION+](/t3Portal/stylegraphics/info.gif)  ![2021 - 2022 MY Avalon Avalon HV [08/2020 -        ]; INTERIOR PANELS / TRIM: ROOF HEADLINING: INSTALLATION+](/t3Portal/stylegraphics/info.gif)  18. INSTALL NO. 2 INSTRUMENT CLUSTER MOULDING (a) Engage the 2 clips as shown in the illustration to install the No. 2 instrument cluster moulding.   
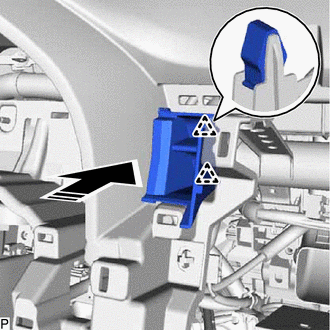


                           |   | Install in this Direction |  19. INSTALL NO. 3 INSTRUMENT CLUSTER FINISH PANEL GARNISH (a) Engage the 2 clips as shown in the illustration to install the No. 3 instrument cluster finish panel garnish.   
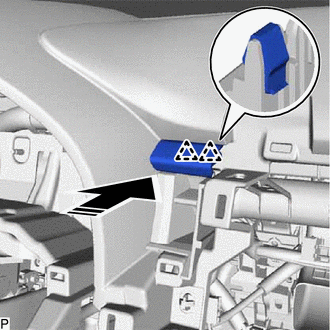


                           |   | Install in this Direction |  20. INSTALL NO. 1 INSTRUMENT PANEL REGISTER ASSEMBLY (a) Engage the 4 clips as shown in the illustration to install the No. 1 instrument panel register assembly.   


                           |   | Install in this Direction |  21. INSTALL NO. 1 INSTRUMENT CLUSTER FINISH PANEL GARNISH (a) Engage the 2 guides and 2 clips as shown in the illustration to install the No. 1 instrument cluster finish panel garnish.   


                           |   | Install in this Direction |  22. INSTALL COMBINATION METER ASSEMBLY Click here
                        
                           
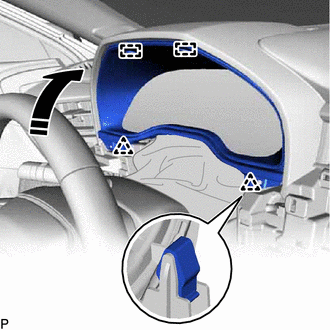
                              ![2019 - 2020 MY Avalon Avalon HV [04/2018 - 08/2020]; METER / GAUGE / DISPLAY: COMBINATION METER: INSTALLATION+](/t3Portal/stylegraphics/info.gif)  ![2021 - 2022 MY Avalon Avalon HV [08/2020 -        ]; METER / GAUGE / DISPLAY: COMBINATION METER: INSTALLATION+](/t3Portal/stylegraphics/info.gif)  23. INSTALL INSTRUMENT CLUSTER FINISH PANEL SUB-ASSEMBLY (a) Engage the 2 guides and 2 clips as shown in the illustration.   


                           |   | Install in this Direction |  (b) Install the 2 clips. (c) Engage the 2 guides and 4 clips as shown in the illustration to install the instrument cluster finish panel sub-assembly.   


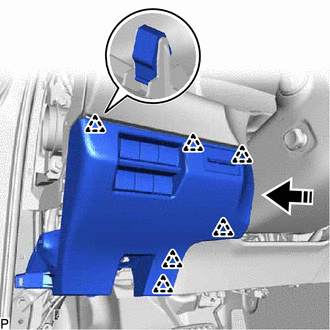
                           |   | Install in this Direction |  24. INSTALL NO. 1 INSTRUMENT PANEL GARNISH SUB-ASSEMBLY (a) Engage the 5 clips as shown in the illustration to install the No. 1 instrument panel garnish sub-assembly.   


                           |   | Install in this Direction |  25. INSTALL LOWER INSTRUMENT PANEL FINISH PANEL ASSEMBLY (a) Connect the connector. (b) Engage the 4 clips as shown in the illustration to install the lower instrument panel finish panel assembly.   


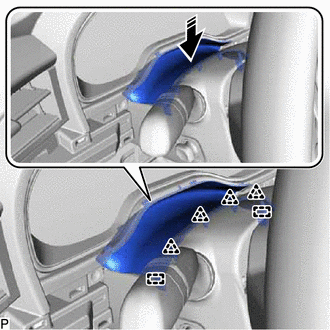
                           |   | Install in this Direction |  26. INSTALL INSTRUMENT CLUSTER FINISH PANEL GARNISH ASSEMBLY (a) Engage the 2 clips and claw as shown in the illustration to install the instrument cluster finish panel garnish assembly.   


                           |   | Install in this Direction |  27. INSTALL NO. 4 INSTRUMENT PANEL REGISTER ASSEMBLY (a) Engage the 9 clips as shown in the illustration.   


                           |   | Install in this Direction |  (b) Install the No. 4 instrument panel register assembly with the screw <D>. 28. INSTALL NO. 2 INSTRUMENT CLUSTER FINISH PANEL GARNISH (a) Engage the 2 guides and 5 clips as shown in the illustration to install the No. 2 instrument cluster finish panel garnish.   
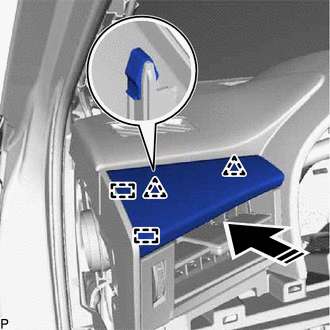


                           |   | Install in this Direction |  29. INSTALL NO. 2 INSTRUMENT PANEL GARNISH SUB-ASSEMBLY (a) Engage the 10 clips as shown in the illustration.   
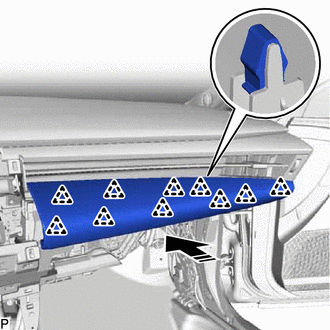


                           |   | Install in this Direction |  (b) Install the No. 2 instrument panel garnish sub-assembly with the screw <D>. 30. INSTALL LOWER CENTER INSTRUMENT PANEL FINISH PANEL (a) Engage the 8 clips as shown in the illustration to install the lower center instrument panel finish panel.   
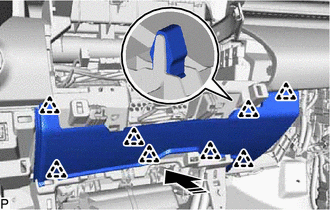


                           |   | Install in this Direction |  31. INSTALL LOWER INSTRUMENT PANEL SUB-ASSEMBLY (a) Connect the connector and engage the clamp. (b) Engage the 3 clips as shown in the illustration.   
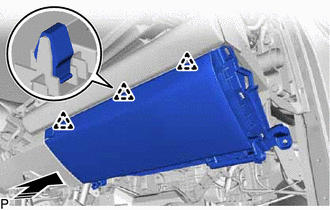


                           |   | Install in this Direction |  (c) Install the lower instrument panel sub-assembly with the 5 screws <C>. 32. INSTALL LOWER NO. 2 INSTRUMENT PANEL AIRBAG ASSEMBLY Click here
                        
                           
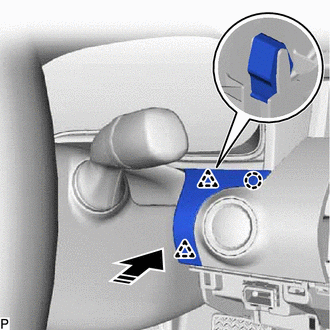
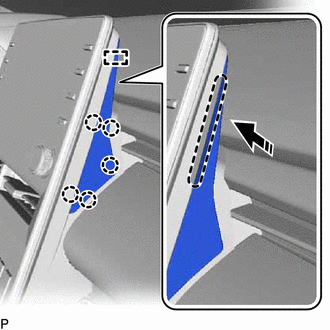
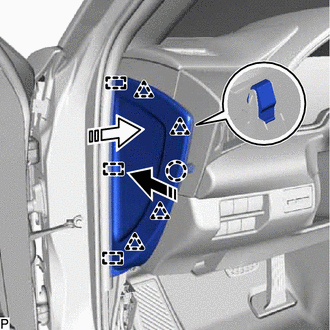
                              ![2019 - 2020 MY Avalon Avalon HV [04/2018 - 08/2020]; SUPPLEMENTAL RESTRAINT SYSTEMS: KNEE AIRBAG ASSEMBLY (for Front Passenger Side): INSTALLATION](/t3Portal/stylegraphics/info.gif)  ![2021 - 2022 MY Avalon Avalon HV [08/2020 -        ]; SUPPLEMENTAL RESTRAINT SYSTEMS: KNEE AIRBAG ASSEMBLY (for Front Passenger Side): INSTALLATION](/t3Portal/stylegraphics/info.gif)  33. INSTALL INSTRUMENT SIDE PANEL RH (a) Insert the instrument side panel RH in the direction indicated by the arrow (1) shown in the illustration to engage the 3 guides.   
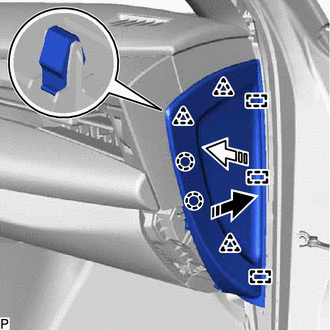


                           |   | Install in this Direction (1) |  
                           |   | Install in this Direction (2) |  (b) Push the instrument side panel RH in the direction indicated by the arrow (2) shown in the illustration to engage the 3 clips and 2 claws and install it. 34. INSTALL FRONT DOOR OPENING TRIM WEATHERSTRIP RH Click here
                        
                           
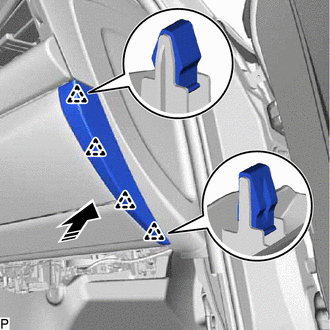
                              ![2019 - 2022 MY Avalon Avalon HV [04/2018 -        ]; DOOR / HATCH: FRONT DOOR OPENING TRIM WEATHERSTRIP: INSTALLATION+](/t3Portal/stylegraphics/info.gif)  35. INSTALL GLOVE COMPARTMENT PLATE (a) Engage the 4 clips as shown in the illustration to install the glove compartment plate.   


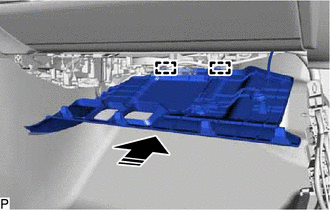
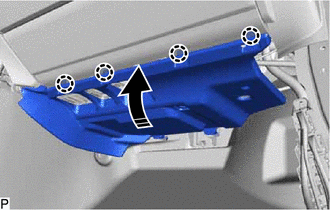
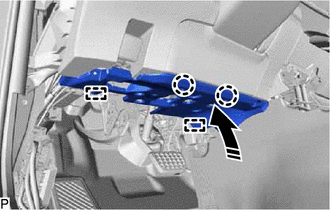
                           |   | Install in this Direction |  36. INSTALL NO. 2 INSTRUMENT PANEL UNDER COVER SUB-ASSEMBLY (a) Connect the connector. (b) Engage the clamp. (c) Engage the 2 guides as shown in the illustration.   


                           |   | Install in this Direction |  (d) Engage the 4 claws as shown in the illustration to install the No. 2 instrument panel under cover sub-assembly.   


                           |   | Install in this Direction |  37. INSTALL COWL SIDE TRIM SUB-ASSEMBLY RH HINT: Use the same procedure as for the LH side. Click here
                        
                           
                              ![2019 - 2020 MY Avalon Avalon HV [04/2018 - 08/2020]; INTERIOR PANELS / TRIM: ROOF HEADLINING: INSTALLATION+](/t3Portal/stylegraphics/info.gif)  ![2021 - 2022 MY Avalon Avalon HV [08/2020 -        ]; INTERIOR PANELS / TRIM: ROOF HEADLINING: INSTALLATION+](/t3Portal/stylegraphics/info.gif)  38. INSTALL FRONT DOOR SCUFF PLATE RH HINT: Use the same procedure as for the LH side. Click here
                        
                           
                              ![2019 - 2020 MY Avalon Avalon HV [04/2018 - 08/2020]; INTERIOR PANELS / TRIM: ROOF HEADLINING: INSTALLATION+](/t3Portal/stylegraphics/info.gif)  ![2021 - 2022 MY Avalon Avalon HV [08/2020 -        ]; INTERIOR PANELS / TRIM: ROOF HEADLINING: INSTALLATION+](/t3Portal/stylegraphics/info.gif)  39. INSTALL NO. 2 HEATER TO REGISTER DUCT SUB-ASSEMBLY (a) Install the No. 2 heater to register duct sub-assembly with the 2 screws <C>. 40. INSTALL RADIO AND DISPLAY RECEIVER ASSEMBLY WITH BRACKET Click here
                        
                           
                              ![2019 - 2022 MY Avalon Avalon HV [04/2018 -        ]; AUDIO / VIDEO: RADIO RECEIVER: INSTALLATION+](/t3Portal/stylegraphics/info.gif)  41. INSTALL CENTER NO. 2 INSTRUMENT CLUSTER FINISH PANEL (a) Engage the guide and 5 claws as shown in the illustration to install the center No. 2 instrument cluster finish panel.   


                           |   | Place Hand Here |  
                           |   | Install in this Direction |  42. INSTALL CENTER NO. 1 INSTRUMENT CLUSTER FINISH PANEL (a) Engage the clip and 2 claws as shown in the illustration to install the center No. 1 instrument cluster finish panel.   


                           |   | Install in this Direction |  43. INSTALL LOWER NO. 1 INSTRUMENT PANEL AIRBAG ASSEMBLY Click here
                        
                           
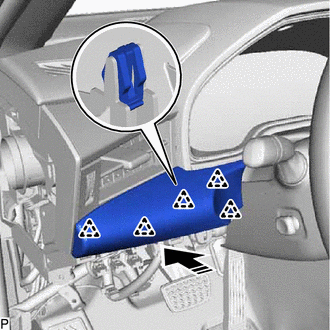
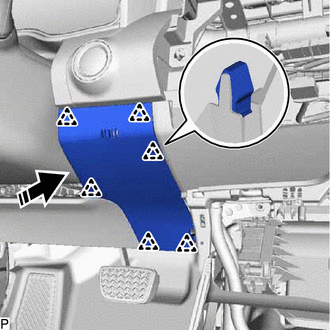
                              ![2019 - 2020 MY Avalon Avalon HV [04/2018 - 08/2020]; SUPPLEMENTAL RESTRAINT SYSTEMS: KNEE AIRBAG ASSEMBLY (for Driver Side): INSTALLATION](/t3Portal/stylegraphics/info.gif)  ![2021 - 2022 MY Avalon Avalon HV [08/2020 -        ]; SUPPLEMENTAL RESTRAINT SYSTEMS: KNEE AIRBAG ASSEMBLY (for Driver Side): INSTALLATION](/t3Portal/stylegraphics/info.gif)  44. INSTALL LOWER NO. 2 INSTRUMENT PANEL FINISH PANEL (a) Engage the 6 clips as shown in the illustration to install the lower No. 2 instrument panel finish panel.   


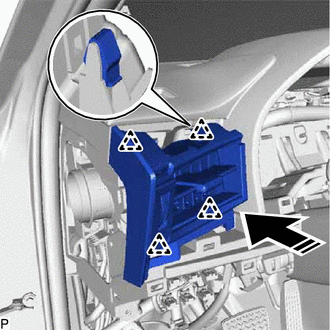
                           |   | Install in this Direction |  45. INSTALL NO. 1 INSTRUMENT PANEL SUB-ASSEMBLY (a) Connect each connector. (b) Engage the clamp. (c) Engage the 6 clips as shown in the illustration to install the No. 1 instrument panel sub-assembly.   


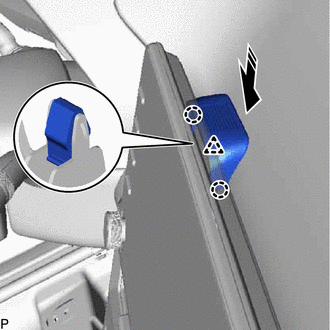
                           |   | Install in this Direction |  46. CONNECT HOOD LOCK CONTROL LEVER SUB-ASSEMBLY (a) Engage the claw and 2 guides to connect the hood lock control lever sub-assembly. 47. INSTALL NO. 1 INSTRUMENT PANEL UNDER COVER SUB-ASSEMBLY (a) Connect the connector and engage the 2 clamps. (b) Engage the 2 claws to install the DLC3 connector. (c) Engage the 2 guides and 2 claws as shown in the illustration.   


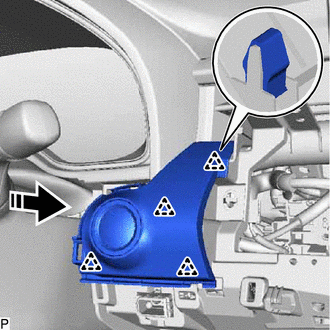
                           |   | Install in this Direction |  (d) Install the No. 1 instrument panel under cover sub-assembly with the 2 screws <C>. 48. INSTALL INSTRUMENT SIDE PANEL LH (a) Insert the instrument side panel LH in the direction indicated by the arrow (1) shown in the illustration to engage the 3 guides.   


                           |   | Install in this Direction (1) |  
                           |   | Install in this Direction (2) |  (b) Push the instrument side panel LH in the direction indicated by the arrow (2) shown in the illustration to engage the 4 clips and claw and install it. 49. INSTALL FRONT DOOR OPENING TRIM WEATHERSTRIP LH Click here
                        
                           
                              ![2019 - 2022 MY Avalon Avalon HV [04/2018 -        ]; DOOR / HATCH: FRONT DOOR OPENING TRIM WEATHERSTRIP: INSTALLATION+](/t3Portal/stylegraphics/info.gif)  50. INSTALL COWL SIDE TRIM SUB-ASSEMBLY LH Click here
                        
                           
                              ![2019 - 2020 MY Avalon Avalon HV [04/2018 - 08/2020]; INTERIOR PANELS / TRIM: ROOF HEADLINING: INSTALLATION+](/t3Portal/stylegraphics/info.gif)  ![2021 - 2022 MY Avalon Avalon HV [08/2020 -        ]; INTERIOR PANELS / TRIM: ROOF HEADLINING: INSTALLATION+](/t3Portal/stylegraphics/info.gif)  51. INSTALL FRONT DOOR SCUFF PLATE LH Click here
                        
                           
                              ![2019 - 2020 MY Avalon Avalon HV [04/2018 - 08/2020]; INTERIOR PANELS / TRIM: ROOF HEADLINING: INSTALLATION+](/t3Portal/stylegraphics/info.gif)  ![2021 - 2022 MY Avalon Avalon HV [08/2020 -        ]; INTERIOR PANELS / TRIM: ROOF HEADLINING: INSTALLATION+](/t3Portal/stylegraphics/info.gif)  52. INSTALL CONSOLE ASSEMBLY Click here
                        
                           
                              ![2019 - 2020 MY Avalon Avalon HV [04/2018 - 08/2020]; INTERIOR PANELS / TRIM: FRONT CONSOLE BOX: INSTALLATION](/t3Portal/stylegraphics/info.gif)  ![2021 - 2022 MY Avalon Avalon HV [08/2020 -        ]; INTERIOR PANELS / TRIM: FRONT CONSOLE BOX: INSTALLATION](/t3Portal/stylegraphics/info.gif)  |