| 
                     
                        | Last Modified: 08-21-2023 | 6.11:8.1.0 | Doc ID: RM100000001ATXA |  
                        | Model Year Start: 2019 | Model: Avalon HV | Prod Date Range: [04/2018 - 08/2021] |  
                        | Title: SUSPENSION CONTROL: SUSPENSION CONTROL ECU: REMOVAL; 2019 - 2021 MY Avalon Avalon HV [04/2018 - 08/2021] |  REMOVALCAUTION / NOTICE / HINTThe necessary procedures (adjustment, calibration, initialization or registration) that must be performed after parts are removed and installed, or replaced during absorber control ECU removal/installation are shown below. Necessary Procedures After Parts Removed/Installed/Replaced


                           | Replaced Part or Performed Procedure | Necessary Procedure | Effect/Inoperative Function when Necessary Procedure not Performed | Link |  
                           
                         
                           | Replacement of the absorber control ECU | Registration of vehicle identification information | 
                                 
                                    
Interrupts damping force control
DTCs are stored
 | 


                                          ![2019 - 2022 MY Avalon Avalon HV [04/2018 -        ]; SUSPENSION CONTROL: ADAPTIVE VARIABLE SUSPENSION SYSTEM: TEST MODE PROCEDURE](/t3Portal/stylegraphics/info.gif)  |  
                           | Disconnect cable from negative battery terminal | Perform steering sensor zero point calibration | Lane departure alert system (w/ Steering Control) | 


                                          ![2019 - 2021 MY Avalon [04/2018 - 08/2021]; PRE-COLLISION: PRE-COLLISION SYSTEM (for Gasoline Model): INITIALIZATION](/t3Portal/stylegraphics/info.gif)  |  
                           | Pre-collision system |  
                           | Intelligent clearance sonar system* |  
                           | Lighting system (for Gasoline Model with Cornering Light) |  
                           | Memorize steering angle neutral point | Parking assist monitor system | 


                                          ![2019 - 2022 MY Avalon [04/2018 -        ]; PARK ASSIST / MONITORING: PARKING ASSIST MONITOR SYSTEM (for Gasoline Model): INITIALIZATION](/t3Portal/stylegraphics/info.gif)  |  
                           | Panoramic view monitor system | 


                                          ![2019 - 2022 MY Avalon [04/2018 -        ]; PARK ASSIST / MONITORING: PANORAMIC VIEW MONITOR SYSTEM (for Gasoline Model): INITIALIZATION](/t3Portal/stylegraphics/info.gif)  |  PROCEDURE1.   PRECAUTION NOTICE: After turning the engine switch off, waiting time may be required before disconnecting the cable from the negative (-) battery terminal. Therefore, make sure to read the disconnecting the cable from the negative (-) battery terminal notices before proceeding with work. Click here
                        
                           
                              ![2019 - 2022 MY Avalon Avalon HV [04/2018 -        ]; INTRODUCTION: REPAIR INSTRUCTION: PRECAUTION](/t3Portal/stylegraphics/info.gif)  2. DISCONNECT CABLE FROM NEGATIVE BATTERY TERMINAL Click here
                        
                           
                              ![2019 - 2021 MY Avalon [04/2018 - 08/2021]; MAINTENANCE: 2GR-FKS BATTERY: REMOVAL+](/t3Portal/stylegraphics/info.gif)  NOTICE: When disconnecting the cable, some systems need to be initialized after the cable is reconnected. Click here
                        
                           
                              ![2019 - 2020 MY Avalon Avalon HV [04/2018 - 08/2020]; INTRODUCTION: REPAIR INSTRUCTION: INITIALIZATION](/t3Portal/stylegraphics/info.gif)  ![2021 MY Avalon Avalon HV [08/2020 - 08/2021]; INTRODUCTION: REPAIR INSTRUCTION: INITIALIZATION](/t3Portal/stylegraphics/info.gif)  3. REMOVE SPARE WHEEL COVER ASSEMBLY Click here
                        
                           
                              ![2019 - 2022 MY Avalon Avalon HV [04/2018 -        ]; DOOR / HATCH: LUGGAGE COMPARTMENT DOOR SUPPORT: REMOVAL+](/t3Portal/stylegraphics/info.gif)  4. REMOVE BAGGAGE HOLDER NET Click here
                        
                           
                              ![2019 - 2022 MY Avalon Avalon HV [04/2018 -        ]; DOOR / HATCH: LUGGAGE COMPARTMENT DOOR SUPPORT: REMOVAL+](/t3Portal/stylegraphics/info.gif)  5. REMOVE NO. 1 LUGGAGE COMPARTMENT TRIM HOOK Click here
                        
                           
                              ![2019 - 2022 MY Avalon Avalon HV [04/2018 -        ]; DOOR / HATCH: LUGGAGE COMPARTMENT DOOR SUPPORT: REMOVAL+](/t3Portal/stylegraphics/info.gif)  6. REMOVE REAR FLOOR FINISH PLATE Click here
                        
                           
                              ![2019 - 2022 MY Avalon Avalon HV [04/2018 -        ]; DOOR / HATCH: LUGGAGE COMPARTMENT DOOR SUPPORT: REMOVAL+](/t3Portal/stylegraphics/info.gif)  7. REMOVE LUGGAGE COMPARTMENT INNER TRIM PAD Click here
                        
                           
                              ![2019 - 2022 MY Avalon Avalon HV [04/2018 -        ]; DOOR / HATCH: LUGGAGE COMPARTMENT DOOR SUPPORT: REMOVAL+](/t3Portal/stylegraphics/info.gif)  8. REMOVE LUGGAGE COMPARTMENT TRIM INNER COVER RH Click here
                        
                           
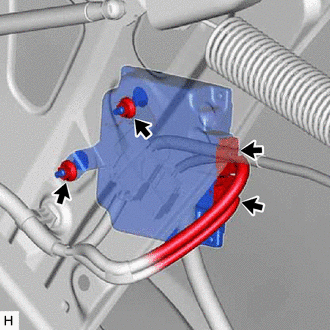
                              ![2019 - 2022 MY Avalon Avalon HV [04/2018 -        ]; DOOR / HATCH: LUGGAGE COMPARTMENT DOOR SUPPORT: REMOVAL+](/t3Portal/stylegraphics/info.gif)  9. REMOVE ABSORBER CONTROL ECU 
                     
                        
                           | (a) Disconnect the 2 connectors from the absorber control ECU. |  |  (b) Remove the 2 nuts and absorber control ECU. 
                     NOTICE: 
                        
Avoid any impact to the absorber control ECU.
Do not drop the absorber control ECU. If it is dropped, replace it with a new one.
 |