| Last Modified: 08-21-2023 | 6.11:8.1.0 | Doc ID: RM100000001ATVA |
| Model Year Start: 2019 | Model: Avalon | Prod Date Range: [04/2018 - ] |
| Title: NAVIGATION / MULTI INFO DISPLAY: NAVIGATION SYSTEM (for Gasoline Model): Steering Pad Switch Circuit; 2019 - 2022 MY Avalon [04/2018 - ] | ||
|
Steering Pad Switch Circuit |
DESCRIPTION
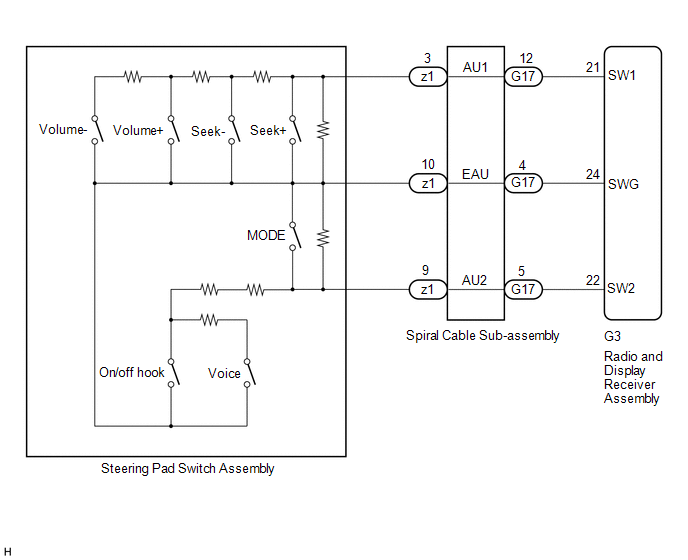
This circuit sends an operation signal from the steering pad switch assembly to the radio and display receiver assembly.
If there is an open in the circuit, the audio system cannot be operated using the steering pad switch assembly.
If there is a short in the circuit, the same condition as when a switch is continuously depressed occurs.
Therefore, the radio and display receiver assembly cannot be operated using the steering pad switch assembly, and the radio and display receiver assembly itself will not function.
WIRING DIAGRAM

CAUTION / NOTICE / HINT
NOTICE:
The vehicle is equipped with a Supplemental Restraint System (SRS) which includes components such as airbags. Before servicing (including removal or installation of parts), be sure to read the precaution for Supplemental Restraint System.
PROCEDURE
|
1. |
CHECK HARNESS AND CONNECTOR (STEERING PAD SWITCH SIGNAL) |
(a) Disconnect the G3 radio and display receiver assembly connector.
(b) Measure the resistance according to the value(s) in the table below.
Standard Resistance:
|
Tester Connection |
Condition |
Specified Condition |
|---|---|---|
|
G3-21 (SW1) - G3-24 (SWG) |
No switch pushed |
95 to 105 kΩ |
|
Seek+ switch pushed |
Below 2.5 Ω |
|
|
Seek- switch pushed |
313 to 345 Ω |
|
|
Volume+ switch pushed |
950 to 1050 Ω |
|
|
Volume- switch pushed |
2955 to 3265 Ω |
|
|
G3-22 (SW2) - G3-24 (SWG) |
No switch pushed |
95 to 105 kΩ |
|
MODE switch pushed |
Below 2.5 Ω |
|
|
On/off hook switch pushed |
950 to 1050 Ω |
|
|
Voice switch pushed |
2955 to 3265 Ω |
| OK |

|
PROCEED TO NEXT SUSPECTED AREA SHOWN IN PROBLEM SYMPTOMS TABLE
|
|
|
2. |
INSPECT STEERING PAD SWITCH ASSEMBLY |
(a) Remove the steering pad switch assembly.
(b) Inspect the steering pad switch assembly.
| NG |

|
|
|
3. |
INSPECT SPIRAL CABLE SUB-ASSEMBLY |
(a) Remove the spiral cable sub-assembly.
(b) Inspect the spiral cable sub-assembly.
| OK |

|
REPAIR OR REPLACE HARNESS OR CONNECTOR (RADIO AND DISPLAY RECEIVER ASSEMBLY - SPIRAL CABLE SUB-ASSEMBLY) |
| NG |

|
|
|
|
![2019 - 2020 MY Avalon [04/2018 - 08/2020]; SUPPLEMENTAL RESTRAINT SYSTEMS: AIRBAG SYSTEM (for Gasoline Model): PRECAUTION](/t3Portal/stylegraphics/info.gif)
