| Last Modified: 08-21-2023 | 6.11:8.1.0 | Doc ID: RM100000001ATSO |
| Model Year Start: 2019 | Model: Avalon HV | Prod Date Range: [04/2018 - ] |
| Title: AUDIO / VIDEO: REAR DOOR SPEAKER: REMOVAL; 2019 - 2022 MY Avalon Avalon HV [04/2018 - ] | ||
REMOVAL
CAUTION / NOTICE / HINT
HINT:
- Use the same procedure for the RH side and LH side.
- The following procedure is for the LH side.
PROCEDURE
1. REMOVE REAR DOOR ARMREST COVER SUB-ASSEMBLY
Click here
![2019 - 2020 MY Avalon Avalon HV [04/2018 - 08/2020]; DOOR / HATCH: REAR DOOR: DISASSEMBLY+](/t3Portal/stylegraphics/info.gif)
2. REMOVE REAR DOOR TRIM ASSEMBLY COVER
Click here
3. REMOVE REAR POWER WINDOW REGULATOR SWITCH ASSEMBLY WITH REAR DOOR UPPER ARMREST BASE PANEL
Click here
4. REMOVE REAR DOOR TRIM BOARD SUB-ASSEMBLY
Click here
5. REMOVE REAR SPEAKER ASSEMBLY
NOTICE:
Do not touch the speaker cone.
|
(a) Disconnect the connector. |
|
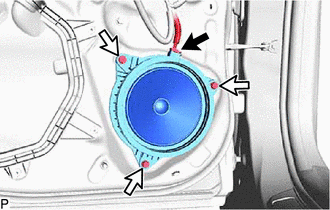
(b) Remove the 3 screws.
|
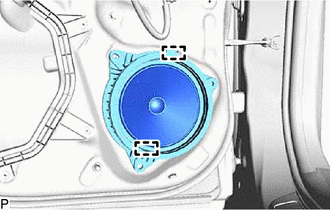
(c) Disengage the 2 guides to remove the rear speaker assembly. |
|
6. REMOVE REAR NO. 2 SPEAKER ASSEMBLY
NOTICE:
Do not touch the speaker cone.
(a) for 8 Speakers:
(1) Disengage the 3 claws to remove the rear No. 2 speaker assembly as shown in the illustration.
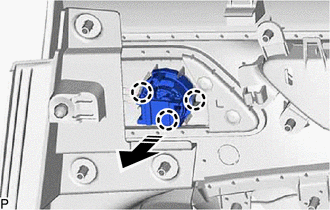

|
Remove in this Direction |
(b) for 14 Speakers:
(1) Disengage the 3 claws to remove the rear No. 2 speaker assembly as shown in the illustration.
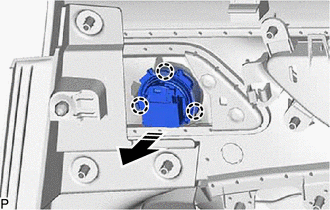
|
|
Remove in this Direction |
|
|
|