- Parking assist monitor system initialization
- Television camera assembly optical axis (Back camera position setting)
| Last Modified: 08-21-2023 | 6.11:8.1.0 | Doc ID: RM100000001AQW6 |
| Model Year Start: 2019 | Model: Avalon HV | Prod Date Range: [04/2018 - ] |
| Title: DOOR / HATCH: LUGGAGE COMPARTMENT DOOR: DISASSEMBLY; 2019 - 2022 MY Avalon Avalon HV [04/2018 - ] | ||
DISASSEMBLY
CAUTION / NOTICE / HINT
The necessary procedures (adjustment, calibration, initialization, or registration) that must be performed after parts are removed and installed, or replaced during luggage compartment door removal/installation are shown below.
Necessary Procedure After Parts Removed/Installed/Replaced (for Gasoline Model)
|
Replaced Part or Performed Procedure |
Necessary Procedure |
Effect/Inoperative Function When Necessary Procedures are not Performed |
Link |
|---|---|---|---|
|
Television camera assembly (w/ Parking assist monitor system) |
|
Parking assist monitor system |
|
|
Television camera assembly (w/ Panoramic view monitor system) |
|
Panoramic view monitor system |
Necessary Procedure After Parts Removed/Installed/Replaced (for HV Model)
|
Replaced Part or Performed Procedure |
Necessary Procedure |
Effect/Inoperative Function When Necessary Procedures are not Performed |
Link |
|---|---|---|---|
|
Television camera assembly (w/ Parking assist monitor system) |
|
Parking assist monitor system |
|
|
Television camera assembly (w/ Panoramic view monitor system) |
|
Panoramic view monitor system |
PROCEDURE
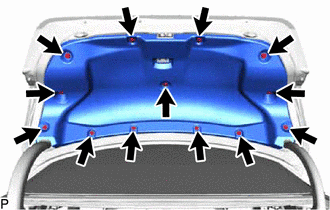
1. REMOVE LUGGAGE COMPARTMENT DOOR COVER
|
(a) Using a clip remover, remove the 13 clips and luggage compartment door cover. |
|
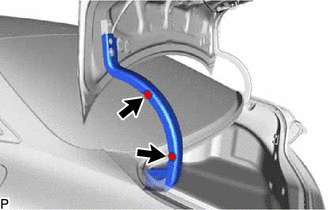
2. REMOVE BACK DOOR UPPER HINGE PROTECTOR LH
|
(a) Remove the 2 clips and back door upper hinge protector LH. |
|
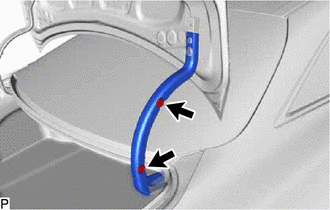
3. REMOVE BACK DOOR UPPER HINGE PROTECTOR RH
|
(a) Remove the 2 clips and back door upper hinge protector RH. |
|
4. REMOVE LUGGAGE COMPARTMENT DOOR LOCK ASSEMBLY
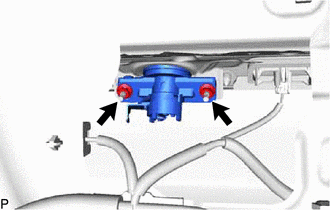
5. REMOVE LUGGAGE COMPARTMENT DOOR LOCK CYLINDER ASSEMBLY
|
(a) Remove the 2 nuts and luggage compartment door lock cylinder assembly. |
|
6. REMOVE LUGGAGE COMPARTMENT DOOR CUSHION
|
(a) Disengage the 8 claws to remove the 2 luggage compartment door cushions. |
|
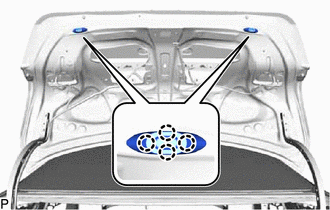
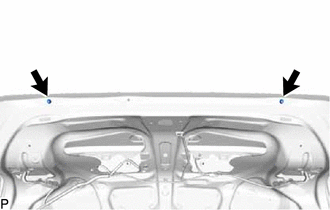
7. REMOVE HOLE PLUG
|
(a) Remove the 2 hole plugs. |
|
8. REMOVE REAR LIGHT ASSEMBLY LH
9. REMOVE REAR LIGHT ASSEMBLY RH
HINT:
Use the same procedure as for the LH side.
10. REMOVE NO. 2 BACK DOOR OUTSIDE GARNISH
11. REMOVE LUGGAGE COMPARTMENT DOOR OUTSIDE GARNISH SUB-ASSEMBLY
12. REMOVE LUGGAGE ELECTRICAL KEY SWITCH
13. REMOVE TELEVISION CAMERA ASSEMBLY
14. REMOVE LICENSE PLATE LIGHT ASSEMBLY
HINT:
Use the same procedure as for the LH side.
15. REMOVE REAR SPOILER SUB-ASSEMBLY (w/ Rear Spoiler)
|
|
|
![2019 - 2022 MY Avalon [04/2018 - ]; PARK ASSIST / MONITORING: PARKING ASSIST MONITOR SYSTEM (for Gasoline Model): CALIBRATION](/t3Portal/stylegraphics/info.gif)
