| Last Modified: 09-10-2025 | 6.11:8.1.0 | Doc ID: RM100000001APTI |
| Model Year Start: 2019 | Model: Avalon | Prod Date Range: [04/2018 - ] |
| Title: SEAT: FRONT POWER SEAT CONTROL SYSTEM (for Gasoline Model with Memory): B2651; Reclining Sensor Malfunction; 2019 - 2022 MY Avalon [04/2018 - ] | ||
|
DTC |
B2651 |
Reclining Sensor Malfunction |
DESCRIPTION
When the position control ECU assembly does not receive a reclining motor position sensor signal despite the seat having been moved forward or rearward by power seat motor operation, this DTC is stored.
|
DTC No. |
Detection Item |
DTC Detection Condition |
Trouble Area |
|---|---|---|---|
|
B2651 |
Reclining Sensor Malfunction |
Reclining motor position sensor signal not received when power seat moved forward or rearward |
|
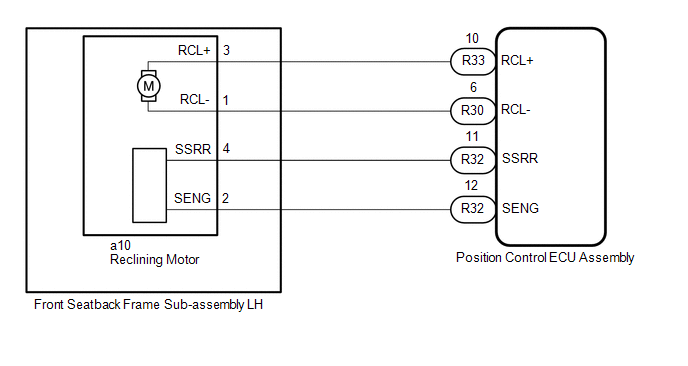
WIRING DIAGRAM

PROCEDURE
PROCEDURE
|
1. |
CLEAR DTC |
(a) Clear the DTCs.
Body Electrical > Driver Seat > Clear DTCs
|
|
2. |
CHECK FOR DTC |
(a) Check for DTCs.
Body Electrical > Driver Seat > Trouble Codes
OK:
DTC B2651 is not output.
| OK |

|
| NG |

|
|
3. |
PERFORM ACTIVE TEST USING TECHSTREAM (SEAT RECLINING OPERATION) |
(a) Connect the Techstream to the DLC3.
(b) Turn the engine switch on (IG).
(c) Turn the Techstream on.
(d) Enter the following menus: Body Electrical / Driver Seat / Active Test.
(e) Perform the Active Test according to the display on the Techstream.
Body Electrical > Driver Seat > Active Test
|
Tester Display |
Measurement Item |
Control Range |
Diagnostic Note |
|---|---|---|---|
|
Seat Reclining |
Seat reclining operation |
OFF/Rear/Front |
- |
Body Electrical > Driver Seat > Active Test
|
Tester Display |
|---|
|
Seat Reclining |
OK:
Reclining motor operates normally.
| NG |

|
|
|
4. |
CHECK POSITION CONTROL ECU ASSEMBLY (RECLINING MOTOR CIRCUIT) |
(a) Disconnect the a10 reclining motor (front seatback frame sub-assembly LH) connector.
(b) Measure the voltage according to the value(s) in the table below.
Standard Voltage:
|
Tester Connection |
Condition |
Specified Condition |
|---|---|---|
|
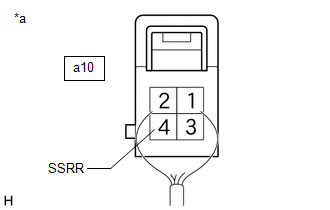
a10-4 (SSRR) - a10-2 (SENG) |
Reclining switch on |
4.8 to 5.1 V |
| NG |

|
|
|
5. |
CHECK RECLINING MOTOR (FRONT SEATBACK FRAME SUB-ASSEMBLY LH) |
|
(a) Reconnect the a10 reclining motor (front seatback frame sub-assembly LH) connector. |
|
(b) Measure the voltage according to the value(s) in the table below.
Standard Voltage:
|
Tester Connection |
Condition |
Specified Condition |
|---|---|---|
|
a10-4 (SSRR) - Body ground |
Reclining motor operating |
4.5 to 4.8 V |
| OK |

|
REPLACE POSITION CONTROL ECU ASSEMBLY |
| NG |

|
REPLACE RECLINING MOTOR (FRONT SEATBACK FRAME SUB-ASSEMBLY LH) |
|
6. |
CHECK HARNESS AND CONNECTOR (POSITION CONTROL ECU ASSEMBLY - RECLINING MOTOR (FRONT SEATBACK FRAME SUB-ASSEMBLY LH)) |
(a) Disconnect the R32 position control ECU assembly connector.
(b) Measure the resistance according to the value(s) in the table below.
Standard Resistance:
|
Tester Connection |
Condition |
Specified Condition |
|---|---|---|
|
R32-11 (SSRR) - a10-4 (SSRR) |
Always |
Below 1 Ω |
|
R32-11 (SSRR) or a10-4 (SSRR) - Body ground |
Always |
10 kΩ or higher |
|
R32-12 (SENG) - a10-2 (SENG) |
Always |
Below 1 Ω |
|
R32-12 (SENG) or a10-2 (SENG) - Body ground |
Always |
10 kΩ or higher |
| OK |

|
REPLACE POSITION CONTROL ECU ASSEMBLY |
| NG |

|
REPAIR OR REPLACE HARNESS OR CONNECTOR |
|
7. |
INSPECT RECLINING MOTOR (FRONT SEATBACK FRAME SUB-ASSEMBLY LH) |
(a) Remove the reclining motor (front seatback frame sub-assembly LH).
(b) Inspect the reclining motor (front seatback frame sub-assembly LH).
| NG |

|
REPLACE RECLINING MOTOR (FRONT SEATBACK FRAME SUB-ASSEMBLY LH) |
|
|
8. |
CHECK HARNESS AND CONNECTOR (POSITION CONTROL ECU ASSEMBLY - RECLINING MOTOR (FRONT SEATBACK FRAME SUB-ASSEMBLY LH)) |
(a) Disconnect the R33 and R30 position control ECU assembly connectors.
(b) Measure the resistance according to the value(s) in the table below.
Standard Resistance:
|
Tester Connection |
Condition |
Specified Condition |
|---|---|---|
|
R33-10 (RCL+) - a10-3 (RCL+) |
Always |
Below 1 Ω |
|
R33-10 (RCL+) or a10-3 (RCL+) - Body ground |
Always |
10 kΩ or higher |
|
R30-6 (RCL-) - a10-1 (RCL-) |
Always |
Below 1 Ω |
|
R30-6 (RCL-) or a10-1 (RCL-) - Body ground |
Always |
10 kΩ or higher |
| OK |

|
REPLACE POSITION CONTROL ECU ASSEMBLY |
| NG |

|
REPAIR OR REPLACE HARNESS OR CONNECTOR |
|
|
|


![2019 - 2021 MY Avalon Avalon HV [04/2018 - 08/2021]; SEAT: POWER SEAT CONTROL ECU: REMOVAL](/t3Portal/stylegraphics/info.gif)