- Rear door glass sub-assembly
- Rear door glass run
| Last Modified: 08-21-2023 | 6.11:8.1.0 | Doc ID: RM100000001AOVN |
| Model Year Start: 2019 | Model: Avalon HV | Prod Date Range: [04/2018 - 08/2020] |
| Title: EXTERIOR PANELS / TRIM: BLACK OUT TAPE (for Rear Door): REMOVAL; 2019 - 2020 MY Avalon Avalon HV [04/2018 - 08/2020] | ||
REMOVAL
CAUTION / NOTICE / HINT
The necessary procedures (adjustment, calibration, initialization, or registration) that must be performed after parts are removed and installed, or replaced during black out tape removal/installation are shown below.
Necessary Procedure After Parts Removed/Installed/Replaced (for Gasoline Model)
|
Replaced Part or Performed Procedure |
Necessary Procedure |
Effect/Inoperative Function When Necessary Procedures are not Performed |
Link |
|---|---|---|---|
| *: When performing learning using the Techstream. | |||
|
Disconnect cable from negative battery terminal |
Perform steering sensor zero point calibration |
Lane Departure Alert System (w/ Steering Control) |
|
|
Pre-collision System |
|||
|
Intelligent Clearance Sonar System* |
|||
|
Lighting System (for Gasoline Model with Cornering Light) |
|||
|
Memorize steering angle neutral point |
Parking Assist Monitor System |
||
|
Panoramic View Monitor System |
|||
|
|
Initialize power window control system |
|
|
Necessary Procedure After Parts Removed/Installed/Replaced (for HV Model)
|
Replaced Part or Performed Procedure |
Necessary Procedure |
Effect/Inoperative Function When Necessary Procedures are not Performed |
Link |
|---|---|---|---|
| *: When performing learning using the Techstream. | |||
|
Disconnect cable from negative auxiliary battery terminal |
Perform steering sensor zero point calibration |
Lane Departure Alert System (w/ Steering Control) |
|
|
Pre-collision System |
|||
|
Intelligent Clearance Sonar System* |
|||
|
Lighting System (for HV Model with Cornering Light) |
|||
|
Memorize steering angle neutral point |
Parking Assist Monitor System |
||
|
Panoramic View Monitor System |
|||
|
Initialize power window control system |
|
|
HINT:
- Use the same procedure for the RH side and LH side.
- The following procedure is for the LH side.
PROCEDURE
1. PRECAUTION
NOTICE:
After turning the engine switch (for Gasoline Model) or power switch (for HV Model) off, waiting time may be required before disconnecting the cable from the negative (-) auxiliary battery terminal. Therefore, make sure to read the disconnecting the cable from the negative (-) auxiliary battery terminal notices before proceeding with work.
2. REMOVE LUGGAGE TRIM SERVICE HOLE COVER (for HV Model)
3. DISCONNECT CABLE FROM NEGATIVE AUXILIARY BATTERY TERMINAL
for A25A-FXS:
for 2GR-FKS:
4. REMOVE REAR DOOR ARMREST COVER SUB-ASSEMBLY
5. REMOVE REAR DOOR TRIM ASSEMBLY COVER
6. REMOVE REAR POWER WINDOW REGULATOR SWITCH ASSEMBLY WITH REAR DOOR UPPER ARMREST BASE PANEL
7. REMOVE REAR DOOR TRIM BOARD SUB-ASSEMBLY
8. REMOVE REAR DOOR NO. 1 TRIM BRACKET
9. REMOVE REAR DOOR SERVICE HOLE COVER
10. REMOVE REAR DOOR INNER GLASS WEATHERSTRIP
11. REMOVE REAR DOOR NO. 2 SERVICE HOLE COVER
12. REMOVE REAR DOOR GLASS RUN
13. REMOVE REAR DOOR REAR LOWER WINDOW FRAME SUB-ASSEMBLY
14. DISCONNECT REAR DOOR WEATHERSTRIP
15. REMOVE REAR DOOR REAR GUIDE SEAL
16. REMOVE REAR DOOR GLASS SUB-ASSEMBLY
17. REMOVE REAR DOOR CHECK ASSEMBLY
18. REMOVE REAR DOOR WEATHERSTRIP
19. REMOVE REAR DOOR FRAME GARNISH
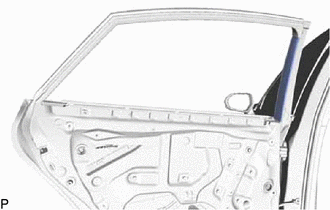
20. REMOVE NO. 1 BLACK OUT TAPE
HINT:
When removing the No. 1 black out tape, heat the vehicle body and No. 1 black out tape using a heat light.
Heating Temperature
|
Item |
Temperature |
|---|---|
|
No. 1 Black Out Tape and Vehicle Body |
40 to 60°C (104 to 140°F) |
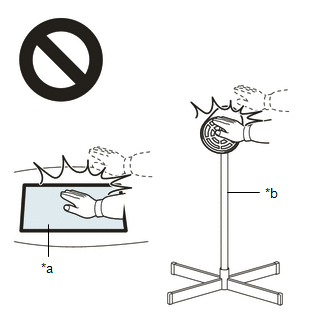
CAUTION:
- Do not touch the heat light and heated parts, touching the heat light may result in burns.
- Touching heated parts for a long time may result in burns.

|
*a |
Heated Part |
|
*b |
Heat Light |
NOTICE:
Do not heat the vehicle body excessively.
(a) Using a heat light, heat the No. 1 black out tape and vehicle body.
|
(b) Pull back on one of the ends of the No. 1 black out tape to remove it. HINT: When pulling on the No. 1 black out tape, pull it parallel to the vehicle body. |
|
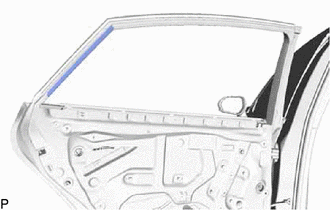
21. REMOVE NO. 3 BLACK OUT TAPE
HINT:
When removing the No. 3 black out tape, heat the vehicle body and No. 3 black out tape using a heat light.
Heating Temperature
|
Item |
Temperature |
|---|---|
|
No. 3 Black Out Tape and Vehicle Body |
40 to 60°C (104 to 140°F) |
CAUTION:
- Do not touch the heat light and heated parts, touching the heat light may result in burns.
- Touching heated parts for a long time may result in burns.

|
*a |
Heated Part |
|
*b |
Heat Light |
NOTICE:
Do not heat the vehicle body excessively.
(a) Using a heat light, heat the No. 3 black out tape and vehicle body.
|
(b) Pull back on one of the ends of the No. 3 black out tape to remove it. HINT: When pulling on the No. 3 black out tape, pull it parallel to the vehicle body. |
|
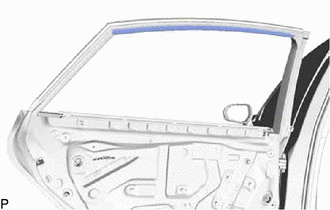
22. REMOVE NO. 2 BLACK OUT TAPE
HINT:
When removing the No. 2 black out tape, heat the vehicle body and No. 2 black out tape using a heat light.
Heating Temperature
|
Item |
Temperature |
|---|---|
|
No. 2 Black Out Tape and Vehicle Body |
40 to 60°C (104 to 140°F) |
CAUTION:
- Do not touch the heat light and heated parts, touching the heat light may result in burns.
- Touching heated parts for a long time may result in burns.

|
*a |
Heated Part |
|
*b |
Heat Light |
NOTICE:
Do not heat the vehicle body excessively.
(a) Using a heat light, heat the No. 2 black out tape and vehicle body.
|
(b) Pull back on one of the ends of the No. 2 black out tape to remove it. HINT: When pulling on the No. 2 black out tape, pull it parallel to the vehicle body. |
|
|
|
|
![2019 - 2022 MY Avalon [04/2018 - ]; PARK ASSIST / MONITORING: INTELLIGENT CLEARANCE SONAR SYSTEM (for Gasoline Model): CALIBRATION](/t3Portal/stylegraphics/info.gif)


