| 
                     
                        | Last Modified: 08-21-2023 | 6.11:8.1.0 | Doc ID: RM100000001AOV3 |  
                        | Model Year Start: 2019 | Model: Avalon HV | Prod Date Range: [04/2018 -                    
                                       ] |  
                        | Title: EXTERIOR PANELS / TRIM: WINDSHIELD OUTSIDE MOULDING: REMOVAL; 2019 - 2022 MY Avalon Avalon HV [04/2018 -        ] |  REMOVALCAUTION / NOTICE / HINT
                     HINT: 
                        
Use the same procedure for the RH side and LH side.
The following procedure is for the LH side.
 PROCEDURE1. REMOVE FRONT FENDER TO COWL SIDE SEAL Click here
                        
                           
                              ![2019 - 2022 MY Avalon Avalon HV [04/2018 -        ]; WIPER / WASHER: FRONT WIPER MOTOR: REMOVAL+](/t3Portal/stylegraphics/info.gif)  
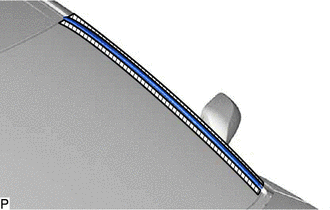
2. REMOVE LOWER WINDSHIELD OUTSIDE MOULDING 
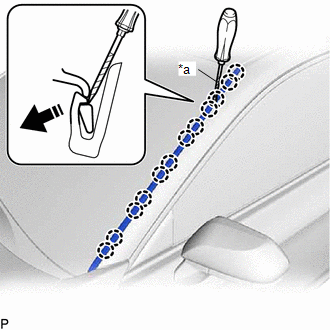
(a) Apply protective tape around the lower windshield outside moulding as shown in the illustration.   


                           |   | Protective Tape |  (b) Using a screwdriver with its tip wrapped with protective tape, disengage the 12 claws as shown in the illustration.   


                           | *a | Protective Tape |  
                           |   | Remove in this Direction |  3. REMOVE NO. 1 WINDSHIELD OUTSIDE MOULDING CLIP HINT: Perform the following procedure only when replacement of a No. 1 windshield outside moulding clip is necessary. 
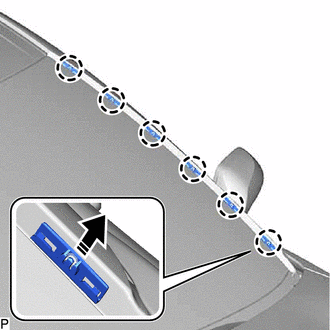
(a) Disengage the 6 claws to remove the 6 No. 1 windshield outside moulding clips as shown in the illustration.   


                           |   | Remove in this Direction |  4. REMOVE NO. 3 WINDSHIELD OUTSIDE MOULDING CLIP HINT: Perform the following procedure only when replacement of a No. 3 windshield outside moulding clip is necessary. (a) Remove the windshield glass sub-assembly. Click here
                        
                           
                              ![2019 - 2020 MY Avalon Avalon HV [04/2018 - 08/2020]; WINDOW / GLASS: WINDSHIELD GLASS: REMOVAL](/t3Portal/stylegraphics/info.gif)  ![2021 MY Avalon Avalon HV [08/2020 - 08/2021]; WINDOW / GLASS: WINDSHIELD GLASS: REMOVAL](/t3Portal/stylegraphics/info.gif)  ![2022 MY Avalon Avalon HV [08/2021 -        ]; WINDOW / GLASS: WINDSHIELD GLASS: REMOVAL](/t3Portal/stylegraphics/info.gif)  
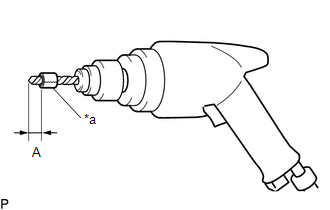
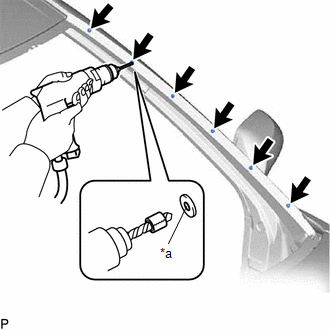
(b) Insert a 4.0 mm (0.157 in.) drill bit into a drill. 
                     
                        
                           | (c) Tape the 4.0 mm (0.157 in.) drill bit 5.0 mm (0.197 in.) from the tip as shown in the illustration. Standard Measurement:  


                                       | Area | Measurement |  
                                       | A | 5.0 mm (0.197 in.) |  NOTICE: Tape the 4.0 mm (0.157 in.) drill bit to prevent the drill bit from going too deep. |  |  
                     
                        
                           | (d) Lightly press the drill bit against the No. 3 windshield outside moulding clips to drill off the No. 3 windshield outside moulding clip flanges, and remove the 6 No. 3 windshield outside moulding clips. CAUTION: Be careful of the drilled No. 3 windshield outside moulding clips, as they may be hot. 
                                 NOTICE: 
                                    
Make sure to protect both the inside and outside of the vehicle as the No. 3 windshield outside moulding clip shavings will fly about.
Pressing the drill too firmly will cause the No. 3 windshield outside moulding clip to turn and result in the No. 3 windshield outside moulding clip not being drilled through.
Prying the No. 3 windshield outside moulding clip with the drill may damage the No. 3 windshield outside moulding clip installation hole or drill bit.
 |  |  (e) Using a vacuum cleaner, remove the No. 3 windshield outside moulding clip fragments and shavings from the drilled areas. |