| Last Modified: 09-10-2025 | 6.11:8.1.0 | Doc ID: RM100000001A0J1 |
| Model Year Start: 2019 | Model: Avalon HV | Prod Date Range: [04/2018 - 08/2020] |
| Title: TIRE / WHEEL: TIRE AND WHEEL SYSTEM: INSPECTION; 2019 - 2020 MY Avalon HV Avalon [04/2018 - 08/2020] | ||
INSPECTION
PROCEDURE
PROCEDURE
1. INSPECT TIRES
(a) Inspect the tires for wear and proper inflation pressure.
Cold Tire Inflation Pressure:
|
Tire Size |
Cold Tire Inflation Pressure |
|
|---|---|---|
|
Front |
Rear |
|
|
215/55R17 94V 235/45R18 94V 235/40R19 92V |
240 kPa (2.4 kgf/cm2, 35 psi) |
240 kPa (2.4 kgf/cm2, 35 psi) |
Cold Tire Inflation Pressure (for Compact Spare Tire):
|
Tire Size |
Cold Tire Inflation Pressure |
|---|---|
|
T155/70D17 110M |
420 kPa (4.2 kgf/cm2, 60 psi) |
(1) Perform initialization.
for Gasoline Model: Click here
![2019 - 2022 MY Avalon [04/2018 - ]; TIRE PRESSURE MONITORING: TIRE PRESSURE WARNING SYSTEM(for Gasoline Model): INITIALIZATION](/t3Portal/stylegraphics/info.gif)
(2) Tire pressure adjustment method when warm:
- Turn the engine switch (for Gasoline Model) or power switch (for HV Model) off.
- Connect the Techstream to the DLC3.
- Turn the engine switch (for Gasoline Model) or power switch (for HV Model) on (IG).
- Turn the Techstream on.
- Enter the following menus: Chassis / Tire Pressure Monitor / Data List.
- Adjust the tire pressure so that the displayed value is equal to the set pressure.
- Perform initialization and check that initialization completes.
- Check and record the value of the Data List item "Temperature in Tire". (Ts)
- Check and record the ambient temperature during tire pressure adjustment. (Tm)
-
Readjust the tire pressure according to the difference between the tire internal temperature (Ts) and the ambient temperature (Tm). (P)
HINT:
Tire internal temperature: Ts, Ambient temperature: Tm, Tire pressure readjustment value: P
P = (Specified Pressure) + (Ts - Tm)
- Check the pressure adjustment value with the Data List item "Tire Inflation Pressure".
|
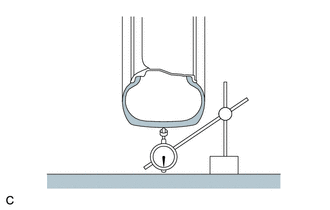
(b) Using a dial indicator, check the runout of the tires. Maximum Tire Runout: 1.4 mm (0.0551 in.) HINT: Measure the runout with the wheel assembly removed from the vehicle. |
|
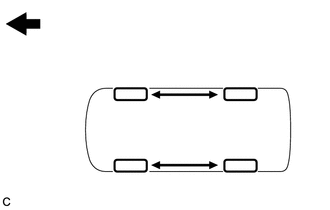
2. ROTATE TIRES
(a) Remove the wheel assembly.
(b) Rotate the tires as shown in the illustration.


|
Front |
(c) Install the wheel assembly.
(d) Perform initialization.
for Gasoline Model: Click here
![2019 - 2022 MY Avalon [04/2018 - ]; TIRE PRESSURE MONITORING: TIRE PRESSURE WARNING SYSTEM(for Gasoline Model): INITIALIZATION](/t3Portal/stylegraphics/info.gif)
3. INSPECT AND ADJUST WHEEL BALANCE
|
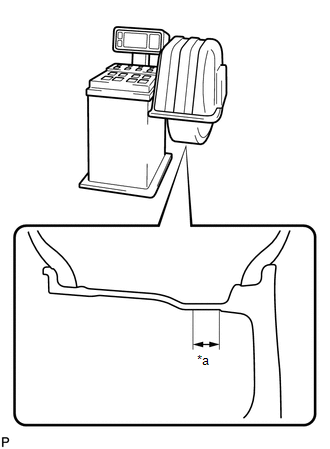
(a) Inspect and adjust the off-the-car balance. Maximum Wheel Imbalance: 8.0 g (0.0176 lb) NOTICE:
HINT:
|
|
4. INSPECT FRONT AXLE HUB BEARING
5. INSPECT REAR AXLE HUB BEARING
|
|
|

