| Last Modified: 02-14-2025 | 6.11:8.1.0 | Doc ID: RM10000000151KH |
| Model Year Start: 2018 | Model: Camry HV | Prod Date Range: [07/2017 - 09/2018] |
| Title: INTERIOR PANELS / TRIM: ROOF HEADLINING: INSTALLATION; 2018 MY Camry HV [07/2017 - 09/2018] | ||
INSTALLATION
PROCEDURE
1. INSTALL ROOF HEADLINING ASSEMBLY
|
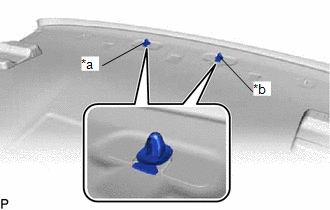
(a) Install the 2 clips to the roof headlining assembly. |
|
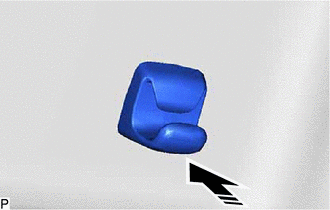
(b) Put the roof headlining assembly into the vehicle through the front door RH as shown in the illustration.
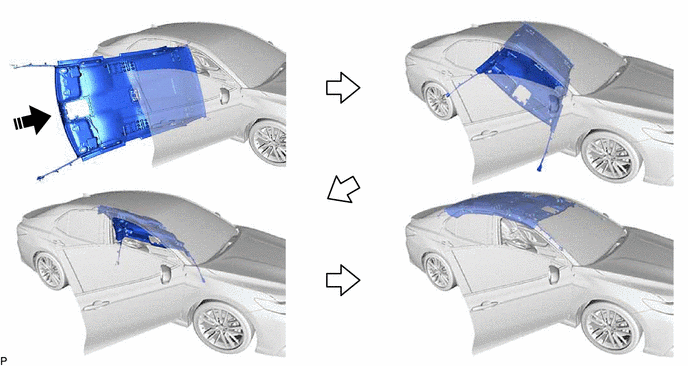

|
Install in this Direction |
- |
- |
NOTICE:
Do not damage the roof headlining assembly or vehicle interior.
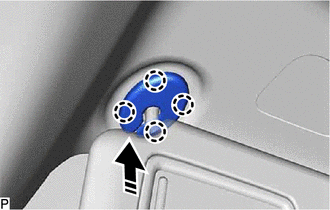
(c) for Roof Side (for Normal Roof):
(1) Engage the 2 claws to install the base of each visor holder.
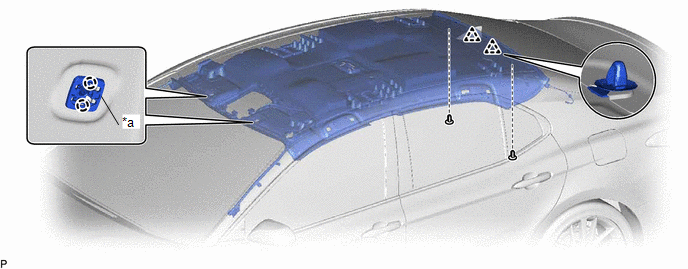
|
*a |
Base of Visor Holder |
- |
- |
(2) Engage the 2 clips and install the roof headlining assembly with the 2 clips.
(d) for Roof Side (for Moon Roof):
(1) Engage the 2 claws to install the base of each visor holder.
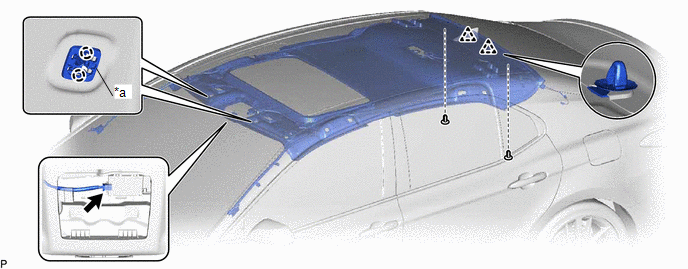
|
*a |
Base of Visor Holder |
- |
- |
(2) Engage the 2 clips and install the roof headlining assembly with the 2 clips.
(3) Connect the connector.
(e) for Rear Pillar LH Side:
(1) Engage the clamp.
(2) Connect the connector.
(f) for Rear Pillar RH Side:
(1) Engage each clamp.
(2) Connect each connector.
(g) for Front Pillar LH Side:
(1) Remove the protective cover.
(2) Engage the 4 clamps.
(3) Connect the 2 connectors.
(4) Install the protective cover.
(h) for Front Pillar RH Side:
(1) Remove the protective cover.
(2) Engage the 2 clamps.
(3) Engage the guide.
(4) Connect the connector bracket with the bolt.
Torque:
7.0 N·m {71 kgf·cm, 62 in·lbf}
(5) Install the protective cover.
(i) for Windshield Glass Side:
(1) Connect each connector.
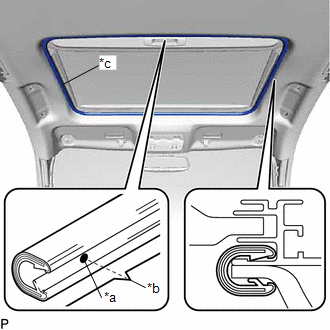
2. INSTALL SUN ROOF OPENING TRIM MOULDING (for Moon Roof)
|
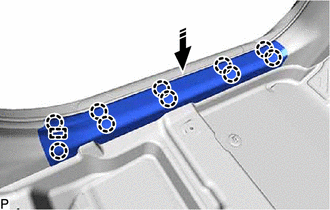
(a) Align the alignment mark on the sun roof opening trim moulding with the notch of the roof headlining assembly to install the sun roof opening trim moulding. NOTICE: After installation, check that the corners fit correctly. HINT: Make sure that the tape are positioned as shown in the illustration. |
|
3. INSTALL VISOR HOLDER LH
(a) Install the visor holder LH as shown in the illustration.
|
|
Install in this Direction |
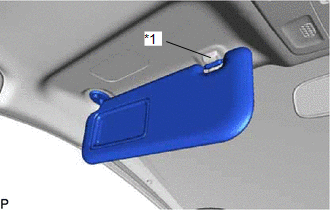
4. INSTALL VISOR ASSEMBLY LH
NOTICE:
Make sure to install the bracket with its arrow facing the front of the vehicle.
|
(a) Connect the visor assembly LH to the visor holder LH. |
|
(b) for "TORX" Screw:
(1) Using a T25 "TORX" socket wrench, install the visor assembly LH with the 2 screws.
(c) except "TORX" Screw:
(1) Install the visor assembly LH with the 2 screws.
5. INSTALL VISOR BRACKET COVER LH
(a) Engage the 4 claws to install the visor bracket cover LH as shown in the illustration.
|
|
Install in this Direction |
6. INSTALL VISOR HOLDER RH
HINT:
Use the same procedure as for the LH side.
7. INSTALL VISOR ASSEMBLY RH
HINT:
Use the same procedure as for the LH side.
8. INSTALL VISOR BRACKET COVER RH
HINT:
Use the same procedure as for the LH side.
9. INSTALL ASSIST GRIP ASSEMBLY
HINT:
Use the same procedure for the RH side and LH side.
|
(a) Install the 2 clips to the assist grip. |
|
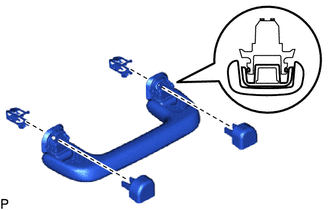
(b) Temporarily install the 2 assist grip covers to the assist grip as shown in the illustration.
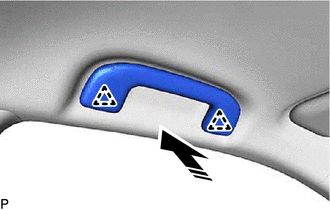
(c) Engage the 2 clips to install the assist grip assembly as shown in the illustration.
|
|
Install in this Direction |
|
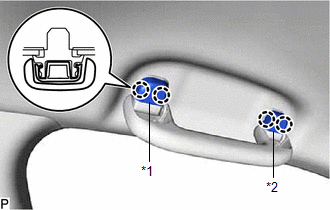
(d) Engage the 4 claws to install the assist grip cover LH and assist grip cover RH. NOTICE: Make sure that the clip is engaged securely. |
|
10. INSTALL REAR ASSIST GRIP ASSEMBLY LH
HINT:
Use the same procedure as for the assist grip assembly.
11. INSTALL REAR ASSIST GRIP ASSEMBLY RH
HINT:
Use the same procedure as for the assist grip assembly.
12. INSTALL NO. 1 FORWARD RECOGNITION COVER
Click here
![2018 - 2020 MY Camry HV [07/2017 - 10/2020]; CRUISE CONTROL: FRONT CAMERA: INSTALLATION+](/t3Portal/stylegraphics/info.gif)
13. INSTALL NO. 2 FORWARD RECOGNITION COVER
Click here
14. INSTALL SENSOR COVER
Click here
15. INSTALL ROOM LIGHT ASSEMBLY (for Bulb Type)
Click here
16. INSTALL SPOT LIGHT ASSEMBLY (for LED Type)
Click here
17. INSTALL ROOF CONSOLE BOX ASSEMBLY
Click here
18. INSTALL TRANSMISSION FLOOR SHIFT ASSEMBLY
Click here
19. INSTALL INSTRUMENT PANEL SAFETY PAD SUB-ASSEMBLY
Click here
20. INSTALL INNER ROOF SIDE GARNISH LH
(a) Install 3 new clips to the inner roof side garnish LH.
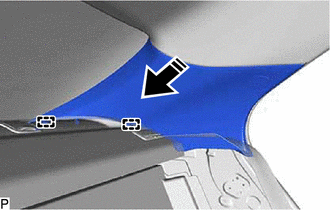
(b) Engage the 2 guides as shown in the illustration.
|
|
Install in this Direction |
(c) Engage the 3 clips to install the inner roof side garnish LH as shown in the illustration.
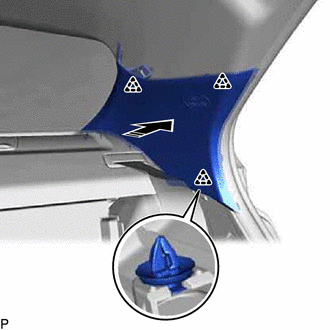
|
|
Install in this Direction |
21. INSTALL UPPER CENTER PILLAR GARNISH LH
(a) Install a new clip to the upper center pillar garnish LH.
(b) Engage the 3 guides and clip as shown in the illustration.
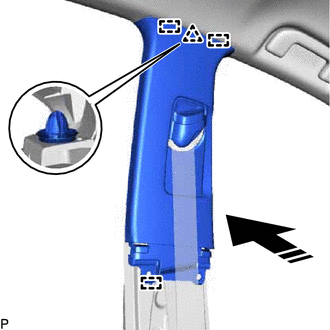
|
|
Install in this Direction |
(c) Install the upper center pillar garnish LH with the 2 clips.
22. INSTALL LOWER CENTER PILLAR GARNISH LH
(a) Engage the 2 claws and 3 clips to install the lower center pillar garnish LH as shown in the illustration.
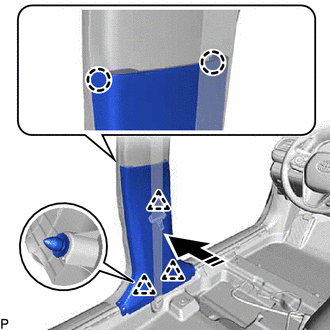
|
|
Install in this Direction |
23. CONNECT FRONT SEAT OUTER BELT ASSEMBLY LH
Click here
24. INSTALL LAP BELT OUTER ANCHOR COVER (for LH Side)
Click here
25. INSTALL REAR DOOR OPENING TRIM WEATHERSTRIP LH
Click here
26. INSTALL REAR DOOR SCUFF PLATE LH
(a) Engage the guide, 6 claws and clip to install the rear door scuff plate LH as shown in the illustration.
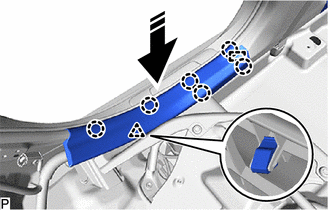
|
|
Install in this Direction |
27. INSTALL FRONT PILLAR GARNISH LH
(a) Remove the protective cover.
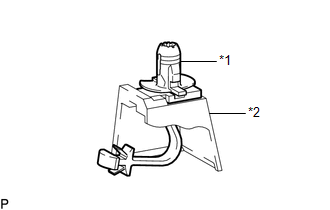
(b) Install a new clip to the front pillar garnish LH.
|
(c) Engage the front pillar garnish clip to the front pillar garnish LH. HINT: Make sure that the front pillar garnish clip is engaged correctly. |
|
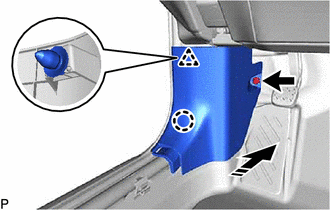
(d) w/o Front No. 3 Speaker:
(1) Push the front pillar garnish LH as shown in the illustration to engage the 2 guides.
|
|
Install in this Direction |
(e) w/ Front No. 3 Speaker:
(1) Connect the connector.
(2) Push the front pillar garnish LH as shown in the illustration to engage the 2 guides.
(f) Engage the clip and front pillar garnish clip to install the front pillar garnish LH as shown in the illustration.
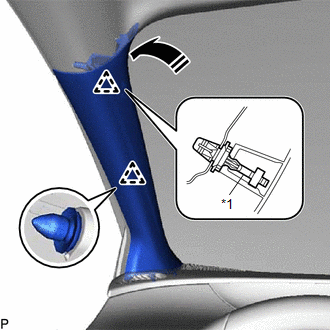
|
*1 |
Front Pillar Garnish Clip |
|
|
Install in this Direction |
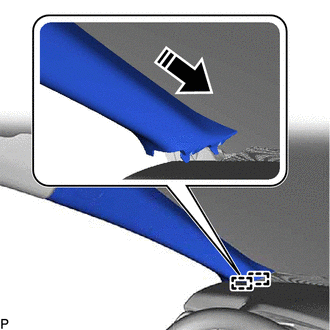
CAUTION:
Make sure to position the strap of the curtain shield airbag assembly LH below the engagement holes of the clips of front pillar garnish LH as shown in the illustration, otherwise the curtain shield airbag assembly LH will not be able to deploy properly.

|
*a |
Position the Strap of the Curtain Shield Airbag Assembly LH |
- |
- |
HINT:
Make sure that the curtain shield airbag assembly LH is not pinched.
28. INSTALL FRONT DOOR OPENING TRIM WEATHERSTRIP LH
Click here
29. INSTALL COWL SIDE TRIM SUB-ASSEMBLY LH
(a) Engage the claw and clip as shown in the illustration.
|
|
Install in this Direction |
(b) Install the cowl side trim sub-assembly LH with the clip.
30. INSTALL FRONT DOOR SCUFF PLATE LH
(a) Engage the guide and 10 claws to install the front door scuff plate LH as shown in the illustration.
|
|
Install in this Direction |
31. INSTALL INNER ROOF SIDE GARNISH RH
HINT:
Use the same procedure as for the LH side.
32. INSTALL UPPER CENTER PILLAR GARNISH RH
HINT:
Use the same procedure as for the LH side.
33. INSTALL LOWER CENTER PILLAR GARNISH RH
HINT:
Use the same procedure as for the LH side.
34. CONNECT FRONT SEAT OUTER BELT ASSEMBLY RH
HINT:
Use the same procedure as for the LH side.
35. INSTALL LAP BELT OUTER ANCHOR COVER (for RH Side)
HINT:
Use the same procedure as for the LH side.
36. INSTALL REAR DOOR OPENING TRIM WEATHERSTRIP RH
HINT:
Use the same procedure as for the LH side.
37. INSTALL REAR DOOR SCUFF PLATE RH
HINT:
Use the same procedure as for the LH side.
38. INSTALL FRONT PILLAR GARNISH RH
HINT:
Use the same procedure as for the LH side.
39. INSTALL FRONT DOOR OPENING TRIM WEATHERSTRIP RH
HINT:
Use the same procedure as for the LH side.
40. INSTALL COWL SIDE TRIM SUB-ASSEMBLY RH
HINT:
Use the same procedure as for the LH side.
41. INSTALL FRONT DOOR SCUFF PLATE RH
HINT:
Use the same procedure as for the LH side.
42. INSTALL REAR SEAT ASSEMBLY
Click here
43. INSTALL FRONT SEAT ASSEMBLY (for Manual Seat)
Click here
44. INSTALL FRONT SEAT ASSEMBLY (for Power Seat)
Click here
|
|
|