| 
                     
                        | Last Modified: 11-20-2023 | 6.11:8.1.0 | Doc ID: RM100000001LA1O |  
                        | Model Year Start: 2020 | Model: Camry | Prod Date Range: [09/2019 - 10/2020] |  
                        | Title: MIRROR (EXT): OUTER REAR VIEW MIRROR: REMOVAL; 2020 MY Camry [09/2019 - 10/2020] |  REMOVALCAUTION / NOTICE / HINTThe necessary procedures (adjustment, calibration, initialization, or registration) that must be performed after parts are removed and installed, or replaced during outer rear view mirror assembly with cover removal/installation are shown below. Necessary Procedure After Parts Removed/Installed/Replaced


                           | Replaced Part or Performed Procedure | Necessary Procedure | Effect/Inoperative Function when Necessary Procedure not Performed | Link |  
                           | 
                                 
                                    
Side television camera assembly LH
Outer rear view mirror assembly LH
Side television camera assembly RH
Outer rear view mirror assembly RH
 | Side television camera view adjustment | Panoramic view monitor system | 


                                          ![2018 - 2020 MY Camry [06/2017 - 10/2020]; PARK ASSIST / MONITORING: PANORAMIC VIEW MONITOR SYSTEM: CALIBRATION](/t3Portal/stylegraphics/info.gif)  |  
                     HINT: 
                        
Use the same procedure for the RH side and LH side.
The following procedure is for the LH side.
 PROCEDURE1. REMOVE FRONT DOOR LOWER FRAME BRACKET GARNISH Click here
                        
                           
                              ![2020 MY Camry [09/2019 - 10/2020]; DOOR / HATCH: FRONT DOOR: DISASSEMBLY+](/t3Portal/stylegraphics/info.gif)  2. REMOVE FRONT DOOR ARMREST COVER SUB-ASSEMBLY Click here
                        
                           
                              ![2020 MY Camry [09/2019 - 10/2020]; DOOR / HATCH: FRONT DOOR: DISASSEMBLY+](/t3Portal/stylegraphics/info.gif)  3. REMOVE MULTIPLEX NETWORK MASTER SWITCH ASSEMBLY WITH FRONT DOOR UPPER ARMREST BASE PANEL (for Driver Side) Click here
                        
                           
                              ![2020 MY Camry [09/2019 - 10/2020]; DOOR / HATCH: FRONT DOOR: DISASSEMBLY+](/t3Portal/stylegraphics/info.gif)  4. REMOVE POWER WINDOW REGULATOR SWITCH ASSEMBLY WITH FRONT DOOR UPPER ARMREST BASE PANEL (for Front Passenger Side) Click here
                        
                           
                              ![2020 MY Camry [09/2019 - 10/2020]; DOOR / HATCH: FRONT DOOR: DISASSEMBLY+](/t3Portal/stylegraphics/info.gif)  5. REMOVE FRONT ARMREST ASSEMBLY Click here
                        
                           
                              ![2020 MY Camry [09/2019 - 10/2020]; DOOR / HATCH: FRONT DOOR: DISASSEMBLY+](/t3Portal/stylegraphics/info.gif)  6. REMOVE FRONT DOOR TRIM PLATE (w/o Courtesy Light) Click here
                        
                           
                              ![2020 MY Camry [09/2019 - 10/2020]; DOOR / HATCH: FRONT DOOR: DISASSEMBLY+](/t3Portal/stylegraphics/info.gif)  7. REMOVE COURTESY LIGHT ASSEMBLY (w/ Courtesy Light) Click here
                        
                           
                              ![2018 - 2024 MY Camry [03/2017 -        ]; LIGHTING (INT): DOOR COURTESY LIGHT: REMOVAL+](/t3Portal/stylegraphics/info.gif)  8. REMOVE FRONT DOOR TRIM BOARD SUB-ASSEMBLY Click here
                        
                           
                              ![2020 MY Camry [09/2019 - 10/2020]; DOOR / HATCH: FRONT DOOR: DISASSEMBLY+](/t3Portal/stylegraphics/info.gif)  9. REMOVE HOLE PLUG 
                     
                        
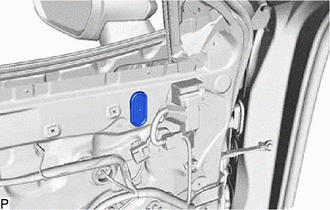
                           | (a) Remove the hole plug. |  |  10. REMOVE OUTER MIRROR INSTALL HOLE COVER 
                     
                        
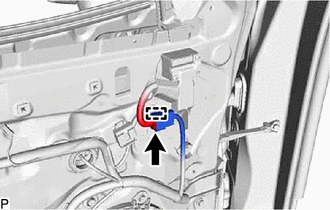
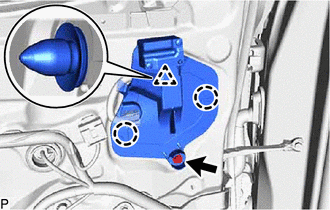
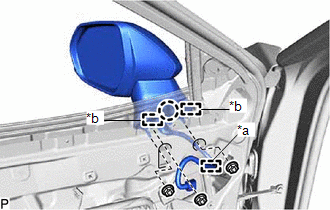
                           | (a) Disconnect the connector. |  |  (b) Disengage the  clamp. (d) Disengage the clip and 2 claws to remove the outer mirror install hole cover. 11. REMOVE OUTER REAR VIEW MIRROR ASSEMBLY WITH COVER (b) Remove the 3 nuts. (c) Disengage the claw and 2 guides and remove the outer rear view mirror assembly with cover. |