| Last Modified: 11-20-2023 | 6.11:8.1.0 | Doc ID: RM100000001KCPO |
| Model Year Start: 2020 | Model: Camry | Prod Date Range: [09/2019 - ] |
| Title: PARKING BRAKE: PARKING BRAKE CABLE (for Front Side): INSTALLATION; 2020 - 2024 MY Camry [09/2019 - ] | ||
INSTALLATION
PROCEDURE
1. INSTALL NO. 1 PARKING BRAKE CABLE ASSEMBLY
|
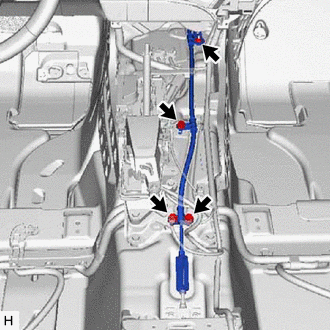
(a) Install the No. 1 parking brake cable assembly with the 3 bolts and nut. Torque: Bolt: : 15.5 N·m {158 kgf·cm, 11 ft·lbf} Nut: : 6.0 N·m {61 kgf·cm, 53 in·lbf} |
|
|
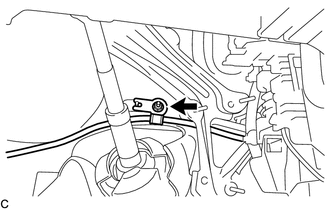
(b) Install the nut. Torque: 6.0 N·m {61 kgf·cm, 53 in·lbf} |
|
|
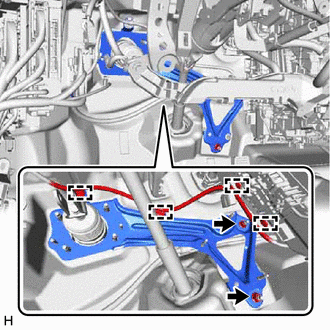
(c) Connect the brake pedal support base to the vehicle body with the 2 nuts. Torque: 12.7 N·m {130 kgf·cm, 9 ft·lbf} |
|
(d) Engage the 4 clamps.
2. INSTALL BRAKE PEDAL SUPPORT ASSEMBLY
3. CONNECT NO. 1 PARKING BRAKE CABLE ASSEMBLY
(a) for Type A:
|
(1) Connect the No. 1 parking brake cable assembly to the No. 1 parking brake pull rod sub-assembly as shown in the illustration. Torque: 5.4 N·m {55 kgf·cm, 48 in·lbf} |
|
(b) for Type B:
|
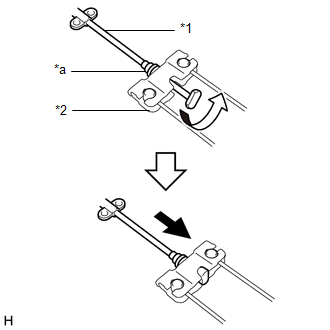
(1) Connect the No. 1 parking brake cable assembly to the parking brake equalizer as shown in the illustration. |
|
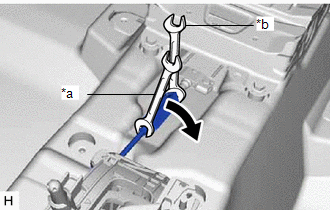
(2) Slide the rubber boot back as shown in the illustration.
NOTICE:
Securely fit the protrusion on the rubber boot into the No. 1 parking brake cable assembly groove.
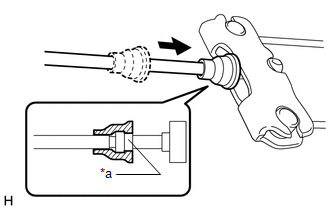
|
*a |
Groove |
4. INSTALL NO. 2 INDOOR ELECTRICAL KEY ANTENNA ASSEMBLY (w/ Smart Key System)
5. INSTALL NO. 1 CONSOLE BOX DUCT (for Dual Type)
(a) Install the No. 1 console box duct with the clip as shown in the illustration.
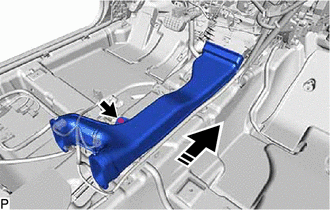

|
Install in this Direction |
6. INSTALL REAR NO. 1 AIR DUCT
7. INSTALL REAR NO. 2 AIR DUCT
(a) Engage the 4 claws to install the rear No. 2 air duct as shown in the illustration.
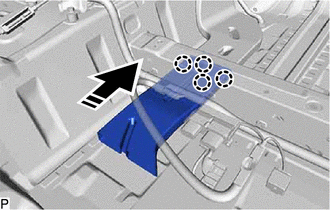

|
Install in this Direction |
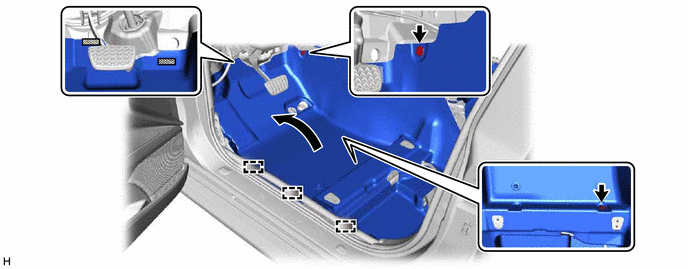
8. INSTALL FRONT FLOOR CARPET ASSEMBLY
(a) for LH Side:
(1) Install the front floor carpet assembly to its original position as shown in the illustration.

|
Fastener |
- |
- |
(2) Engage each fastener and the 3 guides to connect the front floor carpet assembly.
(3) Install the 2 front floor carpet clips.
(b) for RH Side:
(1) Install the front floor carpet assembly to its original position as shown in the illustration.
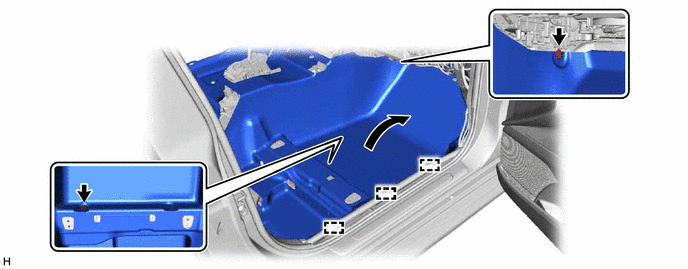
(2) Engage the 3 guides to connect the front floor carpet assembly.
(3) Install the 2 front floor carpet clips.
9. INSTALL ACCELERATOR PEDAL
10. INSTALL LOWER CENTER PILLAR GARNISH LH
11. INSTALL REAR DOOR OPENING TRIM WEATHERSTRIP LH
12. INSTALL REAR DOOR SCUFF PLATE LH
13. INSTALL FRONT DOOR OPENING TRIM WEATHERSTRIP LH
14. INSTALL NO. 2 INSTRUMENT PANEL UNDER COVER SUB-ASSEMBLY
15. INSTALL LOWER CENTER PILLAR GARNISH RH
HINT:
Use the same procedure as for the LH side.
16. INSTALL REAR DOOR OPENING TRIM WEATHERSTRIP RH
HINT:
Use the same procedure as for the LH side.
17. INSTALL REAR DOOR SCUFF PLATE RH
HINT:
Use the same procedure as for the LH side.
18. INSTALL FRONT DOOR OPENING TRIM WEATHERSTRIP RH
HINT:
Use the same procedure as for the LH side.
19. INSTALL COWL SIDE TRIM SUB-ASSEMBLY RH
HINT:
Use the same procedure as for the LH side.
20. INSTALL FRONT DOOR SCUFF PLATE RH
HINT:
Use the same procedure as for the LH side.
21. INSTALL REAR SEAT CUSHION LOCK HOOK
for Fold Down Seat Type: Click here
![2020 - 2024 MY Camry [09/2019 - ]; SEAT: REAR SEAT ASSEMBLY (for Fold Down Seat Type): INSTALLATION+](/t3Portal/stylegraphics/info.gif)
for Fixed Seat Type: Click here
![2018 - 2024 MY Camry [06/2017 - ]; SEAT: REAR SEAT ASSEMBLY (for Fixed Seat Type): INSTALLATION+](/t3Portal/stylegraphics/info.gif)
22. INSTALL REAR SEAT CUSHION ASSEMBLY
for Fold Down Seat Type: Click here
![2020 - 2024 MY Camry [09/2019 - ]; SEAT: REAR SEAT ASSEMBLY (for Fold Down Seat Type): INSTALLATION+](/t3Portal/stylegraphics/info.gif)
for Fixed Seat Type: Click here
![2018 - 2024 MY Camry [06/2017 - ]; SEAT: REAR SEAT ASSEMBLY (for Fixed Seat Type): INSTALLATION+](/t3Portal/stylegraphics/info.gif)
23. INSTALL CONSOLE BOX ASSEMBLY
24. INSTALL FRONT SEAT ASSEMBLY LH
25. INSTALL FRONT SEAT ASSEMBLY RH
26. INSTALL PARKING BRAKE PEDAL ASSEMBLY
|
|
|
