| Last Modified: 11-20-2023 | 6.11:8.1.0 | Doc ID: RM1000000012V8E |
| Model Year Start: 2018 | Model: Camry | Prod Date Range: [03/2017 - ] |
| Title: A25A-FKS (ENGINE CONTROL): CAMSHAFT TIMING CONTROL MOTOR: INSTALLATION; 2018 - 2024 MY Camry [03/2017 - ] | ||
INSTALLATION
CAUTION / NOTICE / HINT
NOTICE:
This procedure includes the installation of small-head bolts. Refer to Small-Head Bolts of Basic Repair Hint to identify the small-head bolts.
Click here
![2018 MY Camry [03/2017 - 06/2017]; INTRODUCTION: REPAIR INSTRUCTION: PRECAUTION](/t3Portal/stylegraphics/info.gif)
PROCEDURE
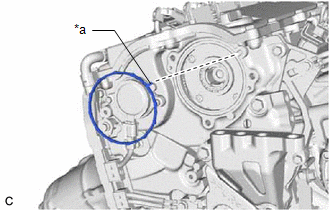
1. INSTALL CAM TIMING CONTROL MOTOR O-RING
|
(a) Install a new cam timing control motor O-ring to the No. 2 timing gear cover assembly with the protrusion of the cam timing control motor O-ring oriented as shown in the illustration. |
|
2. INSTALL CAM TIMING CONTROL MOTOR WITH EDU ASSEMBLY
HINT:
Perform "Inspection After Repair" after removing and installing, or replacing the cam timing control motor with EDU assembly.
Click here
|
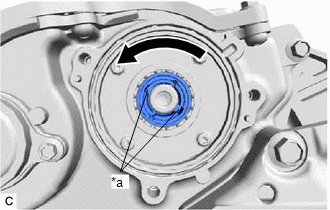
(a) Turn the cutout of the camshaft timing gear assembly eccentric shaft counterclockwise by hand, and set it to the maximum retard angle position. HINT:
|
|
|
(b) Install the cam timing control motor with EDU assembly to the No. 2 timing gear cover assembly. NOTICE:
|
|
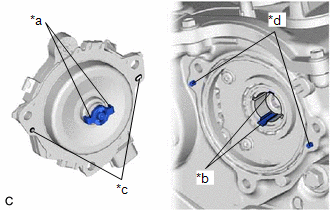
(c) Install the 3 bolts.
Torque:
21 N·m {214 kgf·cm, 15 ft·lbf}
(d) Connect the cam timing control motor with EDU assembly connector.
3. CONNECT CABLE TO NEGATIVE BATTERY TERMINAL
Click here
4. INSPECT FOR ENGINE OIL LEAK
Click here
5. INSTALL NO. 2 ENGINE COVER
Click here
6. INSTALL NO. 2 BRAKE TUBE CLAMP BRACKET
Click here
7. INSTALL NO. 1 ENGINE COVER SUB-ASSEMBLY
Click here
8. PERFORM INITIALIZATION
(a) Perform "Inspection After Repair" after removing and installing, or replacing the cam timing control motor with EDU assembly.
Click here
|
|
|