| Last Modified: 08-28-2024 | 6.11:8.1.0 | Doc ID: RM100000001DL6R |
| Model Year Start: 2019 | Model: Sienna | Prod Date Range: [08/2018 - ] |
| Title: DOOR LOCK: SLIDE DOOR LOCK: REMOVAL; 2019 - 2020 MY Sienna [08/2018 - ] | ||
REMOVAL
CAUTION / NOTICE / HINT
HINT:
- Use the same procedure for both the RH and LH sides.
- The procedure described below is for the RH side.
PROCEDURE
1. REMOVE REAR DOOR ARMREST BASE UPPER PANEL
2. REMOVE REAR DOOR TRIM BOARD SUB-ASSEMBLY
3. REMOVE REAR DOOR GLASS WEATHERSTRIP INNER WITH GARNISH
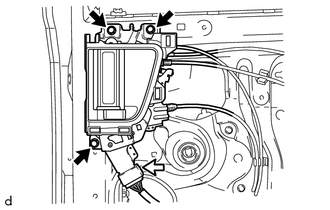
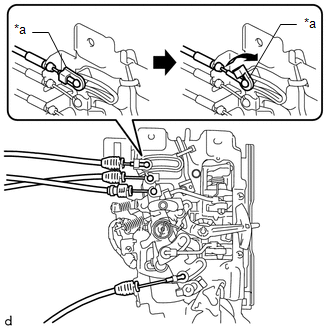
4. REMOVE SLIDE DOOR HANDLE ASSEMBLY (w/o Power Slide Door)
|
(a) Disconnect the connector. |
|
(b) Remove the 3 bolts.
(c) Disengage the guide.
|
(d) Disengage the snap ring as shown in the illustration. |
|
(e) Disconnect the 4 cables to remove the slide door handle assembly.
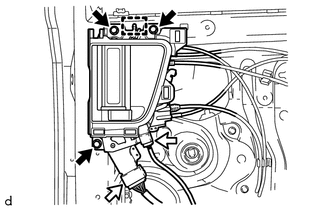
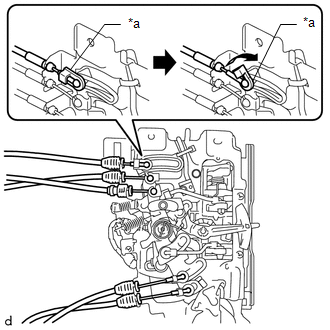
5. REMOVE SLIDE DOOR HANDLE ASSEMBLY (w/ Power Slide Door)
|
(a) Disconnect the 2 connectors. |
|
(b) Remove the 3 bolts.
(c) Disengage the guide.
|
(d) Disengage the snap ring as shown in the illustration. |
|
(e) Disconnect the 5 cables to remove the slide door handle assembly.
6. REMOVE REAR DOOR SCUFF PLATE
7. REMOVE QUARTER TRIM COVER HOLE
8. REMOVE REAR DOOR WIRE (w/o Power Slide Door)
9. REMOVE REAR DOOR WIRE (w/ Power Slide Door)
10. REMOVE QUARTER WINDOW GLASS (w/ Power Slide Door)
11. REMOVE SLIDE RAIL END MOULDING (w/ Power Slide Door)
12. REMOVE POWER SLIDE DOOR MOTOR UNIT (w/ Power Slide Door)
13. REMOVE SLIDE DOOR SERVICE HOLE COVER
14. REMOVE REAR DOOR WINDOW FRAME REAR MOULDING
HINT:
Use the same procedure as for the LH side.
15. REMOVE REAR DOOR GLASS OUTER WEATHERSTRIP ASSEMBLY
HINT:
Use the same procedure as for the LH side.
16. REMOVE REAR DOOR GLASS RUN
17. REMOVE REAR DOOR BELT FRONT SEAL
18. REMOVE NO. 2 REAR DOOR GLASS RUN
19. REMOVE REAR DOOR GLASS SUB-ASSEMBLY
20. REMOVE REAR DOOR WINDOW REAR LOWER FRAME SUB-ASSEMBLY
21. REMOVE FRONT DOOR INSIDE LOCKING LINK PROTECTOR
22. REMOVE REAR DOOR INSIDE LOCKING LINK PROTECTOR
23. REMOVE SLIDE DOOR FRONT LOCK ASSEMBLY
|
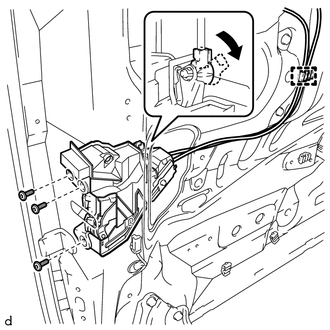
(a) Disengage the clamp. |
|
(b) Disconnect the rod.
(c) Using a T30 "TORX" socket wrench, remove the 3 screws and slide door front lock assembly.
24. REMOVE SLIDE DOOR REAR LOCK ASSEMBLY (w/o Power Slide Door)
|
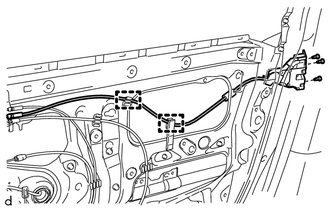
(a) Disengage the 2 clamps. |
|
(b) Using a T30 "TORX" socket wrench, remove the 3 screws and slide door rear lock assembly.
25. REMOVE POWER SLIDE DOOR LOCK ASSEMBLY (w/ Power Slide Door)
|
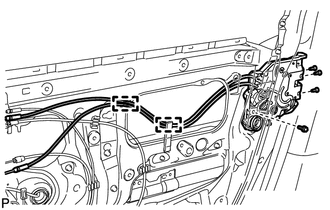
(a) Disengage the 2 clamps. |
|
(b) Remove the bolt.
(c) Using a T30 "TORX" socket wrench, remove the 3 screws and power slide door lock assembly.
|
|
|
![2019 - 2020 MY Sienna [08/2018 - ]; DOOR / HATCH: SLIDE DOOR: DISASSEMBLY+](/t3Portal/stylegraphics/info.gif)
