| Last Modified: 08-28-2024 | 6.11:8.1.0 | Doc ID: RM1000000018DSG |
| Model Year Start: 2018 | Model: Sienna | Prod Date Range: [11/2017 - ] |
| Title: DOOR / HATCH: HOOD LOCK CONTROL CABLE ASSEMBLY: INSTALLATION; 2018 - 2020 MY Sienna [11/2017 - ] | ||
INSTALLATION
PROCEDURE
1. INSTALL HOOD LOCK CONTROL CABLE ASSEMBLY
(a) Pass the hood lock control cable into the engine compartment.
(b) Pass the cable rear side through the grommet until the cable stopper is attached to the grommet.
(c) Pass the cable front side through the upper radiator support.
(d) Engage the cable to the clamps.
(e) Connect the hood lock control cable to hood lock control lever.
2. INSTALL NO. 1 INSTRUMENT PANEL LOWER FINISH PANEL
Click here
![2018 - 2020 MY Sienna [11/2017 - ]; INTERIOR PANELS / TRIM: INSTRUMENT PANEL SAFETY PAD: INSTALLATION+](/t3Portal/stylegraphics/info.gif)
3. INSTALL COWL SIDE TRIM BOARD LH
HINT:
Use the same procedure as for the RH side.
Click here
4. INSTALL FRONT DOOR OPENING TRIM WEATHERSTRIP LH
5. INSTALL FRONT DOOR SCUFF PLATE LH
HINT:
Use the same procedure as for the RH side.
Click here
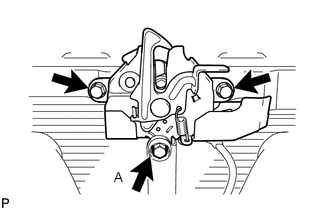
6. INSTALL HOOD LOCK ASSEMBLY
(a) Apply MP grease to the sliding areas of the lock.
(b) Connect the hood lock control cable.
|
(c) Install the A bolts and hood lock. Torque: 8.0 N·m {82 kgf·cm, 71 in·lbf} |
|
(d) Install the 2 bolts.
Torque:
8.0 N·m {82 kgf·cm, 71 in·lbf}
(e) Connect the connector.
7. INSPECT HOOD LOCK ASSEMBLY
Click here
8. ADJUST HOOD LOCK ASSEMBLY
Click here
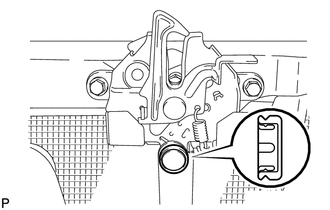
9. INSTALL HOOD LOCK NUT CAP
|
(a) Install a new hood lock nut cap. |
|
10. INSTALL RADIATOR GRILLE SUB-ASSEMBLY
Click here
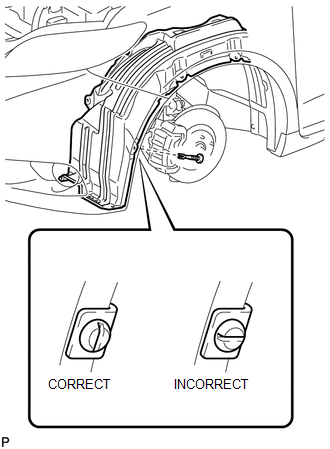
11. INSTALL FRONT FENDER LINER LH
(a) Install the 2 screws.
(b) Install the 2 clips.
|
(c) Install the pin hold clip. NOTICE: Install the pin hold clip with the slot aligned vertically. Do not rotate the clip after inserting it. After installation, confirm that the slot is vertical. |
|
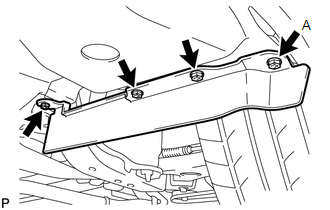
12. INSTALL FRONT WHEEL OPENING EXTENSION PAD LH
|
(a) Install the front wheel opening extension pad LH with the 4 screws. Torque: 7.0 N·m {71 kgf·cm, 62 in·lbf} for screw A |
|
|
|
|