| Last Modified: 08-28-2024 | 6.11:8.1.0 | Doc ID: RM1000000018CTK |
| Model Year Start: 2018 | Model: Sienna | Prod Date Range: [11/2017 - ] |
| Title: INTERIOR PANELS / TRIM: ROOF HEADLINING: INSTALLATION; 2018 - 2020 MY Sienna [11/2017 - ] | ||
INSTALLATION
PROCEDURE
1. INSTALL ROOF HEADLINING ASSEMBLY
(a) Put the roof headlining assembly into the vehicle through the back door.
NOTICE:
Do not damage the roof headlining assembly or body interior.
(b) w/o Rear Sliding Roof:
(1) Install the roof headlining with the 3 clips.
(c) w/ Rear Sliding Roof:
(1) Install the roof headlining with the clip.
(d) Connect the 2 washer hoses.
(e) Connect the connectors.
2. INSTALL NO. 6 REAR AIR DUCT
(a) Install the No. 6 rear air duct.
(b) Engage the 2 claws to install the cooler plate.
(c) Install the outer belt anchor bracket with the 2 bolts.
Torque:
40 N·m {408 kgf·cm, 30 ft·lbf}
3. INSTALL ROOF CONSOLE BOX ASSEMBLY
![2016 - 2020 MY Sienna [12/2015 - ]; SLIDING ROOF / CONVERTIBLE: SLIDING ROOF SWITCH ASSEMBLY: INSTALLATION+](/t3Portal/stylegraphics/info.gif)
4. INSTALL NO. 1 FORWARD RECOGNITION COVER (w/ Toyota Safety Sense)
Click here
5. INSTALL NO. 2 FORWARD RECOGNITION COVER (w/ Toyota Safety Sense)
Click here
6. INSTALL RAIN SENSOR COVER (w/ Rain Sensor)
Click here
7. INSTALL INNER REAR VIEW MIRROR STAY HOLDER COVER (for EC Mirror without Toyota Safety Sense)
Click here
8. INSTALL VISOR HOLDER
(a) Install the visor holder with the screw.
9. INSTALL VISOR ASSEMBLY RH
10. INSTALL VISOR ASSEMBLY LH
HINT:
Use the same procedure as for the RH side.
11. INSTALL REAR ASSIST GRIP ASSEMBLY
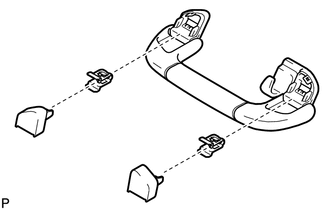
HINT:
Use the same procedure for all rear assist grip assemblies.
(a) Assemble the rear assist grip assembly as shown in the illustration.
(b) Install the rear assist grip assembly.
(c) Engage the 4 claws to install the 2 assist grip covers.
12. INSTALL ASSIST GRIP SUB-ASSEMBLY
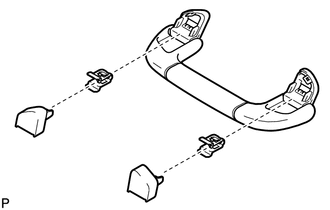
HINT:
Use the same procedure for both assist grip sub-assemblies.
(a) Assemble the assist grip sub-assembly as shown in the illustration.
(b) Install the assist grip sub-assembly.
(c) Engage the 4 claws to install the 2 assist grip covers.
13. INSTALL REAR WINDOW SIDE GARNISH ASSEMBLY RH
(a) Engage the 4 clips to install the rear window side garnish assembly RH.
(b) Install the bolt.
(c) Engage the 3 claws to close the cover.
(d) w/ Rear No. 1 Seat Belt:
(1) Install the rear No. 1 seat outer belt with the bolt.
Torque:
42 N·m {428 kgf·cm, 31 ft·lbf}
(2) Engage the 2 claws to install the anchor cover.
14. INSTALL REAR WINDOW SIDE GARNISH ASSEMBLY LH
HINT:
Use the same procedure as for the RH side.
15. INSTALL REAR NO. 2 WINDOW SIDE GARNISH ASSEMBLY RH
(a) Connect the connectors.
(b) Engage the 5 clips to install the rear No. 2 window side garnish assembly RH.
(c) Engage the 2 claws to install the trim hook.
(d) Engage the 8 claws to install the belt hole cover.
16. INSTALL REAR NO. 2 WINDOW SIDE GARNISH ASSEMBLY LH
(a) Engage the 5 clips to install the rear No. 2 window side garnish assembly LH.
(b) Engage the 2 claws to install the trim hook.
17. INSTALL QUARTER TRIM PANEL ASSEMBLY RH
(a) Connect the connectors.
(b) Engage the 9 claws and 8 clips to install the quarter trim panel assembly RH.
18. INSTALL QUARTER TRIM PANEL ASSEMBLY LH
(a) Connect the connectors.
(b) Engage the 11 claws and 8 clips to install the quarter trim panel assembly LH.
19. INSTALL REAR NO. 2 SEAT OUTER BELT ASSEMBLY RH
(a) Install the shoulder anchor with the bolt.
Torque:
42 N·m {428 kgf·cm, 31 ft·lbf}
(b) Engage the 2 claws to install the anchor cover.
(c) Install the floor anchor with the bolt.
Torque:
42 N·m {428 kgf·cm, 31 ft·lbf}
(d) Engage the 3 claws to close the anchor cover.
20. INSTALL REAR NO. 2 SEAT OUTER BELT ASSEMBLY LH
HINT:
Use the same procedure as for the RH side.
21. INSTALL CENTER PILLAR UPPER GARNISH RH
(a) Engage the 2 clips to install the center pillar upper garnish RH.
(b) Install the screw.
(c) w/ Power Slide Door:
(1) Connect the connector.
(2) Engage the 4 claws to install the power slide door control switch.
22. INSTALL CENTER PILLAR UPPER GARNISH LH
HINT:
Use the same procedure as for the RH side.
23. INSTALL CENTER PILLAR LOWER GARNISH RH
(a) Engage the 4 claws and 2 clips to install the center pillar lower garnish RH.
(b) Install the front seat outer belt RH with the bolt.
Torque:
42 N·m {428 kgf·cm, 31 ft·lbf}
(c) Engage the 3 claws to install the anchor cover.
24. INSTALL CENTER PILLAR LOWER GARNISH LH
HINT:
Use the same procedure as for the RH side.
25. INSTALL ROOF HEADLINING REAR GARNISH
(a) Engage the 2 claws and the 6 clips and install the roof headlining rear garnish.
26. INSTALL BACK DOOR WEATHERSTRIP
27. INSTALL BACK DOOR SCUFF PLATE
(a) Engage the 6 clips and 2 guides to install the back door scuff plate.
(b) Engage the 2 claws to install the hook cover assembly.
(c) Install the bolt.
(d) Engage the 2 claws to install the flap.
HINT:
Use the same procedure for the other 2 hook covers.
28. INSTALL NO. 1 SLIDE DOOR WEATHERSTRIP RH
29. INSTALL NO. 1 SLIDE DOOR WEATHERSTRIP LH
30. INSTALL REAR DOOR SCUFF PLATE RH
(a) Engage the guide, 4 claws and 7 clips to install the rear door scuff plate RH.
31. INSTALL REAR DOOR SCUFF PLATE LH
HINT:
Use the same procedure as for the RH side.
32. INSTALL FRONT PILLAR LOWER GARNISH RH
(a) Engage the 2 claws to install the front pillar lower garnish RH.
33. INSTALL FRONT PILLAR LOWER GARNISH LH
HINT:
Use the same procedure as for the RH side.
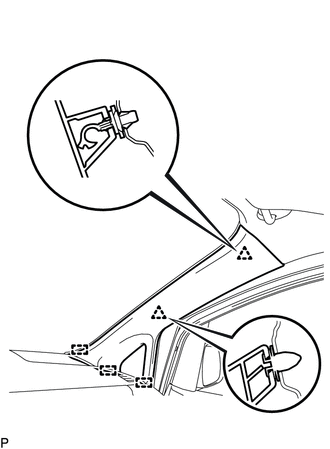
34. INSTALL FRONT PILLAR GARNISH RH
(a) Remove the protective cover.
(b) Install a new front pillar garnish clip to the front pillar garnish RH.
|
(c) Engage the 3 guides, clip and front pillar clip to install the front pillar garnish RH. |
|
35. INSTALL FRONT PILLAR GARNISH LH
HINT:
Use the same procedure as for the RH side.
36. INSTALL FRONT DOOR OPENING TRIM WEATHERSTRIP RH
37. INSTALL FRONT DOOR OPENING TRIM WEATHERSTRIP LH
38. INSTALL COWL SIDE TRIM BOARD RH
(a) Engage the claw and clip to install the cowl side trim board RH.
(b) Install the clip.
39. INSTALL COWL SIDE TRIM BOARD LH
HINT:
Use the same procedure as for the RH side.
40. INSTALL FRONT DOOR SCUFF PLATE RH
(a) Engage the 12 claws to install the front door scuff plate RH.
41. INSTALL FRONT DOOR SCUFF PLATE LH
HINT:
Use the same procedure as for the RH side.
42. INSTALL TELEVISION DISPLAY ASSEMBLY (w/ Rear Seat Entertainment System)
(See page
)
43. CONNECT CABLE TO NEGATIVE BATTERY TERMINAL
Torque:
5.4 N·m {55 kgf·cm, 48 in·lbf}
NOTICE:
When disconnecting the cable, some systems need to be initialized after the cable is reconnected (See page
).
44. INSPECT SRS WARNING LIGHT
(See page
)
|
|
|