| Last Modified: 08-28-2024 | 6.11:8.1.0 | Doc ID: RM100000000Z291 |
| Model Year Start: 2017 | Model: Sienna | Prod Date Range: [08/2016 - ] |
| Title: HEATING / AIR CONDITIONING: FRONT AIR CONDITIONING UNIT: INSTALLATION; 2017 - 2020 MY Sienna [08/2016 - ] | ||
INSTALLATION
PROCEDURE
1. INSTALL AIR CONDITIONING UNIT
(a) Install the air conditioning unit to the instrument panel reinforcement with the 3 screws.
Torque:
9.8 N·m {100 kgf·cm, 87 in·lbf}
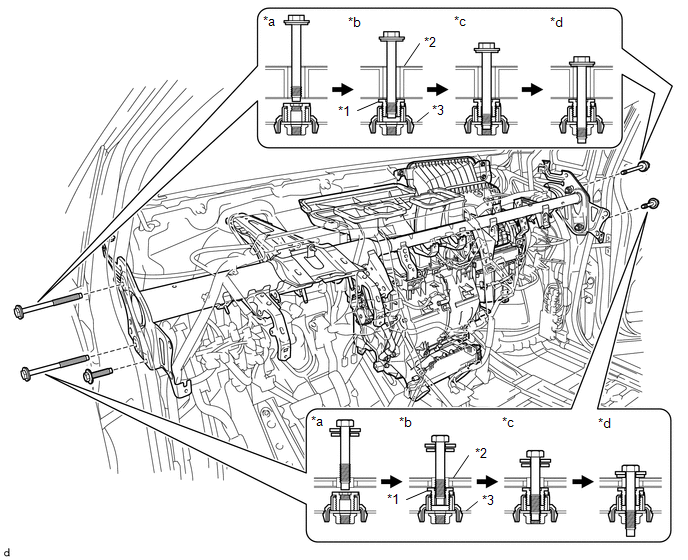
2. INSTALL INSTRUMENT PANEL REINFORCEMENT
(a) Install the instrument panel reinforcement with air conditioning unit to the vehicle.
(b) Install the 5 bolts as shown in the illustration.
|
*1 |
Movable Collar |
*2 |
Body |
|
*3 |
Instrument Panel Reinforcement |
- |
- |
|
*a |
Step 1 |
*b |
Step 2 |
|
*c |
Step 3 |
*d |
Step 4 |
Torque:
27 N·m {275 kgf·cm, 20 ft·lbf}
(c) Install the 2 caps.
(d) Install the 3 caps.
(e) Install the 3 bolts and nut.
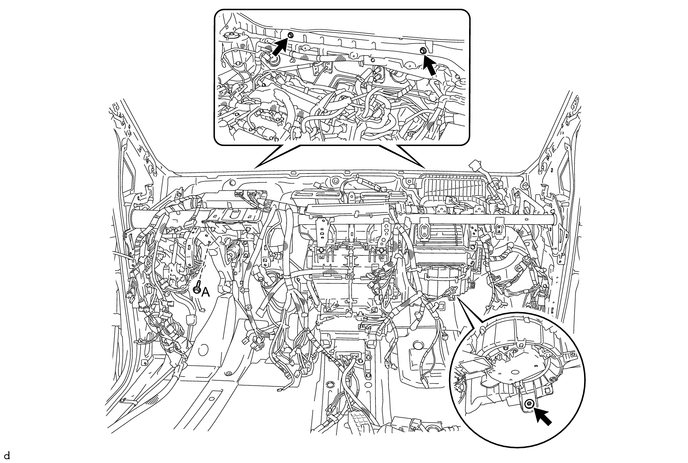
Torque:
bolt A :
19 N·m {194 kgf·cm, 14 ft·lbf}
Torque:
nut :
9.8 N·m {100 kgf·cm, 87 in·lbf}
3. INSTALL INSTRUMENT PANEL WIRE
(a) Engage the clamps to install the instrument panel wire.
(b) Install the ground wire with the bolt.
Torque:
8.5 N·m {87 kgf·cm, 75 in·lbf}
(c) Connect the connectors.
4. INSTALL NO. 1 AIR DUCT SUB-ASSEMBLY
(a) Install the No. 1 air duct sub-assembly with the 3 nuts.
Torque:
9.8 N·m {100 kgf·cm, 87 in·lbf}
5. INSTALL NO. 2 INSTRUMENT PANEL BRACE SUB-ASSEMBLY
(a) Install the No. 2 instrument panel brace sub-assembly with the bolt, 2 nuts and screw.
(b) Install the ground wire with the bolt.
Torque:
8.5 N·m {87 kgf·cm, 75 in·lbf}
(c) Engage the 5 clamps.
(d) Connect the connector.
6. INSTALL NO. 1 INSTRUMENT PANEL BRACE SUB-ASSEMBLY
(a) Install the No. 1 instrument panel brace sub-assembly with the 2 bolts, 2 nuts and screw.
(b) Connect the ground wire with the bolt.
Torque:
8.5 N·m {87 kgf·cm, 75 in·lbf}
(c) Engage the 5 clamps.
(d) Connect the connector.
7. INSTALL TELEVISION BRACKET
(a) Install the television bracket with the 4 bolts.
Torque:
9.0 N·m {92 kgf·cm, 80 in·lbf}
8. INSTALL NO. 5 INSTRUMENT PANEL BRACKET
(a) Install the No. 5 instrument panel bracket with the 3 nuts.
(b) Connect the 3 connectors.
HINT:
If the vehicle is equipped with USB audio system, connect the connector.
9. INSTALL REAR NO. 2 AIR DUCT
(a) Engage the 2 claws to install the rear No. 2 air duct.
(b) Install the clip.
10. INSTALL REAR NO. 4 AIR DUCT
HINT:
Use the same procedure as for the rear No. 2 air duct.
11. INSTALL FRONT FLOOR CARPET ASSEMBLY
![2016 - 2020 MY Sienna [12/2015 - ]; THEFT DETERRENT / KEYLESS ENTRY: ELECTRICAL KEY OSCILLATOR(for Rear Floor): INSTALLATION](/t3Portal/stylegraphics/info.gif)
12. INSTALL FRONT DOOR PANEL SUB-ASSEMBLY LH
(a) Temporarily install the front door panel sub-assembly LH with the 4 bolts.
(b) Pass the front door wire through the opening in the body.
(c) Tighten the 4 bolts on the hinge side.
Torque:
26 N·m {265 kgf·cm, 19 ft·lbf}
(d) Apply adhesive to the threads of the bolt.
NOTICE:
Toyota Genuine Adhesive 1324, Three Bond 1324 or equivalent.
(e) Install the front door check with the bolt.
Torque:
29 N·m {296 kgf·cm, 21 ft·lbf}
13. INSTALL FRONT DOOR PANEL SUB-ASSEMBLY RH
HINT:
Use the same procedure as for the LH side.
14. CONNECT FRONT DOOR WIRE LH
(a) Connect the 3 connectors.
15. CONNECT FRONT DOOR WIRE RH
(a) Connect the 3 connectors.
16. INSTALL CENTER AIRBAG SENSOR ASSEMBLY
17. INSTALL INSTRUMENT PANEL JUNCTION BLOCK ASSEMBLY
18. INSTALL AIR CONDITIONING AMPLIFIER ASSEMBLY
19. INSTALL ECU INTEGRATION BOX RH
20. INSTALL STEERING COLUMN ASSEMBLY
21. INSTALL NO. 3 AIR DUCT SUB-ASSEMBLY
(a) Engage the 3 claws to install the No. 3 air duct sub-assembly.
(b) Install the clip.
22. INSTALL INSTRUMENT PANEL SUB-ASSEMBLY
23. CONNECT AIR CONDITIONER TUBE AND ACCESSORY ASSEMBLY
(a) Remove the vinyl tape from air conditioner tube and accessory and connecting portion of the unit.
(b) Sufficiently apply compressor oil to 2 new O-rings and connecting part of the air conditioner tube and accessory assembly.
Compressor oil:
ND-OIL 8 or equivalent
(c) Install the 2 O-rings to the air conditioner tube and accessory assembly.
(d) Connect the air conditioner tube and accessory assembly by pushing it in until it securely engages.
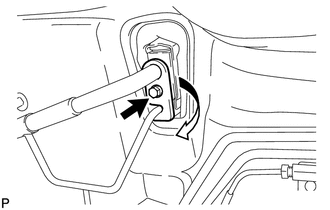
|
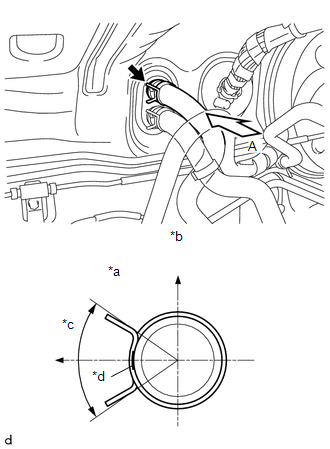
(e) Turn the hook connector in the direction indicated by the arrow in the illustration. |
|
(f) Insert the pipe joints securely into the fitting holes and install the bolt.
Torque:
5.4 N·m {55 kgf·cm, 48 in·lbf}
24. CONNECT HEATER WATER INLET HOSE A
|
(a) Install the heater water inlet hose A to the air conditioning unit with the clip. HINT: Perform the installation with the hose clip and mark at the correct angle. |
|
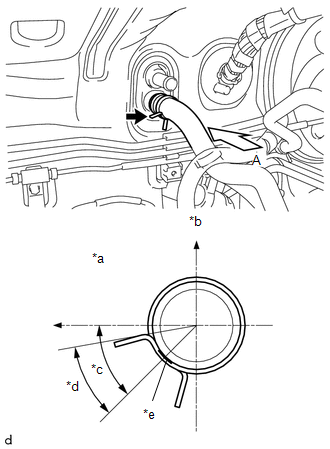
25. CONNECT HEATER WATER OUTLET HOSE A
|
(a) Install the heater water outlet hose A to the air conditioning unit with the clip. HINT: Perform the installation with the hose clip and mark at the correct angle. |
|
26. INSTALL INTAKE AIR SURGE TANK ASSEMBLY
27. ADD ENGINE COOLANT
28. INSPECT FOR COOLANT LEAK
29. CHARGE REFRIGERANT
30. WARM UP ENGINE
31. INSPECT FOR REFRIGERANT LEAK
32. INSTALL NO. 1 ENGINE UNDER COVER
33. INSTALL V-BANK COVER SUB-ASSEMBLY
34. INSPECT FRONT DOOR PANEL SUB-ASSEMBLY LH
HINT:
Use the same procedure as for the RH side.
Click here
35. ADJUST FRONT DOOR PANEL SUB-ASSEMBLY LH
HINT:
Use the same procedure as for the RH side.
Click here
36. INSPECT FRONT DOOR PANEL SUB-ASSEMBLY RH
37. ADJUST FRONT DOOR PANEL SUB-ASSEMBLY RH
|
|
|