| Last Modified: 08-28-2024 | 6.11:8.1.0 | Doc ID: RM100000000YZJL |
| Model Year Start: 2017 | Model: Sienna | Prod Date Range: [08/2016 - ] |
| Title: UA80E (AUTOMATIC TRANSMISSION / TRANSAXLE): TRANSMISSION CONTROL CABLE: INSTALLATION; 2017 - 2020 MY Sienna [08/2016 - ] | ||
INSTALLATION
PROCEDURE
1. INSTALL TRANSMISSION CONTROL CABLE ASSEMBLY
(a) Pass the transmission control cable from the cabin into the engine compartment.
(b) Install the transmission control cable with the 3 bolts.
Torque:
5.0 N·m {51 kgf·cm, 44 in·lbf}
|
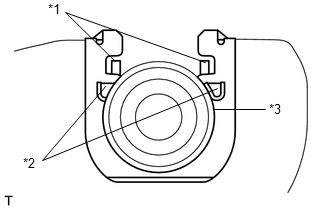
(c) Install a new clip onto the control cable bracket. |
|
(d) Install the transmission control cable onto the transmission control cable bracket.
NOTICE:
- Make sure that the claws A (*1) on the clip are securely fit into the bracket holes.
- Make sure that the cable is securely installed inside of the claws B (*2) of the clip.
- After installation, lightly jiggle the transmission control cable and make sure that it does not come loose from the transmission control cable bracket.
(e) Check that the park/neutral position switch is in the N position.
(f) Install the transmission control cable assembly to the control shaft lever.
|
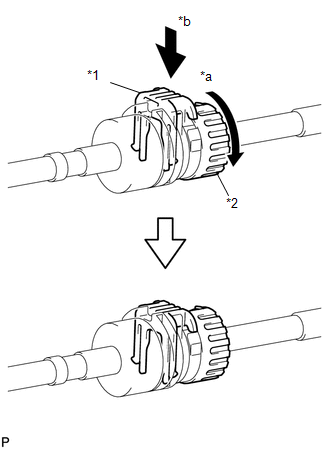
(g) Rotate the transmission control cable nut counterclockwise approximately 270° and, while holding the nut in that position, press in the stopper until it makes 2 "click" sounds. |
|
|
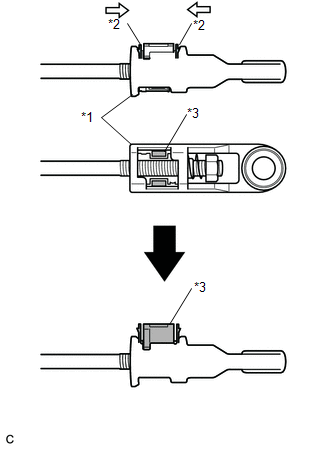
(h) Push the lock piece up from the back side of the adjuster case while pinching the claws on the lock piece. |
|
|
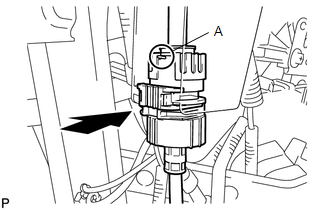
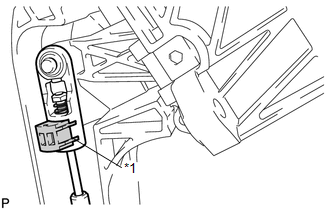
(i) Connect the cable outer of the transmission control cable onto the shift lever retainer, check that the position of the spring is the same as A shown in the illustration, and press in the stopper. HINT: If the stopper cannot be pressed in, slightly rotate the nut clockwise and then press in the stopper. |
|
|
(j) Connect the transmission control cable end to the shift lever. NOTICE: Check that the lock piece is pulled up. |
|
2. INSTALL FRONT NO. 1 FLOOR HEAT INSULATOR
(a) Install the front No. 1 floor heat insulator to the body with the 2 nuts.
Torque:
5.5 N·m {56 kgf·cm, 49 in·lbf}
3. INSTALL EXHAUST MANIFOLD SUB-ASSEMBLY RH (TWC: Front Catalyst)
4. INSTALL AIR CLEANER BRACKET
5. INSTALL AIR CLEANER CASE SUB-ASSEMBLY
6. INSTALL AIR CLEANER FILTER ELEMENT SUB-ASSEMBLY
7. INSTALL AIR CLEANER CAP WITH AIR CLEANER HOSE
8. INSTALL AIR CLEANER INLET ASSEMBLY
9. INSTALL FRONT AIR CONDITIONING UNIT
10. INSTALL BATTERY
11. CONNECT CABLE TO NEGATIVE BATTERY TERMINAL
Torque:
5.5 N·m {56 kgf·cm, 49 in·lbf}
NOTICE:
When disconnecting the cable, some systems need to be initialized after the cable is reconnected.
12. INSPECT SHIFT LEVER POSITION
|
|
|
![2017 - 2020 MY Sienna [08/2016 - ]; 2GR-FKS (INTAKE / EXHAUST): EXHAUST MANIFOLD: INSTALLATION+](/t3Portal/stylegraphics/info.gif)