| Last Modified: 08-28-2024 | 6.11:8.1.0 | Doc ID: RM100000000YZJC |
| Model Year Start: 2017 | Model: Sienna | Prod Date Range: [08/2016 - ] |
| Title: UA80E (AUTOMATIC TRANSMISSION / TRANSAXLE): OIL COOLER: INSTALLATION; 2017 - 2020 MY Sienna [08/2016 - ] | ||
INSTALLATION
PROCEDURE
1. INSTALL NO. 1 OIL COOLER WITHOUT HOSE TUBE SUB-ASSEMBLY
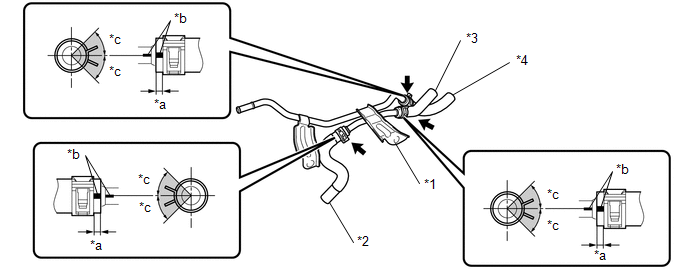
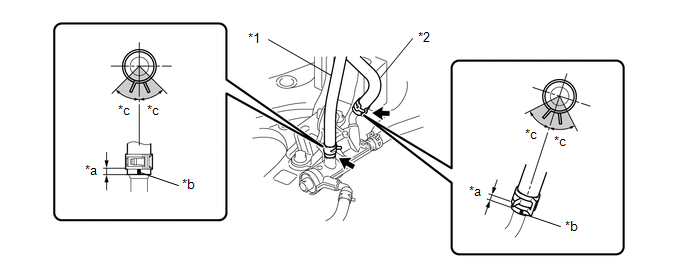
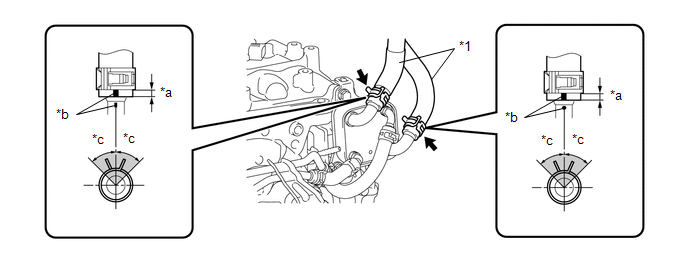
(a) Connect the No. 1 outlet oil cooler hose, No. 1 inlet oil cooler hose and No. 2 inlet oil cooler hose to the No. 1 oil cooler without hose tube sub-assembly and slide the 3 clips to secure them.
|
*1 |
No. 1 Oil Cooler without Hose Tube Sub-assembly |
*2 |
No. 1 Inlet Oil Cooler Hose |
|
*3 |
No. 2 Inlet Oil Cooler Hose |
*4 |
No. 1 Outlet Oil Cooler Hose |
|
*a |
2 to 7 mm (0.0787 to 0.276 in.) |
*b |
Paint Mark |
|
*c |
45° |
- |
- |

|
Paint Mark Location |
- |
- |
NOTICE:
- Make sure to slide the No. 2 outlet oil cooler hose, No. 1 inlet oil cooler hose and No. 2 inlet oil cooler hose until each contacts the hose stopper of the No. 1 oil cooler without hose tube sub-assembly
- Make sure that each paint mark is within the location shown in the illustration.
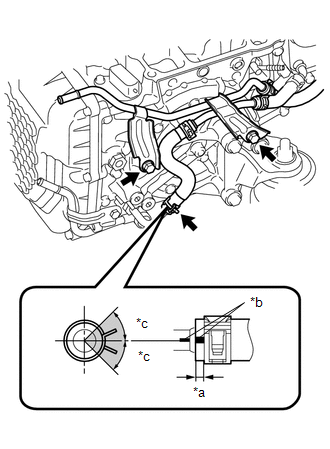
(b) Install the oil cooler tube assembly to the automatic transaxle case sub-assembly and No. 3 engine mounting bracket with the 2 bolts.
|
*a |
2 to 7 mm (0.0787 to 0.276 in.) |
|
*b |
Paint Mark |
|
*c |
45° |
|
|
Paint Mark Location |
Torque:
13.5 N·m {138 kgf·cm, 10 ft·lbf}
(c) Connect the No. 1 inlet oil cooler hose to the connector tube and slide the clip to secure it.
NOTICE:
- Make sure to slide the No. 1 inlet oil cooler hose until each contacts the hose stopper of the connector tube.
- Make sure that each paint mark is within the location shown in the illustration.
2. CONNECT NO. 1 TRANSMISSION OIL COOLER HOSE
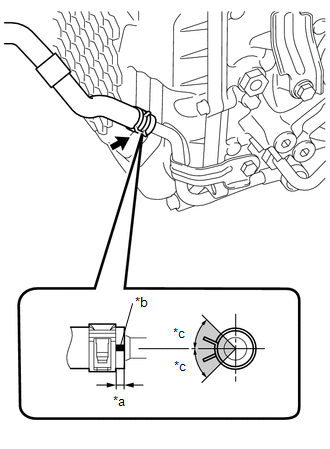
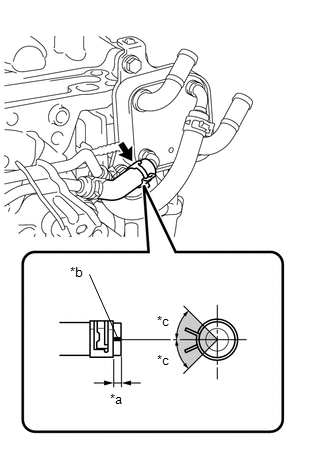
(a) Connect the No. 1 transmission oil cooler hose to the oil cooler union sub-assembly and slide the clip to secure it.
NOTICE:
- Make sure to slide the No. 1 transmission oil cooler hose until each contacts the hose stopper of the oil cooler union sub-assembly
- Make sure that each paint mark is within the location shown in the illustration.
|
*a |
2 to 7 mm (0.0787 to 0.276 in.) |
|
*b |
Paint Mark |
|
*c |
45° |
|
|
Paint Mark Location |
3. CONNECT NO. 2 OUTLET OIL COOLER HOSE
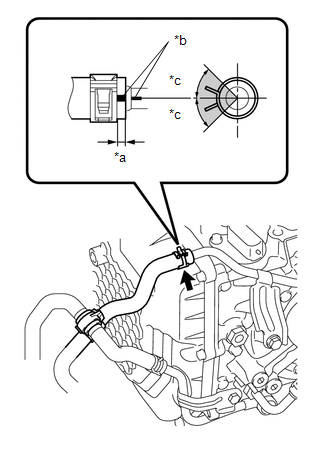
(a) Connect the No. 2 outlet oil cooler hose to the oil cooler tube assembly and slide the clip to secure it.
NOTICE:
- Make sure to slide the No. 2 outlet oil cooler hose until each contacts the hose stopper of the oil cooler tube assembly
- Make sure that each paint mark is within the location shown in the illustration.
|
*a |
2 to 7 mm (0.0787 to 0.276 in.) |
|
*b |
Paint Mark |
|
*c |
45° |
|
|
Paint Mark Location |
(b) Install the automatic transmission oil cooler tube clamp.
4. INSTALL TRANSMISSION OIL THERMOSTAT
(a) Install the transmission oil thermostat to the transmission oil cooler stay with the bolt.
Torque:
19.5 N·m {199 kgf·cm, 14 ft·lbf}
(b) Connect the No. 1 transmission oil cooler hose to the transmission oil thermostat with each paint mark facing up and slide the 2 clips to secure them.

|
*1 |
No. 1 Transmission Oil Cooler Hose Assembly |
- |
- |
|
*a |
2 to 7 mm (0.0787 to 0.276 in.) |
*b |
Paint Mark |
|
*c |
45° |
- |
- |
|
|
Paint Mark Location |
- |
- |
NOTICE:
- Make sure to slide the No. 1 transmission oil cooler hoses assembly until each contacts the hose stopper of the transmission oil thermostat.
- Make sure that each paint mark is within the location shown in the illustration.
(c) Connect the No. 2 outlet oil cooler hose and No. 1 transmission oil cooler hose assembly to the transmission oil thermostat with each paint mark facing the front of the vehicle and slide the 2 clips to secure them.
|
*1 |
No. 1 Transmission Oil Cooler Hose Assembly |
*2 |
No. 2 Outlet Oil Cooler Hose |
|
*a |
2 to 7 mm (0.0787 to 0.276 in.) |
*b |
Paint Mark |
|
*c |
45° |
- |
- |
|
|
Paint Mark Location |
- |
- |
NOTICE:
- Make sure to slide the No. 2 outlet oil cooler hose and the No. 1 transmission oil cooler hose assembly until each contacts the hose stopper of the transmission oil thermostat.
- Make sure that each paint mark is within the location shown in the illustration.
|
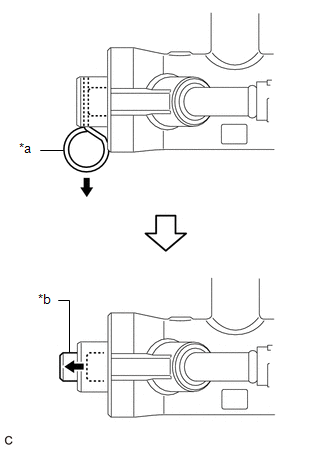
(d) When replacing the transmission oil thermostat with a new one: (1) Remove the pin from the transmission oil thermostat. NOTICE: Make sure that the shaft of the transmission oil thermostat protrudes from the cap after |
|
5. INSTALL TRANSMISSION OIL COOLER
|
(a) Engage the hook to temporarily install the transmission oil cooler to the automatic transaxle case sub-assembly with the bolt (A). |
|
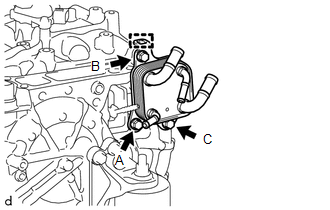
(b) Install the bolt (B).
Torque:
13.5 N·m {138 kgf·cm, 119 in·lbf}
(c) Tighten the bolt (A).
Torque:
13.5 N·m {138 kgf·cm, 119 in·lbf}
(d) Install the bolt (C).
Torque:
13.5 N·m {138 kgf·cm, 119 in·lbf}
6. CONNECT NO. 1 OUTLET OIL COOLER HOSE
(a) Connect the No. 1 outlet oil cooler hose to the transmission oil cooler with the paint mark facing the front of the vehicle and slide the clip to secure it.
NOTICE:
- Make sure to slide the No. 1 outlet oil cooler hose until each contacts the hose stopper of the transmission oil cooler.
- Make sure that each paint mark is within the location shown in the illustration.
|
*a |
2 to 7 mm (0.0787 to 0.276 in.) |
|
*b |
Paint Mark |
|
*c |
45° |
|
|
Paint Mark Location |
7. CONNECT NO. 2 INLET OIL COOLER HOSE
(a) Connect the No. 2 inlet oil cooler hose to the transmission oil cooler with the paint mark facing the front of the vehicle and slide the clip to secure it.
NOTICE:
- Make sure to slide the No. 2 inlet oil cooler hose until each contacts the hose stopper of the transmission oil cooler.
- Make sure that each paint mark is within the location shown in the illustration.
|
*a |
2 to 7 mm (0.0787 to 0.276 in.) |
|
*b |
Paint Mark |
|
*c |
45° |
|
|
Paint Mark Location |
8. CONNECT NO. 3 WATER BY-PASS HOSE
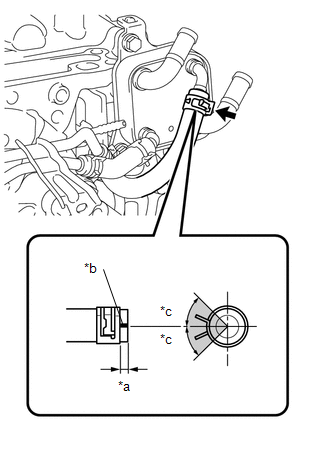
(a) Connect the No. 3 water by-pass hose to the transmission oil cooler and slide the clip to secure it.
|
*1 |
No. 3 Water By-pass Hose |
- |
- |
|
*a |
2 to 7 mm (0.0787 to 0.276 in.) |
*b |
Paint Mark |
|
*c |
45° |
- |
- |
|
|
Paint Mark Location |
- |
- |
NOTICE:
- Make sure to slide the No. 3 water by-pass hose until each contacts the hose stopper of the transmission oil cooler.
- Make sure that each paint mark is within the location shown in the illustration.
9. INSTALL AIR CLEANER BRACKET
Click here
![2017 - 2020 MY Sienna [08/2016 - ]; 2GR-FKS (ENGINE MECHANICAL): ENGINE ASSEMBLY: INSTALLATION+](/t3Portal/stylegraphics/info.gif)
10. INSTALL AIR CLEANER CASE SUB-ASSEMBLY
Click here
11. INSTALL AIR CLEANER FILTER ELEMENT SUB-ASSEMBLY
Click here
12. INSTALL AIR CLEANER CAP WITH AIR CLEANER HOSE
Click here
13. INSTALL AIR CLEANER INLET ASSEMBLY
Click here
14. INSTALL BATTERY
Click here
15. CONNECT CABLE TO NEGATIVE BATTERY TERMINAL
Torque:
5.5 N·m {56 kgf·cm, 49 in·lbf}
NOTICE:
When disconnecting the cable, some systems need to be initialized after the cable is reconnected.
Click here
16. ADD ENGINE COOLANT
Click here
17. ADJUST AUTOMATIC TRANSAXLE FLUID
Click here
18. INSPECT AUTOMATIC TRANSAXLE FLUID LEAK
19. INSPECT FOR COOLANT LEAK
20. INSTALL FRONT FENDER APRON SEAL LH
Click here
21. INSTALL NO. 1 ENGINE UNDER COVER
Click here
22. INSTALL FRONT WHEEL LH
|
|
|