| Last Modified: 08-28-2024 | 6.11:8.1.0 | Doc ID: RM100000000YZJ3 |
| Model Year Start: 2017 | Model: Sienna | Prod Date Range: [08/2016 - ] |
| Title: UA80E (AUTOMATIC TRANSMISSION / TRANSAXLE): PARK / NEUTRAL POSITION SWITCH: REMOVAL; 2017 - 2020 MY Sienna [08/2016 - ] | ||
REMOVAL
PROCEDURE
1. PRECAUTION
NOTICE:
After turning the ignition switch off, waiting time may be required before disconnecting the cable from the negative (-) battery terminal. Therefore, make sure to read the disconnecting the cable from the negative (-) battery terminal notices before proceeding with work.
Click here
![2017 - 2020 MY Sienna [08/2016 - ]; INTRODUCTION: REPAIR INSTRUCTION: PRECAUTION](/t3Portal/stylegraphics/info.gif)
2. DISCONNECT CABLE FROM NEGATIVE BATTERY TERMINAL
NOTICE:
When disconnecting the cable, some systems need to be initialized after the cable is reconnected.
Click here
3. REMOVE BATTERY
Click here
4. REMOVE AIR CLEANER INLET ASSEMBLY
Click here
5. REMOVE AIR CLEANER CAP WITH AIR CLEANER HOSE
Click here
6. REMOVE AIR CLEANER FILTER ELEMENT SUB-ASSEMBLY
Click here
7. REMOVE AIR CLEANER CASE SUB-ASSEMBLY
Click here
8. REMOVE AIR CLEANER BRACKET
Click here
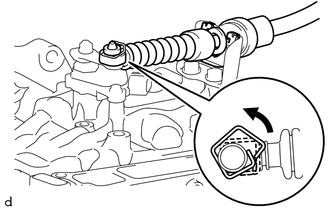
9. DISCONNECT TRANSMISSION CONTROL CABLE ASSEMBLY
(a) Move the shift lever to N.
|
(b) Remove the transmission control cable assembly from the transmission control shaft lever as shown in the illustration. |
|
10. REMOVE PARK/NEUTRAL POSITION SWITCH
|
(a) Disconnect the park/neutral position switch connector. |
|
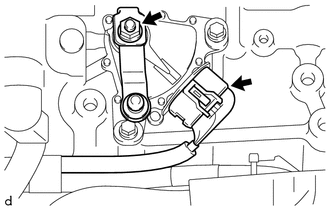
(b) Remove the nut, washer and transmission control shaft lever from the manual valve lever shaft sub-assembly.
|
(c) Remove the 2 bolts and park/neutral position switch from the automatic transaxle case sub-assembly. NOTICE: Before removing the park/neutral position switch, remove any dirt or rust on the installation portion of the manual valve lever shaft sub-assembly. Be sure to remove the park/neutral position switch straight along the manual valve lever shaft sub-assembly while being careful not to deform the plate spring that supports the manual valve lever shaft sub-assembly. If the plate spring is deformed, the park/neutral position switch cannot be reinstalled correctly. |
|

|
|
|