| Last Modified: 08-28-2024 | 6.11:8.1.0 | Doc ID: RM100000000YRCR |
| Model Year Start: 2017 | Model: Sienna | Prod Date Range: [08/2016 - ] |
| Title: DRIVE SHAFT / PROPELLER SHAFT: FRONT DRIVE SHAFT ASSEMBLY: INSTALLATION; 2017 - 2020 MY Sienna [08/2016 - ] | ||
INSTALLATION
CAUTION / NOTICE / HINT
HINT:
- Use the same procedure for the RH side and LH side.
- The following procedure is for the LH side.
PROCEDURE
1. INSTALL DRIVE SHAFT BEARING BRACKET (for 2WD)
Click here
![2017 - 2020 MY Sienna [08/2016 - ]; 2GR-FKS (ENGINE MECHANICAL): ENGINE UNIT: INSTALLATION+](/t3Portal/stylegraphics/info.gif)
2. INSTALL FRONT DRIVE SHAFT ASSEMBLY LH
(a) Coat the snap ring of the front drive inboard joint assembly with MP grease.
(b) Coat the splines of the front drive inboard joint assembly with Toyota genuine ATF WS.
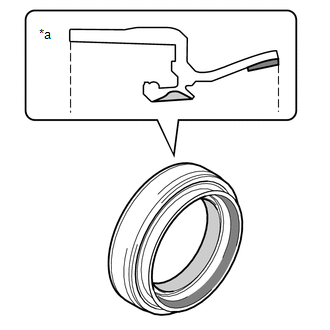
(c) Coat the lip of the front drive shaft oil seal LH with MP grease and Toyota genuine oil seal side lip grease as shown in the illustration.
|
*a |
Cross Section of Front Drive Shaft Oil Seal LH |

|
MP Grease |

|
Toyota Genuine Oil Seal Side Lip Grease |
HINT:
Apply a light coat of MP grease and Toyota genuine oil seal side lip grease to the entire circumference of the front drive shaft oil seal LH.
|
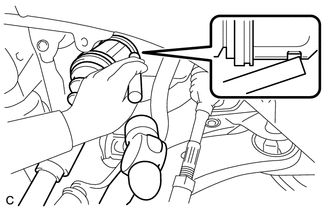
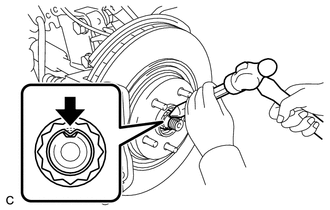
(d) Align the inboard joint splines, and using a brass bar and a hammer, install the front drive shaft assembly LH. NOTICE:
HINT: Confirm whether the drive shaft is securely driven in by checking the reaction force and sound. |
|
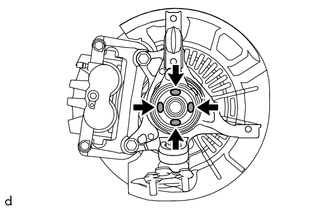
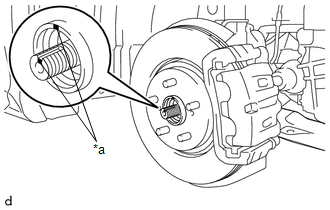
(e) Apply Toyota body grease W to the entire contact surface between the front drive shaft assembly and front axle hub sub-assembly surface or only apply 0.1 to 0.3 g (0.00353 to 0.0105 oz.) of Toyota body grease W to the 4 areas on the axle hub bearing shown in the illustration.
|
|
Toyota Body Grease W |
|
(f) Align the matchmarks and install the front drive shaft assembly LH to the front axle hub sub-assembly. NOTICE:
|
|

3. INSTALL FRONT DRIVE SHAFT ASSEMBLY RH (for 2WD)
(a) Coat the splines of the front drive inboard joint assembly with Toyota genuine ATF WS.
(b) Coat the lip of the front drive shaft oil seal RH with MP grease and Toyota genuine oil seal side lip grease as shown in the illustration.
HINT:
Apply a light coat of MP grease and Toyota genuine oil seal side lip grease to the entire circumference of the front drive shaft oil seal RH.
|
*a |
Cross Section of Front Drive Shaft Oil Seal RH |
|
|
MP Grease |
|
|
Toyota Genuine Oil Seal Side Lip Grease |
(c) Align the inboard joint splines, and securely insert the front drive shaft assembly RH.
NOTICE:
- Do not damage the front drive shaft oil seal RH.
- Do not damage the front axle inboard joint boot.
- When inserting the front drive shaft assembly RH, keep it level.
|
(d) Install the front drive shaft assembly RH to the drive shaft bearing bracket. |
|
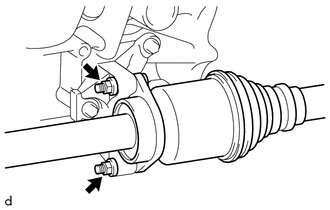
(e) Tighten 2 nuts to the bolts on the front drive shaft assembly RH.
Torque:
37 N·m {377 kgf·cm, 27 ft·lbf}
(f) Apply Toyota body grease W to the entire contact surface between the front drive shaft assembly and front axle hub sub-assembly surface or only apply 0.1 to 0.3 g (0.00353 to 0.0105 oz.) of Toyota body grease W to the 4 areas on the axle hub bearing shown in the illustration.
|
|
Toyota Body Grease W |
|
(g) Align the matchmarks and install the front drive shaft assembly RH to the front axle hub sub-assembly. NOTICE:
|
|
4. INSTALL FRONT DRIVE SHAFT ASSEMBLY RH (for AWD)
(a) Install a new bearing bracket hole snap ring to the front drive shaft assembly RH.
(b) Coat the splines of the front drive inboard joint assembly with Toyota genuine ATF WS.
(c) Coat the lip of the front drive shaft oil seal RH with MP grease.
(d) Align the inboard joint splines, and securely insert the front drive shaft assembly RH.
NOTICE:
- Do not damage the transfer case oil seal RH.
- Do not damage the front axle inboard joint boot.
- When inserting the front drive shaft assembly RH, keep it level.
|
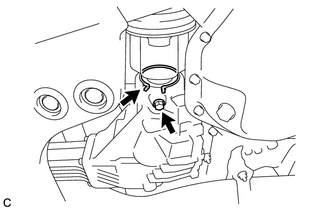
(e) Install the bearing bracket hole snap ring and a new No. 1 drive shaft bearing bracket setting bolt. Torque: 32.4 N·m {330 kgf·cm, 24 ft·lbf} |
|
(f) Apply Toyota body grease W to the entire contact surface between the front drive shaft assembly and front axle hub sub-assembly surface or only apply 0.1 to 0.3 g (0.00353 to 0.0105 oz.) of Toyota body grease W to the 4 areas on the axle hub bearing shown in the illustration.
|
|
Toyota Body Grease W |
|
(g) Align the matchmarks and install the front drive shaft assembly RH to the front axle hub sub-assembly. NOTICE:
|
|

5. INSTALL ENGINE MOUNTING BRACKET RH (for AWD)
(a) Temporarily install the engine mounting insulator RH with the 3 nuts.
(b) Install the engine mounting bracket RH with the 3 bolts.
Torque:
54 N·m {551 kgf·cm, 40 ft·lbf}
6. INSTALL ENGINE MOUNTING INSULATOR RH (for AWD)
(a) Fully tighten engine mounting insulator RH with the 3 nuts.
Torque:
99 N·m {1010 kgf·cm, 73 ft·lbf}
(b) Install the 2 hole plugs.
(c) Install the engine mounting insulator RH with the nut.
Torque:
95 N·m {969 kgf·cm, 71 ft·lbf}
7. INSTALL FRONT FENDER APRON SEAL RH (for AWD)
8. INSTALL FRONT AXLE ASSEMBLY
(a) Pull the front axle out of the vehicle to align the spline of the drive shaft with the front axle and insert the front axle.
NOTICE:
- Do not pull the front axle further out of the vehicle than is necessary.
- Do not damage the outboard joint boot.
- Check for any foreign matter on the speed sensor rotor and insertion part.
- Do not damage the speed sensor rotor.
9. INSTALL FRONT LOWER SUSPENSION ARM
Click here
10. INSTALL TIE ROD ASSEMBLY
(a) Connect the tie rod assembly to the steering knuckle with the nut.
Torque:
49 N·m {500 kgf·cm, 36 ft·lbf}
(b) Install a new cotter pin.
NOTICE:
Further tighten the nut up to 60° if the holes for the cotter pin are not aligned.
11. INSTALL FRONT SPEED SENSOR
(a) Install the front speed sensor and front flexible hose with the bolt.
Torque:
18.8 N·m {192 kgf·cm, 14 ft·lbf}
NOTICE:
- Do not twist the front speed sensor when installing it.
- First install the speed sensor harness bracket, and then install the flexible hose bracket.
(b) Install the front speed sensor to the steering knuckle with the bolt.
Torque:
8.0 N·m {82 kgf·cm, 71 in·lbf}
NOTICE:
- Prevent foreign matter from attaching to the front speed sensor tip.
- Firmly insert the front speed sensor body into the steering knuckle before tightening the bolt.
- After installing the front speed sensor to the steering knuckle, make sure that there is no clearance between the front speed sensor stay and steering knuckle. Also make sure that no foreign matter is stuck between the parts.
- To prevent interference between the front speed sensor and magnetic rotor, do not rotate the front speed sensor body during or after the insertion of the front speed sensor body to the steering knuckle.
(c) Engage the 2 claws to install the sensor clamp.
12. INSTALL FRONT STABILIZER LINK ASSEMBLY
Click here
13. INSTALL FRONT AXLE SHAFT NUT
(a) Clean the threaded parts on the front drive shaft and a new front axle shaft nut using a non-residue solvent.
NOTICE:
- Be sure to perform this work for a new drive shaft.
- Keep the threaded parts free of oil and foreign matter.
|
(b) Install the front axle shaft nut. Torque: 294 N·m {2998 kgf·cm, 217 ft·lbf} |
|
(c) Using a chisel and hammer, stake the front axle shaft nut.
14. INSTALL FRONT WHEELS
Torque:
103 N·m {1050 kgf·cm, 76 ft·lbf}
15. ADD TRANSFER OIL (for AWD)
Click here
16. ADJUST TRANSFER OIL (for AWD)
Click here
17. ADD AUTOMATIC TRANSAXLE FLUID (for 2WD)
Click here
18. ADD AUTOMATIC TRANSAXLE FLUID (for AWD)
Click here
19. ADJUST FRONT WHEEL ALIGNMENT
Click here
20. INSPECT SPEED SENSOR SIGNAL
Click here
21. INSTALL FRONT FENDER APRON SEAL LH
Click here
22. INSTALL NO. 2 ENGINE UNDER COVER (for AWD)
Click here
23. INSTALL NO. 1 ENGINE UNDER COVER
Click here
|
|
|