| Last Modified: 08-28-2024 | 6.11:8.1.0 | Doc ID: RM100000000VK8L |
| Model Year Start: 2016 | Model: Sienna | Prod Date Range: [12/2015 - ] |
| Title: DOOR / HATCH: BACK DOOR: REASSEMBLY; 2016 - 2020 MY Sienna [12/2015 - ] | ||
REASSEMBLY
PROCEDURE
1. INSTALL REAR COMBINATION LIGHT ASSEMBLY LH
2. INSTALL REAR COMBINATION LIGHT ASSEMBLY RH
HINT:
Use the same procedure as for the LH side (See page
![2016 - 2020 MY Sienna [12/2015 - ]; LIGHTING (EXT): REAR COMBINATION LIGHT ASSEMBLY: INSTALLATION+](/t3Portal/stylegraphics/info.gif) ).
).
3. INSTALL LICENSE PLATE LIGHT ASSEMBLY
4. INSTALL REAR NO. 3 SPEAKER ASSEMBLY (for 10 Speakers)
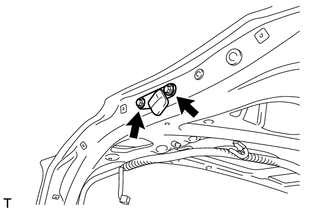
5. INSTALL BACK DOOR SIDE MALE STOPPER LH
|
(a) Install the back door side male stopper LH with the 2 bolts. |
|
6. INSTALL BACK DOOR SIDE MALE STOPPER RH
HINT:
Use the same procedure as for the LH side.
7. INSTALL POWER BACK DOOR SENSOR ASSEMBLY LH (w/ Power Back Door)
8. INSTALL POWER BACK DOOR SENSOR ASSEMBLY RH (w/ Power Back Door)
9. INSTALL BACK DOOR LOCK ASSEMBLY (w/o Power Back Door)
10. INSTALL BACK DOOR LOCK ASSEMBLY (w/ Power Back Door)
11. INSTALL REAR TELEVISION CAMERA ASSEMBLY
12. INSTALL BACK DOOR OPENER SWITCH ASSEMBLY
13. INSTALL BACK DOOR OUTSIDE GARNISH SUB-ASSEMBLY
14. INSTALL DOOR CONTROL SWITCH ASSEMBLY (w/ Power Back Door)
15. INSTALL REAR WIPER MOTOR GROMMET
16. INSTALL REAR WIPER MOTOR AND BRACKET ASSEMBLY
17. INSTALL REAR WIPER ARM AND BLADE ASSEMBLY
18. INSTALL NO. 6 REAR SPOILER PROTECTOR
19. INSTALL NO. 5 REAR SPOILER PROTECTOR
20. INSTALL NO. 10 REAR SPOILER PROTECTOR
21. INSTALL NO. 4 REAR SPOILER PROTECTOR
22. INSTALL NO. 3 REAR SPOILER PROTECTOR
23. INSTALL NO. 3 REAR SPOILER PROTECTOR
24. INSTALL NO. 2 REAR SPOILER PROTECTOR
25. INSTALL NO. 2 REAR SPOILER PROTECTOR
26. INSTALL NO. 2 REAR SPOILER PROTECTOR
27. INSTALL REAR SPOILER SUB-ASSEMBLY
28. INSTALL POWER BACK DOOR WARNING BUZZER (w/ Power Back Door)
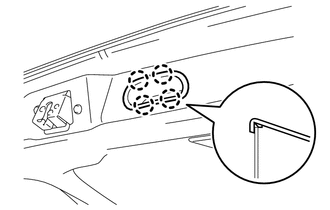
29. INSTALL BACK DOOR INSIDE HANDLE
|
(a) Engage the 4 claws to install the back door inside handle. |
|
30. INSTALL UPPER BACK DOOR STAY BRACKET (w/ Power Back Door)
|
(a) Install the upper back door stay bracket with the 2 bolts. Torque: 14 N·m {140 kgf·cm, 10 ft·lbf} |
|
(b) Engage the clamp.
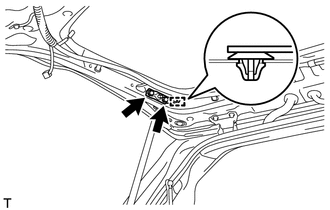
31. INSTALL BACK DOOR SIDE GARNISH LH
|
(a) Engage the 2 clips to install the back door side garnish LH. |
|
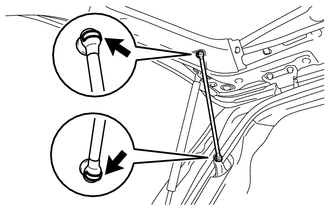
32. INSTALL POWER BACK DOOR ROD (w/ Power Back Door)
|
(a) Install the power back door rod and 2 stop rings. |
|
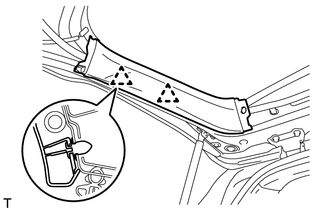
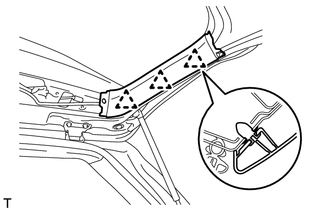
33. INSTALL BACK DOOR SIDE GARNISH RH
|
(a) Engage the 3 clips to install the back door side garnish RH. |
|
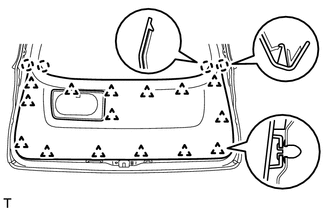
34. INSTALL BACK DOOR TRIM BOARD ASSEMBLY
|
(a) Engage the 15 clips and 4 claws to install the back door trim board assembly. |
|
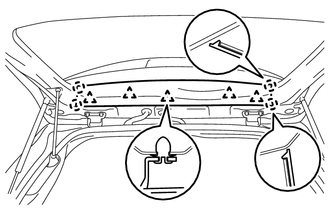
35. INSTALL BACK DOOR CENTER GARNISH
|
(a) Engage the 5 clips and 4 claws to install the back door center garnish. |
|
|
|
|
