| Last Modified: 08-28-2024 | 6.11:8.1.0 | Doc ID: RM100000000VK6F |
| Model Year Start: 2016 | Model: Sienna | Prod Date Range: [12/2015 - ] |
| Title: WINDOW / GLASS: POWER WINDOW CONTROL SYSTEM: Power Vent Window Motor Circuit; 2016 - 2020 MY Sienna [12/2015 - ] | ||
|
Power Vent Window Motor Circuit |
DESCRIPTION
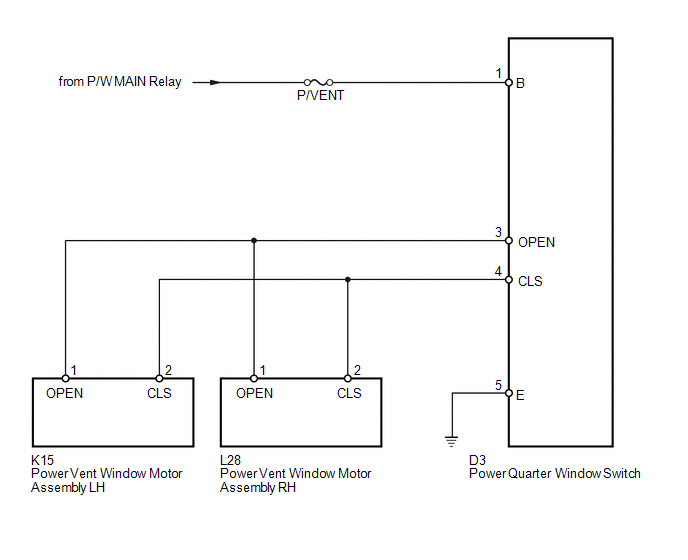
The power quarter windows are operated by power quarter window switch on the instrument panel while the ignition switch is in the ON position.
WIRING DIAGRAM

CAUTION / NOTICE / HINT
NOTICE:
Inspect the fuses for circuits related to this system before performing the following inspection procedure.
PROCEDURE
|
1. |
CHECK HARNESS AND CONNECTOR (POWER QUARTER WINDOW SWITCH - BODY GROUND) |
(a) Disconnect the power quarter window switch connector.
(b) Measure the resistance according to the value(s) in the table below.
Standard Resistance:
|
Tester Connection |
Condition |
Specified Condition |
|---|---|---|
|
D3-5 (E) - Body ground |
Always |
Below 1 Ω |
| NG |

|
REPAIR OR REPLACE HARNESS OR CONNECTOR |
|
|
2. |
CHECK HARNESS AND CONNECTOR (BATTERY - POWER QUARTER WINDOW SWITCH) |
|
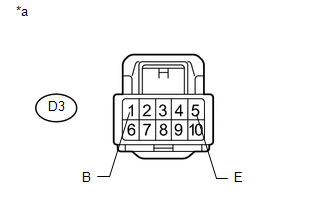
(a) Measure the voltage according to the value(s) in the table below. Standard Voltage:
Text in Illustration
|
|
| NG |

|
CHECK FOR ALL HARNESSES, CONNECTORS AND COMPONENTS CONNECTED TO P/VENT FUSE |
|
|
3. |
INSPECT POWER QUARTER WINDOW SWITCH |
|
(a) Remove the power quarter window switch. |
|
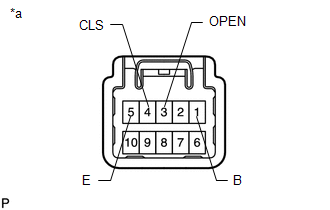
(b) Measure the resistance according to the value(s) in the table below.
Standard Resistance:
|
Tester Connection |
Switch Condition |
Specified Condition |
|---|---|---|
|
D3-1 (B) - D3-3 (OPEN) |
Open position → Close position |
Below 1 Ω → 10 kΩ or higher |
|
D3-1 (B) - D3-4 (CLS) |
Open position → Close position |
10 kΩ or higher → Below 1 Ω |
|
D3-3 (OPEN) - D3-5 (E) |
Open position → Close position |
10 kΩ or higher → Below 1 Ω |
|
D3-4 (CLS) - D3-5 (E) |
Open position → Close position |
Below 1 Ω → 10 kΩ or higher |
Text in Illustration
|
*a |
Component without harness connected (Power Quarter Window Switch) |
| NG |

|
REPLACE POWER QUARTER WINDOW SWITCH |
|
|
4. |
CHECK HARNESS AND CONNECTOR (POWER QUARTER WINDOW SWITCH - POWER VENT WINDOW MOTOR) |
(a) Disconnect the power vent window motor assembly LH and RH connector.
(b) Measure the resistance according to the value(s) in the table below.
Standard Resistance:
|
Tester Connection |
Condition |
Specified Condition |
|---|---|---|
|
D3-3 (OPEN) - K15-1 (OPEN) |
Always |
Below 1 Ω |
|
D3-4 (CLS) - K15-2 (CLS) |
Always |
Below 1 Ω |
|
D3-3 (OPEN) - L28-1 (OPEN) |
Always |
Below 1 Ω |
|
D3-4 (CLS) - L28-2 (CLS) |
Always |
Below 1 Ω |
|
D3-3 (OPEN) - Body ground |
Always |
10 kΩ or higher |
|
D3-4 (CLS) - Body ground |
Always |
10 kΩ or higher |
| NG |

|
REPAIR OR REPLACE HARNESS OR CONNECTOR |
|
|
5. |
CHECK REAR QUARTER POWER WINDOW CONTROL SYSTEM |
(a) Check the operation of the rear quarter power window control system.
|
Result |
Proceed to |
|---|---|
|
The rear quarter power window control system operates normally. |
A |
|
The power vent window motor assembly LH does not operate normally. |
B |
|
The power vent window motor assembly RH does not operate normally. |
C |
| A |

|
USE SIMULATION METHOD TO CHECK |
| B |

|
| C |

|
|
|
|


![2016 MY Sienna [12/2015 - 08/2016]; INTRODUCTION: HOW TO TROUBLESHOOT ECU CONTROLLED SYSTEMS: HOW TO PROCEED WITH TROUBLESHOOTING](/t3Portal/stylegraphics/info.gif)