| Last Modified: 08-28-2024 | 6.11:8.1.0 | Doc ID: RM100000000VK4P |
| Model Year Start: 2016 | Model: Sienna | Prod Date Range: [12/2015 - 11/2017] |
| Title: INTERIOR PANELS / TRIM: INSTRUMENT PANEL SAFETY PAD: REMOVAL; 2016 - 2017 MY Sienna [12/2015 - 11/2017] | ||
REMOVAL
PROCEDURE
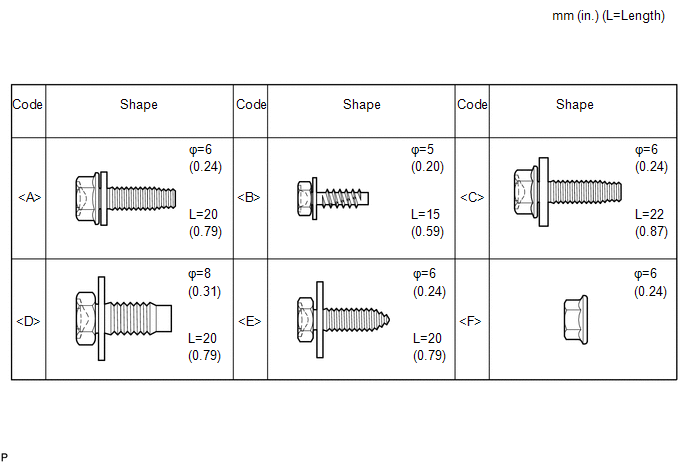
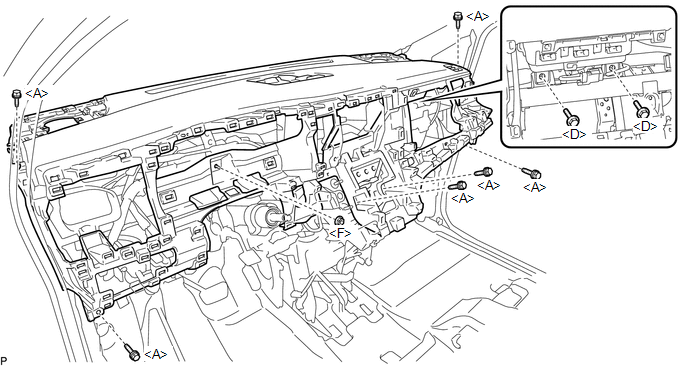
1. BOLT, SCREW AND NUT TABLE
(a) The bolts, the screws and the nuts, which are necessary for installation and removal of the instrument panel are shown in the illustration below with alphabets.
2. TURN FRONT WHEELS TO FACE STRAIGHT AHEAD
3. DISCONNECT CABLE FROM NEGATIVE BATTERY TERMINAL
CAUTION:
Wait at least 90 seconds after disconnecting the cable from the negative (-) battery terminal to disable the SRS system.
NOTICE:
When disconnecting the cable, some systems need to be initialized after the cable is reconnected (See page
![2016 MY Sienna [12/2015 - 08/2016]; INTRODUCTION: REPAIR INSTRUCTION: INITIALIZATION](/t3Portal/stylegraphics/info.gif) ).
).
4. REMOVE CONSOLE ASSEMBLY (for Slide Type)
(See page
)
5. REMOVE CONSOLE ASSEMBLY (for Fixed Type)
(See page
)
6. REMOVE STEERING WHEEL ASSEMBLY
(See page
)
7. REMOVE LOWER STEERING COLUMN COVER
8. REMOVE UPPER STEERING COLUMN COVER
9. REMOVE DOOR SCUFF PLATE ASSEMBLY RH
10. REMOVE DOOR SCUFF PLATE ASSEMBLY LH
HINT:
Use the same procedure as for the RH side.
11. REMOVE COWL SIDE TRIM BOARD RH
12. REMOVE COWL SIDE TRIM BOARD LH
HINT:
Use the same procedure as for the RH side.
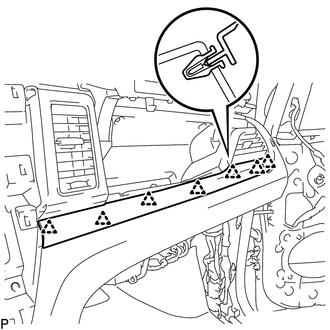
13. SEPARATE FRONT DOOR OPENING TRIM WEATHERSTRIP RH
(a) Separate the front door opening trim weatherstrip RH.
14. SEPARATE FRONT DOOR OPENING TRIM WEATHERSTRIP LH
HINT:
Use the same procedure as for the RH side.
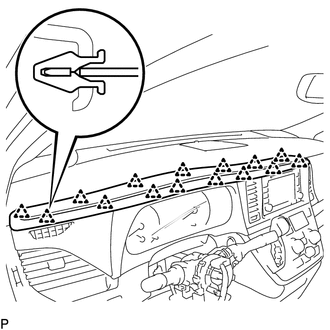
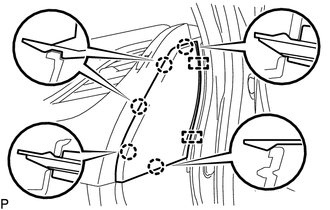
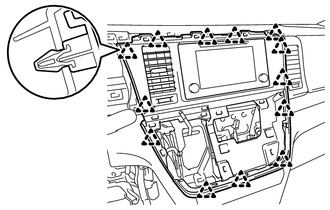
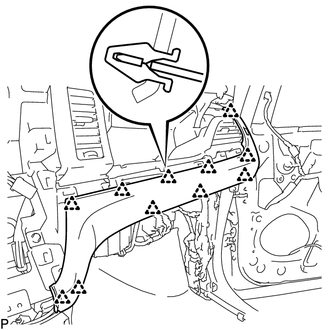
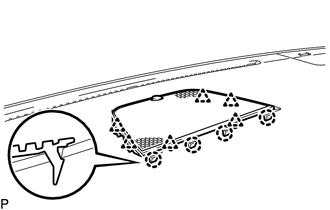
15. REMOVE NO. 1 INSTRUMENT PANEL GARNISH SUB-ASSEMBLY
|
(a) Disengage the 15 clips to remove the No. 1 instrument panel garnish sub-assembly. |
|
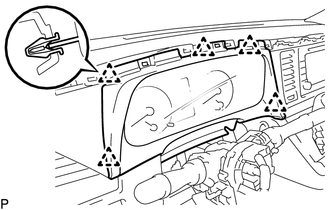
16. REMOVE NO. 1 INSTRUMENT CLUSTER FINISH PANEL
|
(a) Disengage the 5 clips to remove the No. 1 instrument cluster finish panel. |
|
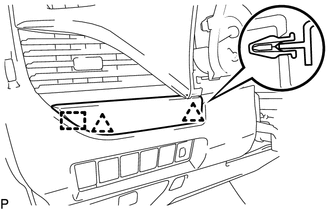
17. REMOVE NO. 1 INSTRUMENT CLUSTER FINISH PANEL GARNISH
|
(a) Disengage the 2 clips and guide to remove the No. 1 instrument cluster finish panel garnish. |
|
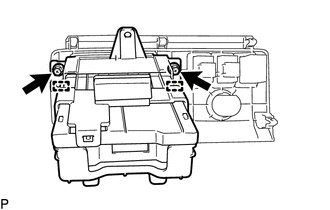
18. REMOVE INSTRUMENT SIDE PANEL RH
(a) Disengage the 5 claws and 2 guides to remove the instrument side panel RH.
19. REMOVE INSTRUMENT SIDE PANEL LH
HINT:
Use the same procedure as for the RH side.
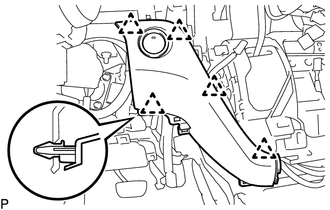
20. REMOVE INSTRUMENT PANEL LOWER FINISH PANEL SUB-ASSEMBLY LH
|
(a) Disengage the 7 clips. |
|
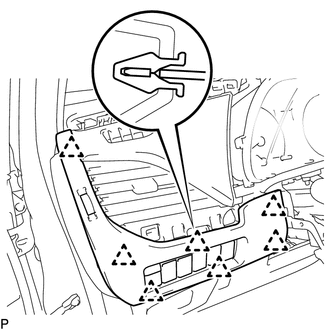
(b) Disconnect the connectors to remove the instrument panel lower finish panel sub-assembly LH.
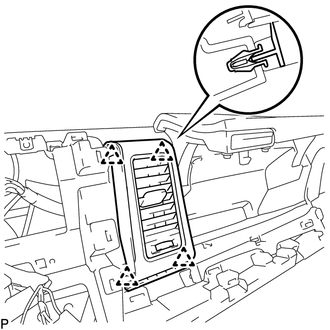
21. REMOVE NO. 1 INSTRUMENT PANEL REGISTER ASSEMBLY
|
(a) Disengage the 5 clips to remove the No. 1 instrument panel register assembly. |
|
22. REMOVE COMBINATION METER ASSEMBLY
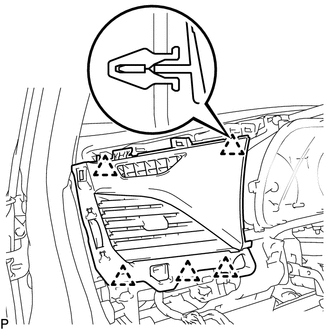
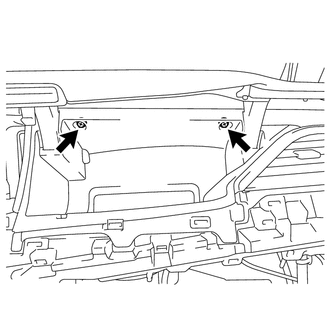
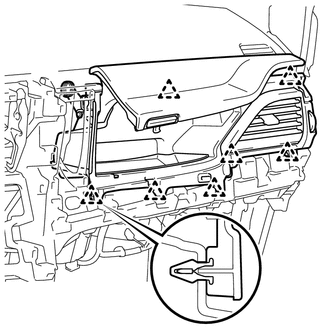
23. REMOVE NO. 1 INSTRUMENT PANEL LOWER FINISH PANEL
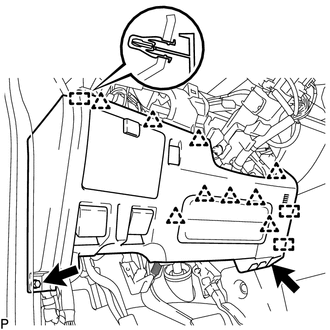
(a) Remove the 2 <A> bolts.
(b) Disengage the 9 clips and 3 guides to separate the No. 1 instrument panel lower finish panel.
|
(c) Disengage the claw and 2 guides to separate the fuel lid lock open lever. |
|
(d) Disengage the claw and 2 guides to separate the hood lock control lever.
(e) Disconnect the connectors to remove the No. 1 instrument panel lower finish panel.
24. REMOVE LOWER NO. 1 INSTRUMENT PANEL AIRBAG ASSEMBLY
25. REMOVE AIR CONDITIONING CONTROL ASSEMBLY
26. REMOVE SHIFT LEVER KNOB SUB-ASSEMBLY
27. REMOVE POSITION INDICATOR HOUSING ASSEMBLY
28. REMOVE CENTER INSTRUMENT CLUSTER FINISH PANEL SUB-ASSEMBLY
|
(a) Disengage the 13 clips to remove the center instrument cluster finish panel sub-assembly. |
|
29. REMOVE RADIO RECEIVER ASSEMBLY WITH BRACKET (for Radio Receiver Type)
30. REMOVE NAVIGATION RECEIVER ASSEMBLY WITH BRACKET (for Navigation Receiver Type)
31. REMOVE NO. 2 SWITCH HOLE BASE
(a) Disengage the 3 clips to remove the No. 2 switch hole base.
32. REMOVE NO. 1 SWITCH HOLE BASE
|
(a) Remove the <B> screw. |
|
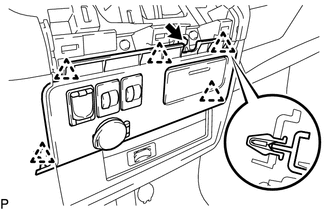
(b) Disengage the 5 clips.
(c) Disconnect the connectors to remove the No. 1 switch hole base.
33. REMOVE INSTRUMENT PANEL CUP HOLDER ASSEMBLY
|
(a) Remove the 2 <B> screws. |
|
(b) Disengage the 2 guides to remove the instrument panel cup holder assembly.
34. REMOVE GLOVE COMPARTMENT DOOR SUB-ASSEMBLY
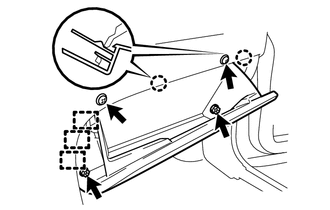
(a) Remove the 2 <A> bolts and 2 <B> screws.
(b) Disengage the 2 claws and 3 guides to remove the glove compartment door sub-assembly.
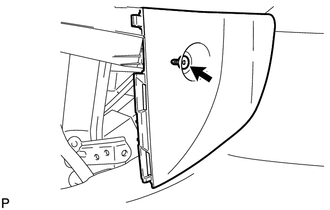
35. REMOVE INSTRUMENT PANEL FINISH PANEL END RH
|
(a) Remove the clip and instrument panel finish panel end RH. |
|
36. REMOVE INSTRUMENT PANEL FINISH PANEL END LH
HINT:
Use the same procedure as for the RH side.
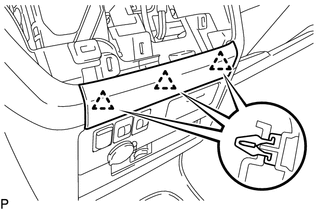
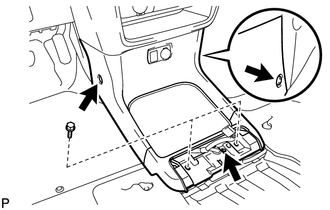
37. REMOVE INSTRUMENT LOWER CENTER COVER (w/o Front Console Box)
|
(a) Disengage the 7 clips to remove the instrument lower center cover. |
|
38. REMOVE INSTRUMENT LOWER CENTER COVER (w/ Front Console Box)
|
(a) Disengage the 6 clips to remove the instrument lower center cover. |
|

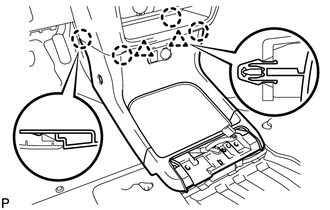
39. REMOVE INSTRUMENT CLUSTER FINISH LOWER CENTER PANEL SUB-ASSEMBLY
|
(a) Remove the 3 clips. |
|
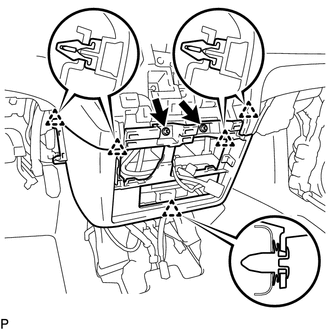
(b) Remove the 2 <E> bolts (w/o front console box).
|
(c) Disengage the 4 claws and 2 clips. |
|
(d) Disconnect the connectors to remove the instrument cluster finish lower center panel sub-assembly.
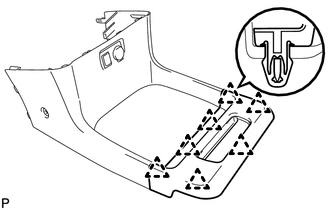
40. REMOVE BOX BOTTOM MAT
(a) Remove the box bottom mat.
41. REMOVE INSTRUMENT CLUSTER FINISH CENTER PANEL ASSEMBLY
|
(a) Remove the 2 <B> screws. |
|
(b) Disengage the 5 clips to remove the instrument cluster finish center panel assembly.
42. REMOVE STEREO OPENING COVER (w/ Disc Player)
43. REMOVE DISC PLAYER ASSEMBLY WITH BRACKET (w/ Disc Player)
44. REMOVE NO. 2 INSTRUMENT CLUSTER FINISH PANEL GARNISH
|
(a) Open the No. 2 instrument panel box door sub-assembly. |
|
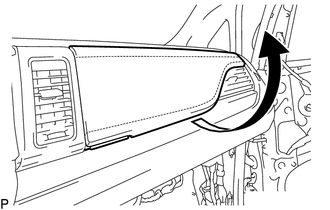
|
(b) Disengage the 7 clips to remove the No. 2 instrument cluster finish panel garnish. |
|
45. REMOVE INSTRUMENT PANEL FINISH PANEL SUB-ASSEMBLY
(a) Disengage the 11 clips to remove the instrument panel finish panel sub-assembly.
46. REMOVE NO. 3 INSTRUMENT PANEL REGISTER ASSEMBLY
(a) Disengage the 4 clips to remove the No. 3 instrument panel register assembly.
47. REMOVE NO. 2 INSTRUMENT PANEL BOX DOOR SUB-ASSEMBLY
|
(a) Remove the 2 <B> screws. |
|
|
(b) Disengage the 7 clips to remove the No. 2 instrument panel box door sub-assembly. |
|
48. REMOVE LOWER INSTRUMENT PANEL FINISH PANEL ASSEMBLY
|
(a) Disengage the 5 clips to remove the lower instrument panel finish panel assembly. |
|
(b) Disconnect connector. (w/ Entry and Start System)
49. REMOVE NO. 1 INSTRUMENT PANEL SAFETY PAD RETAINER
|
(a) Remove the 2 <B> screws. |
|
(b) Disengage the 2 guides to remove the No. 1 instrument panel safety pad retainer.
50. REMOVE FRONT PILLAR GARNISH RH
51. REMOVE FRONT PILLAR GARNISH LH
HINT:
Use the same procedure as for the RH side.
52. REMOVE FRONT PILLAR LOWER GARNISH RH
53. REMOVE FRONT PILLAR LOWER GARNISH LH
HINT:
Use the same procedure as for the RH side.
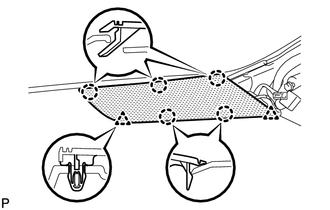
54. REMOVE NO. 2 INSTRUMENT PANEL SPEAKER PANEL SUB-ASSEMBLY
|
(a) Disengage the 5 claws and 2 clips to remove the No. 2 instrument panel speaker panel sub-assembly. |
|
55. REMOVE NO. 1 INSTRUMENT PANEL SPEAKER PANEL SUB-ASSEMBLY
HINT:
Use the same procedure as for the No. 2 instrument panel speaker panel sub-assembly.
56. REMOVE INSTRUMENT PANEL FINISH PLATE SUB-ASSEMBLY
|
(a) Disengage the 4 claws and 6 clips. |
|
(b) Disconnect the connector to remove the instrument panel finish plate sub-assembly
57. REMOVE FRONT NO. 2 SPEAKER ASSEMBLY
58. REMOVE FRONT NO. 3 SPEAKER ASSEMBLY
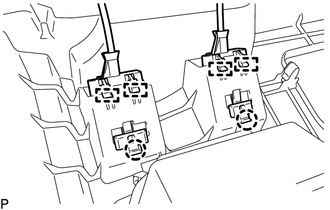
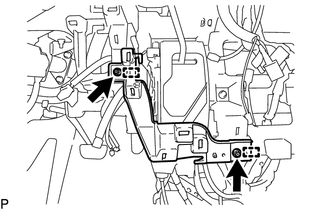
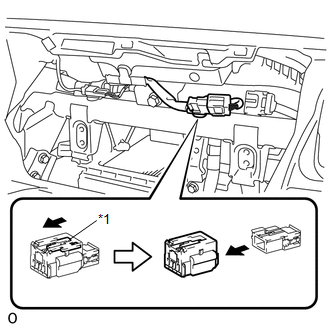
59. DISCONNECT NO. 2 INSTRUMENT PANEL WIRE
|
(a) Slide the slider to release the lock, and then disconnect the connector. Text in Illustration
NOTICE: When disconnecting any airbag connector, take care not to damage the airbag wire harness. |
|
60. REMOVE INSTRUMENT PANEL SUB-ASSEMBLY
(a) Disengage the clamps.
(b) Remove the 8 <A>, <D> bolts, <F> nut and instrument panel sub-assembly.
|
|
|