| Last Modified: 08-28-2024 | 6.11:8.1.0 | Doc ID: RM100000000VK2L |
| Model Year Start: 2016 | Model: Sienna | Prod Date Range: [12/2015 - ] |
| Title: HEATING / AIR CONDITIONING: COMPRESSOR: INSTALLATION; 2016 - 2020 MY Sienna [12/2015 - ] | ||
INSTALLATION
PROCEDURE
1. INSTALL W/PULLEY COMPRESSOR ASSEMBLY
(a) Using an E8 "TORX" socket wrench, install the compressor with the 2 stud bolts.
Torque:
10 N·m {102 kgf·cm, 7 ft·lbf}
|
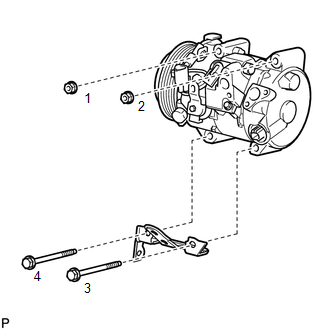
(b) Install the compressor assembly with pulley with the 2 bolts and 2 nuts. Torque: 25 N·m {250 kgf·cm, 18 ft·lbf} HINT: Tighten the bolts and the nuts in the order shown in the illustration. |
|
(c) Connect the 3 connectors.
(d) Engage the 2 clamps.
2. CONNECT SUCTION HOSE SUB-ASSEMBLY
(a) Remove the attached vinyl tape from the suction hose.
(b) Sufficiently apply compressor oil to a new O-ring and the fitting surface of the compressor.
Compressor oil:
ND-OIL 8 or equivalent
(c) Install the O-ring onto the suction hose.
(d) Connect the suction hose to the compressor with the bolt.
Torque:
5.4 N·m {55 kgf·cm, 48 in·lbf}
3. CONNECT DISCHARGE HOSE SUB-ASSEMBLY
(a) Remove the attached vinyl tape from the discharge hose.
(b) Sufficiently apply compressor oil to a new O-ring and the fitting surface of the compressor.
Compressor oil:
ND-OIL 8 or equivalent
(c) Install the O-ring onto the discharge hose.
(d) Connect the discharge hose to the compressor with the bolt.
Torque:
5.4 N·m {55 kgf·cm, 48 in·lbf}
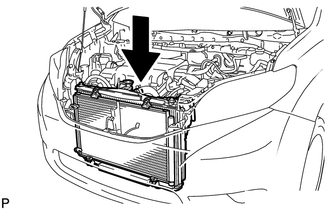
4. INSTALL RADIATOR AND FAN ASSEMBLY

(a) Install the radiator and fan assembly with condenser into the vehicle.
5. INSTALL RADIATOR SUPPORT SUB-ASSEMBLY
(a) Install the radiator support with 5 bolts.
Torque:
6.0 N·m {62 kgf·cm, 53 in·lbf}
(b) Connect the 2 connectors.
(c) Engage the clamp.
6. INSTALL HOOD LOCK ASSEMBLY
7. INSTALL HOOD LOCK NUT CAP
8. CONNECT COOLER REFRIGERANT LIQUID PIPE A
(a) Remove the attached vinyl tape from the cooler refrigerant liquid pipe A.
(b) Sufficiently apply compressor oil to a new O-ring and the fitting surface of the condenser.
Compressor oil:
ND-OIL 8 or equivalent
(c) Install the O-ring onto the cooler refrigerant liquid pipe A.
(d) Connect the cooler refrigerant liquid pipe A to the condenser with the bolt.
Torque:
5.4 N·m {55 kgf·cm, 48 in·lbf}
9. CONNECT DISCHARGE HOSE SUB-ASSEMBLY
(a) Remove the attached vinyl tape from the discharge hose.
(b) Sufficiently apply compressor oil to a new O-ring and the fitting surface of the condenser.
Compressor oil:
ND-OIL 8 or equivalent
(c) Install the O-ring onto the discharge hose.
(d) Connect the discharge hose to the condenser with the bolt.
Torque:
5.4 N·m {55 kgf·cm, 48 in·lbf}
10. CONNECT OUTLET OIL COOLER HOSE
11. CONNECT INLET OIL COOLER HOSE
12. CONNECT NO. 2 RADIATOR HOSE
13. CONNECT NO. 1 RADIATOR HOSE
14. INSTALL AIR CLEANER INLET COVER ASSEMBLY SEAL
15. INSTALL RADIATOR GRILLE SUB-ASSEMBLY (w/o Dynamic Radar Cruise Control System)
16. INSTALL MILLIMETER WAVE RADAR SENSOR ASSEMBLY (w/ Dynamic Radar Cruise Control System)
17. INSTALL FAN AND GENERATOR V BELT
18. ADD ENGINE COOLANT
19. INSPECT FOR COOLANT LEAK
20. CHARGE REFRIGERANT
21. WARM UP ENGINE
22. INSPECT FOR REFRIGERANT LEAK
23. INSPECT AUTOMATIC TRANSAXLE FLUID
24. INSTALL NO. 1 ENGINE UNDER COVER
25. INSTALL V-BANK COVER SUB-ASSEMBLY
26. INSPECT HOOD SUB-ASSEMBLY
27. ADJUST HOOD SUB-ASSEMBLY
|
|
|

![2016 - 2020 MY Sienna [12/2015 - ]; DOOR / HATCH: HOOD: ON-VEHICLE INSPECTION+](/t3Portal/stylegraphics/info.gif)