| Last Modified: 08-28-2024 | 6.11:8.1.0 | Doc ID: RM100000000VK23 |
| Model Year Start: 2016 | Model: Sienna | Prod Date Range: [12/2015 - 08/2016] |
| Title: HEATING / AIR CONDITIONING: REAR AIR CONDITIONING UNIT: REMOVAL; 2016 MY Sienna [12/2015 - 08/2016] | ||
REMOVAL
PROCEDURE
1. RECOVER REFRIGERANT FROM REFRIGERATION SYSTEM
2. REMOVE V-BANK COVER SUB-ASSEMBLY
3. REMOVE NO. 1 ENGINE UNDER COVER
4. DRAIN ENGINE COOLANT
5. REMOVE BACK DOOR WEATHERSTRIP
6. REMOVE BACK DOOR SCUFF PLATE
7. REMOVE ROOF HEADLINING REAR GARNISH
8. SEPARATE REAR NO. 2 SEAT OUTER BELT ASSEMBLY RH
9. REMOVE REAR DOOR SCUFF PLATE RH
10. SEPARATE SLIDE DOOR WEATHERSTRIP RH
11. REMOVE QUARTER TRIM PANEL ASSEMBLY RH
12. REMOVE REAR NO. 2 WINDOW SIDE GARNISH ASSEMBLY RH
13. REMOVE JACK ASSEMBLY
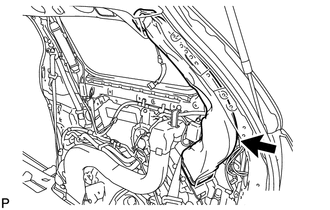
14. REMOVE BELT OUTER ANCHOR BRACKET SUB-ASSEMBLY RH
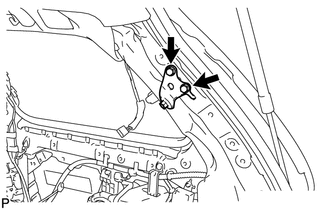
(a) Remove the 2 bolts and belt outer anchor bracket sub-assembly RH.
HINT:
Do not try to remove the bolt since it is integrated with the belt outer anchor bracket.
15. REMOVE REAR NO. 6 AIR DUCT
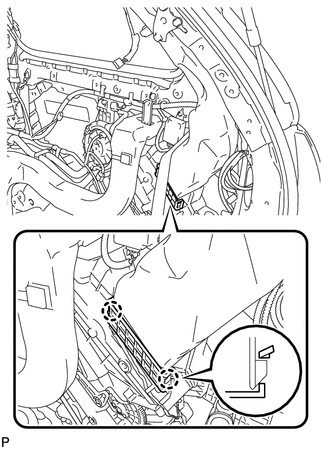
(a) Disengage the 2 claws and remove the cooler plate.
|
(b) Remove the rear No. 6 air duct. |
|
16. REMOVE AIR DUCT ASSEMBLY
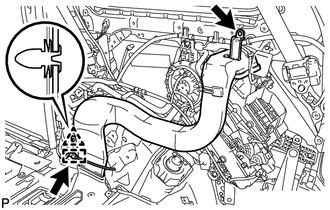
(a) Remove the clip.
(b) Disengage the clamp and disconnect the connector.
(c) Disengage the clip and remove the air duct assembly.
17. DISCONNECT NO. 3 AIR CONDITIONING ACCESSORY ASSEMBLY
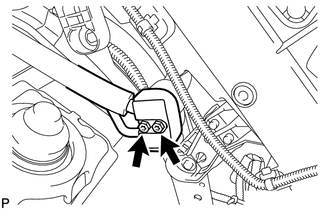
(a) Remove the 2 bolts and disconnect the No. 3 air conditioning accessory assembly from the rear cooling unit.
(b) Remove the 2 O-rings from the No. 3 air conditioning accessory assembly.
NOTICE:
Seal the openings of the disconnected parts using vinyl tape to prevent the entry of moisture and foreign matter.
18. REMOVE HEATER WATER OUTLET HOSE G
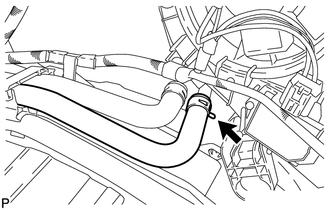
(a) Slide the clip and disconnect the heater water outlet hose G from the heater radiator unit.
19. REMOVE HEATER WATER INLET HOSE H
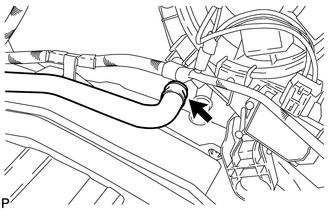
(a) Slide the clip and disconnect the heater water inlet hose H from the heater radiator unit.
20. DISCONNECT NO. 2 FLOOR WIRE
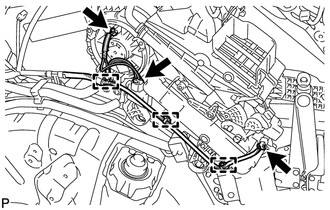
(a) Disconnect the 3 connectors.
(b) Disengage the 3 clamps and separate the No. 2 floor wire.
21. REMOVE REAR COOLING UNIT ASSEMBLY
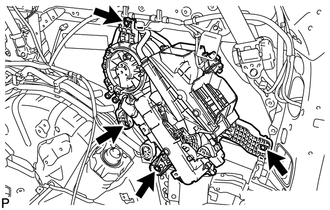
(a) Remove the 4 bolts and rear cooling unit assembly.
(b) Disconnect the drain cooler hose.
22. REMOVE DRAIN COOLER HOSE
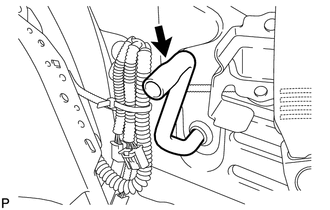
(a) Remove the drain cooler hose.
|
|
|
![2016 MY Sienna [12/2015 - 08/2016]; HEATING / AIR CONDITIONING: REFRIGERANT: REPLACEMENT+](/t3Portal/stylegraphics/info.gif)
