| Last Modified: 08-28-2024 | 6.11:8.1.0 | Doc ID: RM100000000VJW3 |
| Model Year Start: 2016 | Model: Sienna | Prod Date Range: [12/2015 - ] |
| Title: SEAT: REAR POWER SEAT CONTROL SYSTEM: Indicator Circuit; 2016 - 2020 MY Sienna [12/2015 - ] | ||
|
Indicator Circuit |
DESCRIPTION
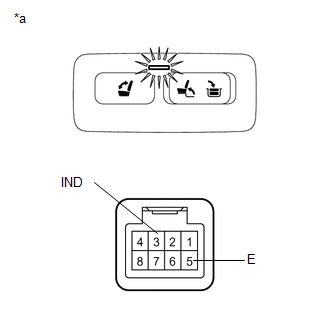
This system has two indicator lights. One of the indicator lights is built into the fold seat switch assembly. This indicator light receives power from the fold seat control ECU. It comes on or blinks when the system detects that an object is caught or when the seat operation conditions are not met.
The other indicator light is on the combination meter assembly. This indicator light comes on when the reclining motor or fold seat control ECU is not initialized, any seat legs are released, or when the seatback is outside the reclining operation range.
WIRING DIAGRAM
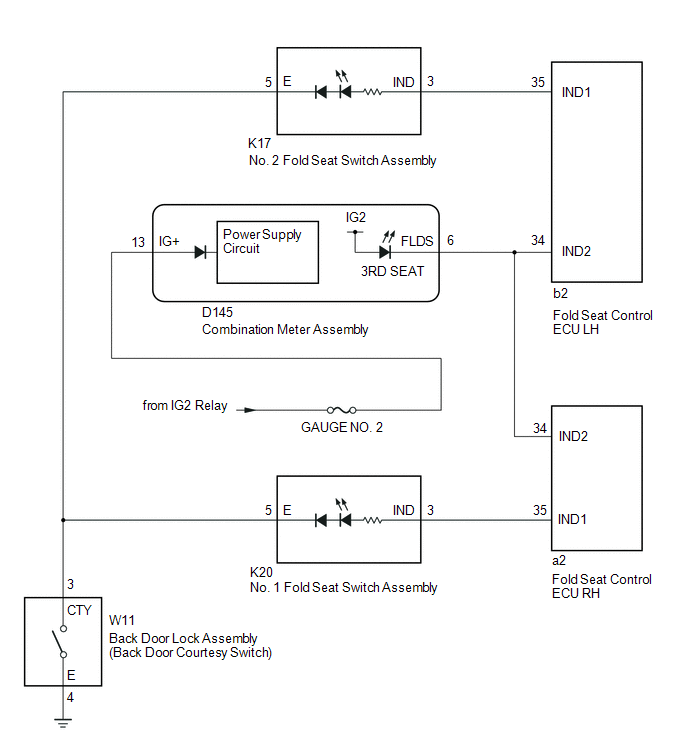
CAUTION / NOTICE / HINT
NOTICE:
Inspect the fuse for circuits related to this system before performing the following inspection procedure.
PROCEDURE
|
1. |
CHECK OPERATION OF INDICATOR LIGHT |
(a) Check the indicator light operation.
Result
|
Result |
Proceed to |
|---|---|
|
When the indicator light on the fold seat switch assembly does not come on |
A |
|
When the indicator light on the combination meter assembly does not come on |
B |
| B |

|
|
|
2. |
INSPECT FOLD SEAT SWITCH ASSEMBLY |
(a) Remove the fold seat switch assembly (See page
![2016 - 2020 MY Sienna [12/2015 - ]; SEAT: POWER SEAT SWITCH(for Roof Side): REMOVAL](/t3Portal/stylegraphics/info.gif) ).
).
|
(b) Apply battery voltage to the fold seat switch assembly and check that the indicator light comes on. OK:
Text in Illustration
|
|
(c) Reinstall the fold seat switch assembly.
| NG |

|
|
|
3. |
CHECK HARNESS AND CONNECTOR (FOLD SEAT CONTROL ECU - FOLD SEAT SWITCH ASSEMBLY) |
(a) Disconnect the b2 or a2 fold seat control ECU connector.
(b) Disconnect the K17 or K20 fold seat switch assembly connector.
(c) Measure the resistance according to the value(s) in the table below.
Standard Resistance:
LH Side
|
Tester Connection |
Condition |
Specified Condition |
|---|---|---|
|
b2-35 (IND1) - K17-3 (IND) |
Always |
Below 1 Ω |
|
b2-35 (IND1) or K17-3 (IND) - Body ground |
Always |
10 kΩ or higher |
RH Side
|
Tester Connection |
Condition |
Specified Condition |
|---|---|---|
|
a2-35 (IND1) - K20-3 (IND) |
Always |
Below 1 Ω |
|
a2-35 (IND1) or K20-3 (IND) - Body ground |
Always |
10 kΩ or higher |
(d) Reconnect the fold seat switch assembly connector.
(e) Reconnect the fold seat control ECU connector.
| NG |

|
REPAIR OR REPLACE HARNESS OR CONNECTOR |
|
|
4. |
CHECK HARNESS AND CONNECTOR (FOLD SEAT SWITCH ASSEMBLY - BACK DOOR COURTESY SWITCH) |
(a) Disconnect the K17 or K20 fold seat switch assembly connector.
(b) Disconnect the W11 back door lock assembly (back door courtesy switch) connector.
(c) Measure the resistance according to the value(s) in the table below.
Standard Resistance:
LH Side
|
Tester Connection |
Condition |
Specified Condition |
|---|---|---|
|
K17-5 (E) - W11-3 (CTY) |
Always |
Below 1 Ω |
|
K17-5 (E) or W11-3 (CTY) - Body ground |
Always |
10 kΩ or higher |
RH Side
|
Tester Connection |
Condition |
Specified Condition |
|---|---|---|
|
K20-5 (E) - W11-3 (CTY) |
Always |
Below 1 Ω |
|
K20-5 (E) or W11-3 (CTY) - Body ground |
Always |
10 kΩ or higher |
(d) Reconnect the back door lock assembly (back door courtesy switch) connector.
(e) Reconnect the fold seat switch assembly connector.
| NG |

|
REPAIR OR REPLACE HARNESS OR CONNECTOR |
|
|
5. |
INSPECT BACK DOOR LOCK ASSEMBLY (BACK DOOR COURTESY SWITCH) |
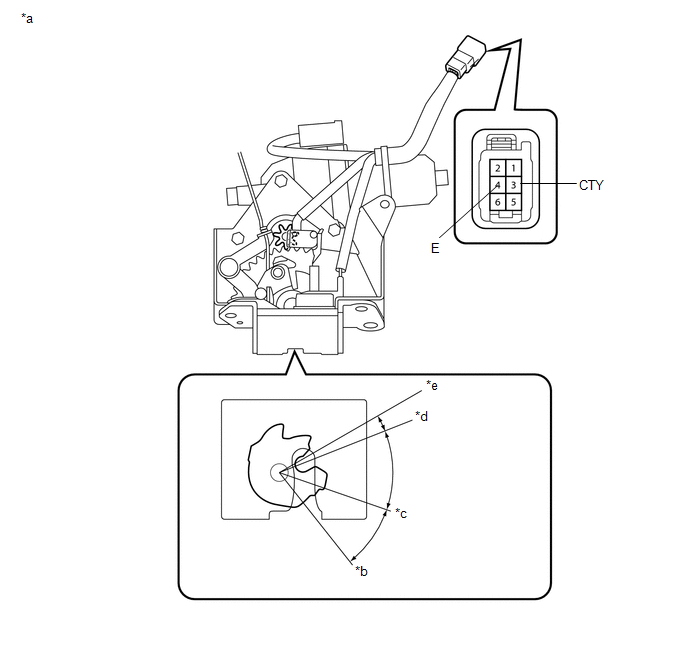
Text in Illustration
|
*a |
Component without harness connected (Back Door Lock Assembly (Back Door Courtesy Switch)) |
*b |
Open-latch |
|
*c |
Half-latch |
*d |
Full-latch |
|
*e |
Over-latch |
- |
- |
(a) Remove the back door lock assembly (See page
![2016 - 2020 MY Sienna [12/2015 - ]; DOOR LOCK: BACK DOOR LOCK: REMOVAL](/t3Portal/stylegraphics/info.gif) ).
).
(b) Measure the resistance according to the value(s) in the table below.
Standard Resistance:
|
Tester Connection |
Switch Condition |
Specified Condition |
|---|---|---|
|
3 (CTY) - 4 (E) |
Open-latch |
Below 1 Ω |
|
Half-latch |
Below 1 Ω |
|
|
Full-latch |
10 kΩ or higher |
|
|
Over-latch |
10 kΩ or higher |
(c) Reinstall the back door lock assembly.
| NG |

|
|
|
6. |
CHECK HARNESS AND CONNECTOR (BACK DOOR COURTESY SWITCH - BODY GROUND) |
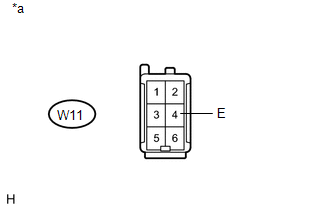
|
(a) Disconnect the W11 back door lock assembly (back door courtesy switch) connector. |
|
(b) Measure the resistance according to the value(s) in the table below.
Standard Resistance:
|
Tester Connection |
Condition |
Specified Condition |
|---|---|---|
|
W11-4 (E) - Body ground |
Always |
Below 1 Ω |
Text in Illustration
|
*a |
Front view of wire harness connector (to Back Door Lock Assembly (Back Door Courtesy Switch)) |
(c) Reconnect the back door lock assembly (back door courtesy switch) connector.
| OK |

|
PROCEED TO NEXT SUSPECTED AREA SHOWN IN PROBLEM SYMPTOMS TABLE |
| NG |

|
REPAIR OR REPLACE HARNESS OR CONNECTOR |
|
7. |
CHECK HARNESS AND CONNECTOR (COMBINATION METER ASSEMBLY - POWER SOURCE) |
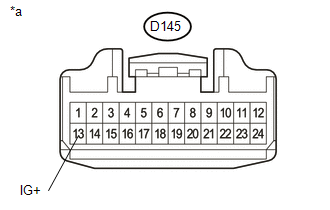
|
(a) Disconnect the combination meter assembly connector. |
|
(b) Measure the voltage according to the value(s) in the table below.
Standard Voltage:
|
Tester Connection |
Switch Condition |
Specified Condition |
|---|---|---|
|
D145-13 (IG+) - Body ground |
Engine switch off |
Below 1 V |
|
Engine switch on (IG) |
11 to 14 V |
Text in Illustration
|
*a |
Front view of wire harness connector (to Combination Meter Assembly) |
(c) Reconnect the combination meter assembly connector.
| NG |

|
REPAIR OR REPLACE HARNESS OR CONNECTOR |
|
|
8. |
INSPECT COMBINATION METER ASSEMBLY (3RD SEAT INDICATOR LIGHT) |
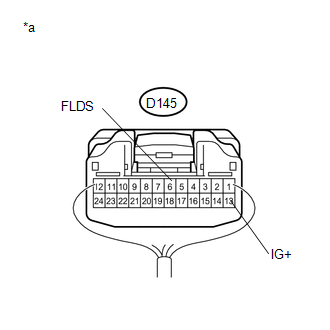
|
(a) Remove the combination meter assembly with its connector still connected (See page
|
|
(b) Apply battery voltage to the combination meter assembly connector and check that the indicator light comes on.
OK:
|
Measurement Condition |
Specified Condition |
|---|---|
|
Battery positive (+) → Terminal D145-13 (IG+) Battery negative (-) → Terminal D145-6 (FLDS) |
Indicator light comes on |
Text in Illustration
|
*a |
Component with harness connected (Combination Meter Assembly) |
(c) Reinstall the combination meter assembly.
| NG |

|
|
|
9. |
CHECK HARNESS AND CONNECTOR (COMBINATION METER ASSEMBLY - FOLD SEAT CONTROL ECU) |
(a) Disconnect the D145 combination meter assembly connector.
(b) Disconnect the b2 or a2 fold seat control ECU connector.
(c) Measure the resistance according to the value(s) in the table below.
Standard Resistance:
LH Side
|
Tester Connection |
Condition |
Specified Condition |
|---|---|---|
|
D145-6 (FLDS) - b2-34 (IND2) |
Always |
Below 1 Ω |
|
D145-6 (FLDS) or b2-34 (IND2) - Body ground |
Always |
10 kΩ or higher |
RH Side
|
Tester Connection |
Condition |
Specified Condition |
|---|---|---|
|
D145-6 (FLDS) - a2-34 (IND2) |
Always |
Below 1 Ω |
|
D145-6 (FLDS) - a2-34 (IND2) - Body ground |
Always |
10 kΩ or higher |
(d) Reconnect the fold seat control ECU connector.
(e) Reconnect the combination meter assembly connector.
| OK |

|
PROCEED TO NEXT SUSPECTED AREA SHOWN IN PROBLEM SYMPTOMS TABLE |
| NG |

|
REPAIR OR REPLACE HARNESS OR CONNECTOR |
|
|
|

